Hi,
I realize this is an old thread, but I'm running into the same sort of issue only my PM-1236.
I broke my parting tool for the 2nd time. In fact, with pockets milled at both ends, I've broken the blade 4 times, which is a real PITA.
This gets expensive quickly, each time half a blade and one insert goes to trash...
I'm using SGH inserts in a 19mm blade, 2mm thick.
I do get the blade as square as It can get. Blade, holder are secured.
I'm lubricating with cutting oil.
I broke my tools in both aluminium and steel. Works fine at the beginning until I'm "deep" into the work (a few mm, really not that deep BTW), then it will snap with absolutely no warning.
I'm really wondering if cutting speed is the problem ? Since parting gets me nervous now, I tend to slow the RPM. Could that be the problem ?
I've set cutting height at centerline, is this a safe bet ?
Or maybe 19mm height 2mm thick is just not strong enough ? Should I move to a 26mm and 3mm thick blade ?
Should I move out of indexable inserts and blades altogether ?
I'm kinda lost here. I'm open to any advice, I don't have a big stock of inserts, I could change my blade system, as long as it just works and stop breaking every now and then...
It needs to work with aluminium, mild steel, brass and 6/4 Titanium
Cheers
I was in your same situation when I got my PM1340. Parting was absolutely the most challenging and frustrating operations in my first couple of months. I decided to dig into this topic deeply and see if I couldn't overcome the challenge. I do a lot of work with stainless steel which is one of the more difficult materials to part because it is so gummy. I also work with lots of other metals, but stainless is by far the worst, and I simply had no choice but to master parting or the lathe was going to become a boat anchor. In the process of digging through this, I learned several things that I will share here.
Alignment of the parting tool is critical. It must be exactly perpendicular to the centerline of the spindle rotation, and by "exactly" I mean the parting tool needs to be indicated in, not just eyeballed or registered against the chuck. And the cutting part of the tool height must also be exactly at the centerline of spindle rotation - indicate this in as well (if you need instruction on how to do that, let me know). If you have a QCTP like Aloris/Dorian, once the tool height is set properly, it should repeat when installed a second time - unless you move the cutting tool in the holder. For this latter reason, I prefer indexable parting tools rather than HSS parting blades. Also, some of the parting blade tool holders are angled in a way that when the blade is moved forward or backward in the holder, the tool height is changed which means you have to realign the tool height every time the blade is sharpened.
Speeds and Feeds are also critical. Running at high RPM's is a quick way to destroy the parting tool or the part you're machining. For steels, I generally run 180-250 RPM for OD's in the 0-3" range. The larger the OD, the slower the RPM. You can get more specific if you use a Feed/Speed calculator targeting a recommended SFM. My point is go slower than you'd like. Jerky feed rate is another cause of parting failure. A hand-fed tool is more likely to be advanced at an inconsistent rate, and when the rate increases, the tool digs into the part and can cause the insert to fracture, or the tool to flex and bend as the material tries to climb on top of the cutting edge - it can also force the part out of the chuck if it isn't well gripped. As a result, I employ power feed of the cross slide to part, usually at the slowest feed rate of the machine - that way I know the tool is advancing at a consistent rate into the material.
Lube is your friend. I used to think "I didn't need lubrication to face or turn the OD with a carbide tool, so why would I need it in parting?" WRONG! You might be successful parting without lube, or by using a mostly-dry acid brush with some kind of lube, but you're taking a big risk doing so. I have two squeeze bottles with 1mm drip tubes - one with cutting oil, the other with WD40 - that I hold over the cutting operation dripping a consistent amount of fluid throughout the parting operation. I use cutting oil with ferrous materials, and WD40 (or denatured alcohol) with aluminum/bronze. I shoot for a drip rate of 1 drop per 2 seconds right on top of the cutting action where the tool meets the material.
Rigidity is critical. A lot of my early problems stemmed from lack of rigidity. Choke up on your cutting tool as much as possible - especially if you're using a blade-type tool - make the stick-out just enough to get through the material depth required.
The compound of this size lathe is not the most rigid platform to begin with, but if you have the compound cranked out in a cantilevered manner, it is going to flex more than when the tool post is pulled back in and directly over the base of the cross slide. Think about the pressure on the cutting tool - it's being forced downward by the rotating material, and if the compound flexes downward, the cutting edge of the tool is no longer on center, the tool starts digging in, downward forces increase, and the part being turned wants to crawl on top of the parting tool which will surely fracture the insert, may bend the parting tool or even cause the material to be pulled free of the chuck jaws.
The single best thing I have done to improve rigidity, was to make a solid block tool post mount. It's amazing the difference, and unless I'm cutting a taper, my compound sits in a drawer. Here are some resources that might help you understand the concept of a solid tool post and how to build your own if you'd like:
Robin Renzetti's video
Stefan Gotteswinter's video
My PM1340 Solid Tool Post Build for the PM1340 includes detailed drawing with dimensions.
Good Parting Tools Help a LOT. I feel like I have purchased and tried every type of parting tool commonly available. I've tried T-shaped and wedge-shaped HSS blades, making my own HSS parting tool by grinding a 1/2" square tool steel into the perfect narrow blade shape at the end, Wedge-style insert parting tools, and several insert parting tools with screw-down clamps for the insert.
Here is a typical setup for a blade type - notice how the tool cutting height will change if the blade is sharpened while still mounted in the tool, or will change if the blade is moved in/out:
You could fix that angled blade problem by using a special block for holding the parting blade horizontal in a standard QC tool holder. Here's one likely setup for that, but then you're hanging the blade out to the side in a cantilevered manner which is really bad practice if you're trying to improve rigidity. Shown below is that type of arrangement, and that parting blade will likely chatter and flex under the downward pressure of the material being cut, and your parting operation will fail:
There are special tool holders and blades for wedge-type inserts, where the insert is held in place by friction. This is one example where the blade is held close-in to the tool holder, but the tool holder only accepts a proprietary blade like the one shown, not a HSS T-shaped or wedge-shaped blade. In my experience these wedge-insert blades to not do a very good job keeping the insert seated, and if the tool isn't exactly aligned and height just perfect, the insert can be forced out of the blade, breaking the insert, bending the blade, or both.
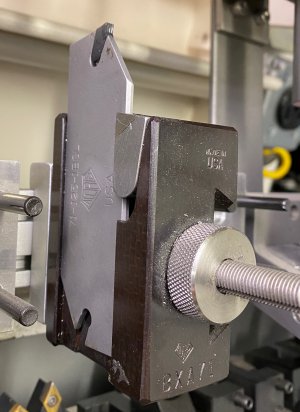
One of the wedge-insert systems that does work pretty well is the Aloris BXA71 with the wider style blade that takes GTN 6 inserts - the tool is held horizontally, so changing it's position doesn't disturb cutting height, and is plenty rigid not to flex, and will hold the insert securely, but the GTN 6 insert for this is blade is a full 1/4" (6mm) wide. My experience with GTN 3 size inserts (3mm wide) is not good - the blade is not robust enough to resist flex and the insert often comes unseated. Shown below is the GTN 6 blade holder in the Aloris BXA-71.
By far, and in my opinion, for this type of lathe, the best choice is an insert tool with screw-down clamping for the insert. This recommendation is valid only if the steps mentioned above are followed, otherwise you'll be damaging an expensive tool and breaking expensive inserts.
Below are my three favorites.
Keith Fenner turned me onto this one - it's expensive and the inserts are typically ~$12/cutting end:
The inserts for that are not cheap and you won't find them on eBay either, but they do have cutting edges both ends:
Link
Randy Richard turned me on to this one - less expensive tool, the inserts are a bit more per cutting edge thatn the Seco above:
Inserts for this are less expensive and more available but have only one cutting end:
Link
And here's a third I like:
The inserts aren't cheap either, but they are more durable that either of the styles above:
Link
Hope this helps. Sorry for the long post.