Odd behavior in "MX-210V" forward/reverse/power switches

There may be a reason the factory did that, but I don't know what it could be. You obviously don't want to smoke the controller finding out
It may be that they want to be sure the motor comes to a full stop before changing direction to prevent damaging the motor driver output stage
-M
 
Last edited:
Yeah - that is always the concern. The way I see it the neutral goes to the controller from the same location either way - from the on/off switch. Routing it through the selector switch - when the 0 position is off - just adds another on/off switch. The selector sends the neutral to the board to tell it which way to turn either way and the board should not "know" that the neutral goes to the main power switch with my proposed "solution". I will mull this one over a bit more.
 
My point being if the motor is coasting to a stop and you slam it into reverse with power applied is that going to break anything?
Maybe that's what the factory was trying to avoid. With the machinery coming in from overseas, it's often hard to tell between a malfunction or a feature.
Anyhow, a bldc motor and a 3 phase motor are different enough that a vfd might have difficulty with the former even if there's no rotary encoder providing feedback. Make sure you can return any vfd you buy if it doesn't work out with your motor
 
Last edited:
Good point! I suppose that under the current setup if I were to (stupidly) rotate from forward through off to reverse while it is still spinning as soon as the switch goes to reverse it will do about the same thing I would think. The controller gets the reverse signal either way - it just is running on the capacitors in between direction signals now but with the change it would just stay on.


Sent from my iPhone using Tapatalk
 
I did some additional sleuthing on how this switch is wired up and found some details on a listing on Ali-Express. In the diagram below the common wire is wired to positions 9-10. This switch is independent of the three wires that send signal to the motor controller for direction and serves, apparently, just to cut the common when it is at the 0 position. It would seem to me that simply bypassing this extra switch by taking the wires out and connecting them with a simple wire nut would prevent the controller from powering down when the direction is changed. the safety cutoff switch and on/off buttons would still work as normal. Of course, slamming the switch from forward to reverse with the lathe running would be a bad idea, but that is a bad idea either way IMHO.
 

Attachments

  • rotary switch.JPG
    rotary switch.JPG
    23.5 KB · Views: 113
Update - I finally got time to take the panel off and rewire the common to bypass the switch and it worked perfectly. Now to complete my other projects on this lathe : rebuild of tailstock, removal of compound in favor of a solid block, backplate for 4 jaw chuck, and finishing the Cough42 ELS.
 
Hey Tomzo, I wanted to say a sincere THANK YOU for researching and posting this. I also own an MX-120V with the same aggravating "power off everything" behavior when switching spindle directions, and also implemented a Clough42 ELS, so the powering off between cycles of ELS thread cutting was SUPER annoying.

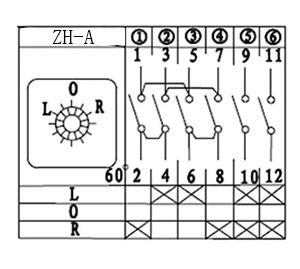
I'd pulled my switch out of my lathe to find its part number and was Google searching for its wiring sheet so that I could disable that power-off "safety" ... when I happened across this thread in the Hobby Machinist, which solved the problem. Simply disconnecting the red and orange wires from posts 9 and 10 and connecting them together in a wire nut keeps the power on through direction changes. (Of course, we now need to be diligent to ensure that the spindle is completely stopped between directon changes, but that's simple enough.)

After finding this thread, I registered on this Hobby Machinist forum just so that I could say THANKS to you. (It took overnight to be approved.) And now that I'm here, it seems like a great resource for other things too, and I'm sure I'll stick around.

I was about to post a link to my own thread in the ELS "Issues" section in Clough42's GitHub, but remembered that the Hobby Machinist acceptance requires that I make at least three appends before linking anything. Anyway, I'm sure you can find my issue #224 thread there. And in it, you'll find a link to a video that I posted to show my ELS setup to introduce the problem. (I also show pics of the before and after switch mod.) I'm sure you must've completed your own MX-210V ELS setup by now, but if not, you might be interested in seeing my implementation. And of course I'd be happy to share the 3D printed designs with you (encoder bracket, ELS display mount, gears) if they'd help.
 
As to your other ongoing projects (which I'm sure you also must've finished by now):
  1. rebuild of tailstock: I'd be interested in some detail about what you're doing there. My tailstock is about 2mm too tall and I see no way to adjust it lower ... other than milling down its base, and I don't yet own a mini-mill.

  2. removal of compound in favor of a solid block: I recently did this myself and can confirm that it improves rigidity, especially noticeable when cutting threads. I made sure that my block is exactly the same height as the deleted compound so that I can easily swap them back and forth without having to readjust quick-change tool heights. It bolts into the existing compound attachment rotating plate (which I found you MUST do in order to keep that plate "up" so that it doesn't interfere with the cross-slide travel) as well as two other bolts threaded into the cross-slide so that it's very solid.

  3. backplate for 4 jaw chuck: I recently bought an independent 4-jaw chuck with the proper 95mm register for the original lathe back plate. The only issue is that the 4-jaw chuck mounts with four rather than three bolts. Rather than build a new back-pate, I plan on drilling and tapping 3 new holes in the original back plate, which I think will be easier to do and easier when changing chucks. And BTW, I also bought an ER-32 collet chuck that mounts directly to that same backplate. It's what I'm using most often now.

  4. finishing the Cough42 ELS: I've finished mine ... with the final touch of disabling the "safety off" between spindle direction changes, thanks to you.
Greg

P.S. I also added a 3-axis DRO, which works great.
 
Thanks Greg - I am glad you found the info useful. I got diverted to doing some projects on a used RF-30 clone mill that I got, so I did not update the things I have done on the MX-210V. I did complete the ELS project and that system is awesome. I made a solid block (aluminum for now) to replace the compound and it does make things more rigid. I have not tackled the entirety of the tailstock's issues as there are a few, but I have been able to get it adjusted so that I am not turning too bad a taper. It is not perfect by any means. I also got a 4 jaw chuck with the right register and did as you suggested - drilled and tapped holes to fit the existing backplate. I also ordered an ER32 collet chuck from Ali Express (my first purchase from that site) and while it fits, I am still fiddling with it trying to get it to run true. Whether it every will or not is anyone's guess. I have been moving both of my kids over the last few weeks and have been slammed, so I have not had much time.

I would be interested in the DRO you used on the lathe - what did you go with?
 
FWIW, here's the ER32 collet chuck I bought. It fit perfectly and runs true ... but it cost almost as much having it shipped here (Florida) as the collet itself. https://www.ebay.com/itm/304319402090

And here's the DRO kit that I purchased: https://www.ebay.com/itm/384487676170 I had to shorten one of the scales (for the Z-axis used on the tailstock for drilling depth), which was easy enough to do. I'll take some pics to share with you shortly. But I'll note right now that it's not a perfect setup:
  1. Due to the location of the Y-scale on the left-hand side of my cross-slide, it can interfere with the chuck if the chuck jaws are opened significantly (the end of the opened jaws would crash into the scale mount!). No big deal for MY needs, as I'm usually making small parts in the ER32 collet. If I need big parts in the 3- or 4-jaw chuck and need to get up close to the chuck face, I can add the compound again to give me the additional 1.5 inch reach to the chuck face without interference of my Y-scale mount. So it's a bit fiddly, but there's really nowhere else better to mount the Y-axis scale on the cross-slide. If you were to mount it on the right, it'd block the gib screws and you'd lose X range to the tailstock. And...

  2. You lose the ability to mount a follow rest there. I never found the need for a follow rest anyway.
The X-axis is the easiest, mounted on the rear. And my Y-axis (cross-slide) mount serves double purpose in also holding the X-axis scale slider/reader. I didn't put a scale on the compound, as I was planning on deleting the compound anyway. Instead, my 3rd DRO axis (Z) is on the tailstock for drilling depth. This was the trickiest to mount, but I think I came up with a reasonable solution, as you'll see in the pics once I take them. OTOH, I've only used it once and could easily live without it. I was just looking for an excuse to use that 3rd DRO axis somehow.

Greg
 
Last edited:
Back
Top