Odd dovetail size?

dbb-the-bruce

Dave
H-M Lifetime Diamond Member
Joined
Feb 28, 2019
Messages
508
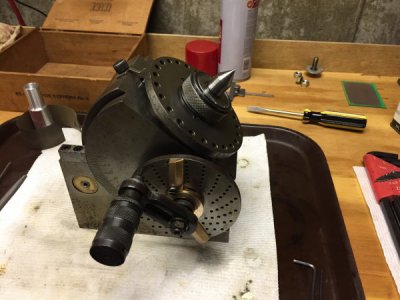
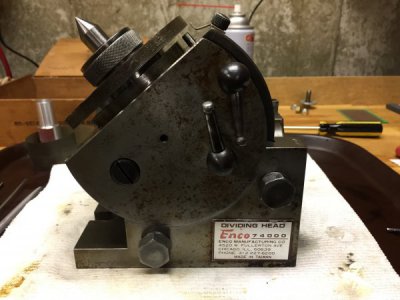
I acquired a dividing head in need of a little TLC. One of the things I'd like to replace are the brass bushings that clamp the body by pinching on the dovetails on the head. I could post pictures, but basically they are round plugs about 3/4" dia and 1/2 thick with a dovetail cut tangentially across one of the faces. A bolt is use to force them into the dove tails on the body of the head, locking the head angle relative to the base.

I figured it would be easy. However I just took a measurement of the dovetail angle and it appears to be ~75 deg or higher. Definitely way more than 60.

A quick look through a few online catalogs and cutters seem to come in 45 and 60.

Having never cut a dovetail before, I'm not sure if I'm looking for a cutter with an odd angle or if I'm missing some trick. For instance, I could see using a 60 deg cutter and adding the difference to piece when I clamp it. However that seems a little awkward to me.

How is this normally done? Do I just need to buy a less common higher angle dovetail?

-Dave
 
Dovetail angle are all over the map, 60 deg. being the most common in the modern era; Brown & Sharpe used 55 deg. early on, went to 60 deg in the mid 40s. The cross slide on my 19" Regal lathe has a bastard angle, neither fish not fowl. A shaper is one method to cut odd angle dovetails, it can furnish any angle desired; setting a standard cutter at a nonstandard angle is another method.
 
How is this normally done? Do I just need to buy a less common higher angle dovetail?

make your own cutters:

Get some hardening steel
Cut a taper at the DoveTail Angle on the lathe.
On the mill cut teeth (4-6-8) into the Dove Tail Angle using an indexer (or rotary table)
Roast in flame until cherry red for more than 10 seconds.
Dunk in oil
Roast in flame until deep red and allow to air cool.
 
For something that small, and only doing it once (or two, if two bolts), I would gut them colse with what you have, and hand file the rest of the dovetail.
 
The above comments on heat treating show very little knowledge of heat treating; the instructions would result in a dead soft tool, the last line is the bad advice, it would result in a partially annealed tool; if the tool is made of a oil or water hardening tool. If HSS (an air hardening tool steel) was used, the 4th line of the instructions would be incorrect and result in a tool that is partially hardened and would not exhibit the red hardness of a properly hardened tool, and would be little better than a oil or water hardening steel. HSS takes a two stage heat treatment for hardening, first it is heated to a red heat temperature for a certain amount of time, then it is exposed to a higher temperature, up to white heat, then air quenched in an air stream and then it is subsequently tempered at a lower temperature; for fine tools, the process doses not lend itself to home workshop efforts, not impossible, but unlikely to result in a tool that will hold up to use.
The process of heat treating a non HSS tool steel would be to heat the article to be hardened up to a red heat, in the vicinity of perhaps 1800 deg. F (depending on the grade of the steel), then quenching in the proper medium, oil or water (depending on the grade of steel), then drawing the hardness back to remove brittleness at a correct temperature, much less than any red color showing, for cutting tools this may be a straw color, obtained at several hundred degrees F, again, depending on the grade of steel. Ideally, the steel would be soaked at heat for an extended period of time, perhaps at least 1/2 hour for small items before quenching and would be done in a protective atmosphere to avoid decarbonization on the surface which results in a soft layer; the time at heat should also be done for the tempering for best results. In my own heat treating, I have a temperature controlled gas fired furnace, and use a char packing material in a metal box to prevent decarb, and use a nitrate salt bath for tempering, also temperature controlled by pyrometer, which holds temperature quite closely.
 
Last edited:
Thanks for all the suggestions.

After a little more research, it's clear that as John says, "dovetail angles are all over the place"

I have a muffle (heat treating oven) and Tubal Cain's book on heat treating. My big project that's really pushing me into metal working will require making any number of cutters and other tools, I'm looking forward to it.

Thinking more about the task at hand, even if I had the correct dovetail mill end, it would still be a compromise - the part I need to make has a dovetail cut on a 3-4" radius path.

It occurred to me that I can mount a boring bar to a faceplate on my lathe and make kind-of giant fly cutter. I'll just need to grind the correct dovetail angle into an HHS tool bit and mount it in the bar.

I've got all the stuff and just need to do some milling to make the parts to mount it.

As another comment says - yes these parts are trivial enough that I could probably get it done with a file. Part of the point (for me personally) is to build my machining skills while working on small precise parts. So, at least for me, the overkill is worth it.

The original brass clamping blocks had straight dovetail cuts in them and they ended up badly mangled when whoever clamped them down while miss-aligned. It will be cool to have them fit the circular dovetails on the body accurately, and I get to challenge myself at the same time!

I'll post follow up pictures and maybe a video.

-Dave
 
Last edited:
It's done (almost). Back together, all de-gunked and working great with a couple of improvements.

I've only got one thing left to fix up, it's missing a spring clip that holds the two brass hole count markers (whatever you call them) in place. The shaft has a groove cut into it. Looks like it takes one of those spring-lock clips, you know the kind that go flying across the room never to be found again, which is probably why it's missing.

It might be some other sort of retaining clip, the design is such that you'd have to remove it to swap out the dividing plates.

I'm also going to need to look for the other plates that should come with it. I've only got one of them.

I took a whole bunch of video, it's going to take a night or two to edit it down to project video.

Thanks again for all the suggestions and help.

-Dave

294694294695
 
If anyone is interested, here is a video of the teardown and clean up:

Please remember a few things if you choose to watch it -

1. I'm a relative novice and at the time had only a mostly conceptual idea of how a dividing head is constructed (needless to say, I now have very direct experience!!!).

2. Production value is low, shot on an iPhone and crudely edited. I'm sure I'll get better at that also but my primary focus is on learning machining and the tools involved.

3. In a similar vein, this is not meant to be an instructional video, it's more a record and sharing of my experience and learning. Other people who might shy away from trying to tear one apart can have a better idea of what they are getting into.

Any constructive criticism or suggestings along with outright encouragement will be gladly accepted!

I still need to edit the video of the rebuild and improvements, it will probably be more interesting.

-Dave
 
Back
Top