- Joined
- Oct 12, 2021
- Messages
- 45
Newbie Alert: good mechanical and fabrication skills but brand new to machine work.
I just purchased a '42 South Bend Heavy 10 and with it came two independent, 6", 4-jaw South Bend chucks, both in desperate need of servicing and gunked up to the point where they barely work. I found a couple YouTube videos of guys stripping these down, cleaning, lubing, and reassembling. There are 4 hardened steel pins that retain the 4 individual operating screws. In the YT vids, these pins were (somewhat) easily tapped out with a punch or small drift pin.
On the better of my two chucks (pictured below), these pins were pressed in so tightly that I had to fab a custom tool and then, with all my weight, force them out with my 2-ton arbor press. I am now ready to reassemble the chuck and these pins are so tight that I can't even get them started properly and I can barely force them with the press. It looks as if these pins need to be very accurately positioned (rotationally) so they don't bind the operating screws when the pins are fully seated and as tight as these are, I don't think I can make that happen.
I'm guessing that I need to reduce the diameter of these pins to give them a just slight interference fit, but they are hardened and I have no idea how to accomplish that with a lathe. Is there a way to deal with this, or is it time for a new chuck?
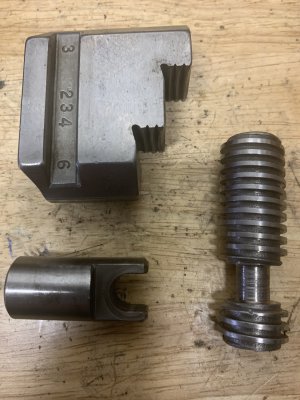
Jaw, Operating Screw, and Retaining Pin.
I am being careful to keep the groups of parts together as they came out of the chuck body.

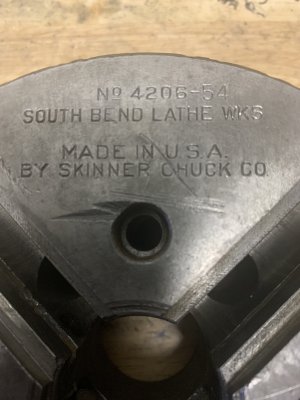
Chuck Body.
The original sales slip shows that the lathe was delivered with a 3 and 4-jaw, so this may be an original.
It appears as though the work or tooling has been crashed into the chuck once or twice in the last 70 years.

I just purchased a '42 South Bend Heavy 10 and with it came two independent, 6", 4-jaw South Bend chucks, both in desperate need of servicing and gunked up to the point where they barely work. I found a couple YouTube videos of guys stripping these down, cleaning, lubing, and reassembling. There are 4 hardened steel pins that retain the 4 individual operating screws. In the YT vids, these pins were (somewhat) easily tapped out with a punch or small drift pin.
On the better of my two chucks (pictured below), these pins were pressed in so tightly that I had to fab a custom tool and then, with all my weight, force them out with my 2-ton arbor press. I am now ready to reassemble the chuck and these pins are so tight that I can't even get them started properly and I can barely force them with the press. It looks as if these pins need to be very accurately positioned (rotationally) so they don't bind the operating screws when the pins are fully seated and as tight as these are, I don't think I can make that happen.
I'm guessing that I need to reduce the diameter of these pins to give them a just slight interference fit, but they are hardened and I have no idea how to accomplish that with a lathe. Is there a way to deal with this, or is it time for a new chuck?
Jaw, Operating Screw, and Retaining Pin.
I am being careful to keep the groups of parts together as they came out of the chuck body.

Chuck Body.
The original sales slip shows that the lathe was delivered with a 3 and 4-jaw, so this may be an original.
It appears as though the work or tooling has been crashed into the chuck once or twice in the last 70 years.


