Ornate walking stick head to be attached to a staff.

tredding

Registered
Registered
Joined
Apr 23, 2022
Messages
65
A friend I play tennis with heard I was resuming machining after a 60 break and asked if I could turn metal. I of course said yes, and sent him an image of an aluminum meat mallet that I had just made.

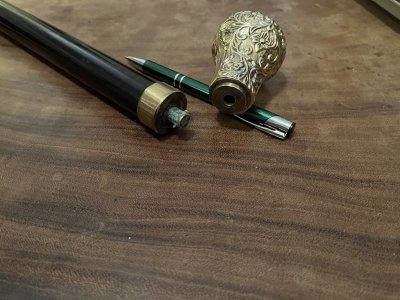
Then he sent me the image of his walking stick parts, see attached image. His idea is to turn down the top of the stick so the pin would fit in the bottom of the head. I am thinking it would be better to make a piece that goes between the top of the stick and the bottom of the ornate head that would produce a near seamless fit and would make it appear manufactured as three pieces that fit perfectly together.

I have just recently returned to machining after a 60+ year break and would appreciate hearing all your comments and thoughts on the project. How would you go about it?

I assume I could hold the ornate head in a four-jaw chuck. The walking stick is just under 3/4" in diameter, so it should slide through the spindle on the 7X14" lathe. But I am thinking a better and safer solution would be to focus my primary effort on making a piece to go between the two pieces.

Again, all comments will be appreciated. Terry - W6LMJ
 

Attachments

  • IMG-0235.jpeg
    IMG-0235.jpeg
    525.4 KB · Views: 61
  • IMG_7251.jpeg
    IMG_7251.jpeg
    304.3 KB · Views: 63
A simple ring as a third piece makes sense to me. I’m guessing this is not the original top piece to this walking stick. My concern would be the pin/hole diameter matching, and how they are joined.
 
Looks like the head already has a hole and face made to fit something.

Avoid doing anything like putting it in your lathe as you WILL damage the outside.

If the hole is not threaded then look at threading with tap, use drill bits to check size and tap for whatever size drill fits is the tap drill for.

Agree with others, make setting from matching or contrasting material that will interface the 2, easy take it fit the bottom of the top, then drill and tap center for same as the top then use all thread take stud for head to simply screw on.

You can take a die and thread the stud on the stick or, remove it Andale the top of stick with female thread same as top.

If hole is too large you could carefully enlarge hole in top with portable drill and holding top.

Or make an insert, thread bottom for what fits.

Then take a bolt in your lathe and drill tap a hole in center that matches the top then single all thread bolts everything together.

Thread locker after done.


Sent from my SM-G781V using Tapatalk
 
Your 3rd piece adapter seems to make the most sense. I'd use brass and maybe do some ornate ribbing on the outside. Then solder the pieces together?

Bruce
 
Good Evening all. I will, of course, do as my friend request. The simplest approach is to drill out the hole in the head to match it to the diameter of the rod end at the top of the stick. My guess is the "cross pin" in the rod at the top of the stick served as a key and the original head was hollow at its base and designed to lock on the rod-pin-key. I have not actually seen the pieces, but am guessing the new head is solid.

So, at a minimum, the pin portion of the rod should be filed off and the hole in the bottom of the head made larger to match the diameter of the rod. However, I doubt the outer diameter of the top of the stick matches either the base of the head or the step just below the bottom of the head.
I should see it this Saturday and have a better feel for the project. Note to self, take a micrometer to tennis.
 
Last edited:
Close examination of your photo of the two pieces suggests that the hole in the head has a lip around it, possibly due to past efforts to fix it in place. That will have to be addressed for everything to mate well. Maybe it's the angle of illumination, but it's also possible that the outer machined lip also is slightly mangled. In addition, it looks like there is some sort of feature inside the hole. Maybe it's already threaded? Or possibly the remnant of something that broke off?

Finally, the OD of the brass piece on the stick doesn't look like an exact match to the head so you may be looking at machining a taper to get a nice-looking join.

That nice-looking and highly figured head makes it difficult to do any precise machining on the head, since it would be marred by chuck jaws. Have you heard of Wood's Metal? It is a low melting-point alloy that is used for holding odd-shaped pieces like yours. In this case, you'd do something like place the head in a cylindrical mold and pour the alloy around it. Let it cool and you're ready to chuck the part up in your lathe.

Since Wood's metal melts below the boiling point of water your mold can be just about anything, and actually could be left in place while you do your machining. A big-enough aluminum or plastic tube would work well. The trick would be to hold your piece so the flat-bottomed portion is well aligned to the axis of the cylinder. When done dunk the cylinder in hot water to re-melt the alloy. It can be re-used many times.

The downside is that Wood's Metal and its cousins are pretty expensive. I found a vendor on ebay selling 800g for $37.80. I dunno if that would be enough or not, that depends on how big the mold is relative to the walking stick head.

Some of these low melting-point alloys are designed to have very small dimensional changes as they solidify so they're also used to measure inside dimensions of objects that are otherwise difficult to measure.

I've seen descriptions of folks using Wood's Metal to make complicated hollow pieces by machining the stuff to match the exterior form, then plating it with copper. After the copper has been plated to the desired thickness, drain the alloy out through a strategically placed hole. The coolest example I saw was making the boiler for a model steam locomotive.

It also has been used to make joke items like spoons that melt in hot water and the like.
 
Interesting. I learn something new every day.

"Wood's metal, also known as Lipowitz's alloy or by the commercial names Cerrobend, Bendalloy, Pewtalloy, and MCP 158, is a metal alloy that is useful for soldering and making custom metal parts, but which is toxic to touch or breathe vapors from. The alloy is named for Barnabas Wood, who first created and patented the alloy in 1860."

I had not heard of it but will consider using it. It sounds like fascinating material with an endless list of uses. Saturday I will see the items, and take some measurements and additional photos. His plan was for me to simply drill out the hole in the head. I think I could use scraps of aluminum cans to protect the head from the jaws of a chuck, and align it in a four-jaw chuck well enough to drill a precise hole. But I suspect the better and more elegant solution is to fabricate an intermediate piece to provide a seamless match of the head to the stick.

If I use Wood's Metal, I could build a form using PVC, expose the hole in the head for enlarging, and make the intermediate piece. Wood's Metal would provide greater protection for the ornate head.

Thank you for the suggestion. Terry - W6LMJ
 
Back
Top