

-
Welcome back Guest! Did you know you can mentor other members here at H-M? If not, please check out our Relaunch of Hobby Machinist Mentoring Program!
You are using an out of date browser. It may not display this or other websites correctly.
You should upgrade or use an alternative browser.
You should upgrade or use an alternative browser.
POTD- PROJECT OF THE DAY: What Did You Make In Your Shop Today?
- Thread starter wachuko
- Start date

- Joined
- Nov 25, 2015
- Messages
- 8,403
looks good except for the caster plates sticking out the back. They are going to hurt when you mis judge and walk past them and your toe hits it. OR you catch something while moving it and it drags it about.
Can you replace it with a screw in caster?
Can you replace it with a screw in caster?
- Joined
- Feb 25, 2021
- Messages
- 3,150
I'm not worried about that. I'll lose the family jewels on the hook for the power cord long before I hit the caster. Intentional decision to space them wide for stability. I could cut off the outer 1" of the plate as it extends beyond the vertical support plate if I thought that would matter. Ideally I would have used wheels that attach to an axle, which would protrude at least as far, but the local Menards didn't carry anything suitable.looks good except for the caster plates sticking out the back. They are going to hurt when you mis judge and walk past them and your toe hits it. OR you catch something while moving it and it drags it about.
Can you replace it with a screw in caster?
Last edited:
It's taken me two days , but I finally had time to start a new quill stop/drop/coolant mount for my 833. The stock one is comically bad. This is my second project on the mill (tnuts for the vise were my first) and I leaned lots. And destroyed plenty.
Now I have to remove the whole quill assembly to remove the stock one. Super poor design. If anyone has any tips I'm all ears.
Also a question from a conpete beginner - you will see my 75mm bored hole to match the quill is more oblong than circle. That's due to boring the hole then cutting it in half. I lost more than I wanted in that process. Should I have cut the part in half, bolted it back together as shown and then bored the hole? Will it matter once it's mounted? I could try to re- bore it before dismantling the machine.
- Joined
- Dec 21, 2018
- Messages
- 1,829
It shouldn't matter. If you did it the other way you wouldn't have any pinching action unless you shaved some off the meeting surfaces.Will it matter once it's mounted?
- Joined
- Oct 7, 2020
- Messages
- 2,117
My wife asked if I could make a new handle for a steamer that we have. Well, yes of course I can. Good thing I didn't have to pay by the hour for this little thing, LOL.
I had some fun with FreeCAD first, then out to the shop.
The nut part was easy, but I had some problems single point cutting the 5mm thread on the shaft, there is just not much room. I needed a shoulder for the steamer to register on, I ended up grinding a cut off blade down a little thinner, basically make a thin grooving tool. Unfortunately, I didn't do that first, so my relief grove is a little wide. All went well until I needed to drill a cross hole, now what? I had a couple pieces of aluminum pretty much the size I needed, so I cut a grove down the center of those to hold the shaft.
Anyway, my first time working with Stainless, it didn't seem too difficult but that 17-4 annealed stuff might not be all that difficult to begin with.
Here are some photos, and my wife is happy!

That little lip was keeping the nut from going all the way on and needed to be removed, hence the thin grooving tool.


The finished product.

I had some fun with FreeCAD first, then out to the shop.
The nut part was easy, but I had some problems single point cutting the 5mm thread on the shaft, there is just not much room. I needed a shoulder for the steamer to register on, I ended up grinding a cut off blade down a little thinner, basically make a thin grooving tool. Unfortunately, I didn't do that first, so my relief grove is a little wide. All went well until I needed to drill a cross hole, now what? I had a couple pieces of aluminum pretty much the size I needed, so I cut a grove down the center of those to hold the shaft.
Anyway, my first time working with Stainless, it didn't seem too difficult but that 17-4 annealed stuff might not be all that difficult to begin with.
Here are some photos, and my wife is happy!
That little lip was keeping the nut from going all the way on and needed to be removed, hence the thin grooving tool.
The finished product.
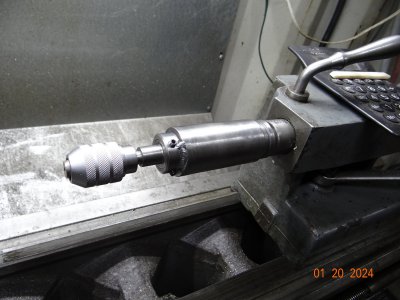
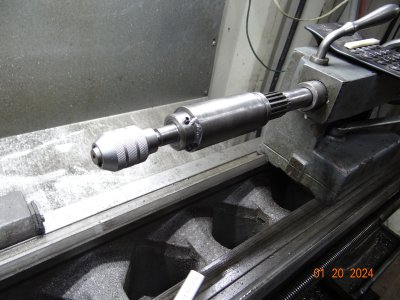
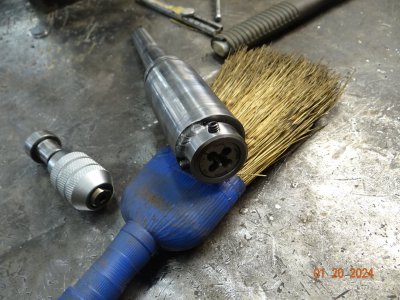
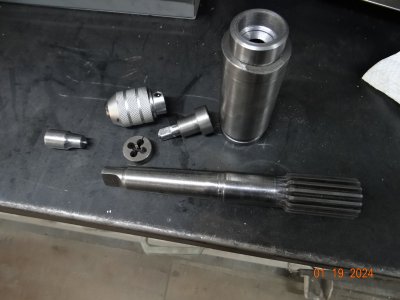
Made a threading tap and die holder for my lathe tailstock. I used a spare MT3 x JT6 and machined the taper off it and used it as a locating pine for the U-joint spline. I chopped off the end of a 3/8 drive extension to fit the tap chuck, and silver soldered the piece into the die adapter. This give me a 3 inch slide on the spline
Attachments


- Joined
- Oct 14, 2013
- Messages
- 1,012
BTW, on acrylic you may want to anneal it after heroic hole sawing to avoid stress cracking later..
Ramp up to 180 f, hold 1 hour per mm (sounds too slow to me) cool about twice the heat up.
Or, not worry about it
I did some acrylic pressure vessel type stuff a few years back...
Sent from my SM-S911U using Tapatalk
Ramp up to 180 f, hold 1 hour per mm (sounds too slow to me) cool about twice the heat up.
Or, not worry about it

I did some acrylic pressure vessel type stuff a few years back...
Sent from my SM-S911U using Tapatalk
- Joined
- Nov 25, 2015
- Messages
- 8,403
I take a torch and gently go over the edge when needed, it helps put a finished edge on whatever you have cut. That after sanding ..It usually winds up with a clear polished edge.BTW, on acrylic you may want to anneal it after heroic hole sawing to avoid stress cracking later..
Ramp up to 180 f, hold 1 hour per mm (sounds too slow to me) cool about twice the heat up.
Or, not worry about it
I did some acrylic pressure vessel type stuff a few years back...
Sent from my SM-S911U using Tapatalk
Flame finishing puts a huge amount of stress into the edge. The acrylic will craze much sooner than a polished edge. Annealing will help!I take a torch and gently go over the edge when needed, it helps put a finished edge on whatever you have cut. That after sanding ..It usually winds up with a clear polished edge.