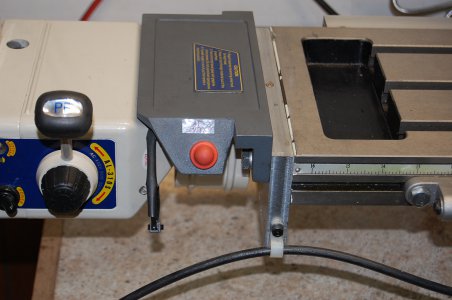
Precision Matthews X Axis Power Feed

I never mentioned the part of the installation that occurs where the left handwheel was. Removing the handwheel and putting the power feed on there is straightforward. It is very east to increase or decrease the engagement between the gears by raising and lowering the power feed (motor) unit. Obviously, it is important to keep that bracket level along the y-axis of the table.
 
Going by the top pic in post #14, I’d look at dismounting the limit switch from the bracket, turning the bracket 180 degrees and remounting the LS lower down on the saddle. I think that would allow you to align the LS buttons with the slot in the table and, therefore, with the stops. As pictured with the buttons above the slot, it looks pretty iffy that the stops would hit the LS buttons reliably.

Tom
 
The installation has been delayed because (1) I cracked the cast aluminum bracket by overtightening the steel mounting bolt, and (2) mounting the limit switch to the saddle requires some planning. PM responded very quickly and shipped me out a new cast aluminum bracket, free of charge.

Not sure if your aluminum bracket is like the one I had on my RF-45 mill which also cracked. I tossed mine & made this modification which ran much better FWIW. https://www.hobby-machinist.com/threads/rf-45-mill-power-feed-mount-improvement.64766/
 
I modified the brackets that came in the kit.

I clearanced the thick one (the one that mounts to the saddle) so that I could access the ball oiler.

I shortened the thinner bracket (the one that mounts to the limit switch) by 11mm so that it would clear the base.

IMG_6766.PNG
 
Does anybody have a recommendation for a torque spec for the bolts that mount the cast aluminum power feed bracket to the table? I don't want to crack another bracket.

I will go easy and post here how much I tightened it.

I can't mount this yet because I am still waiting on my 16mm (or 18mm) M5 bolts that will be used to connect the modified bracket above to the saddle.

How about a touch of blue loctite and 'snug'. Well it worked for me anyway. ;)
 
Just snug enough to hold the bracket from moving. It's not a support element and it does not need to hold your body weight, so choke up on that wrench halfway and just apply snug pressure.
 
Helpful info on the tightening pressure. It had not occurred to me to use Loctite.
 
Here's a picture of the bracket I made for my PM30 to replace that clamp on bracket. Not the prettiest bracket, but functional, and it makes the ball oiler available again, and frees up the space at the end of the table that the clamp on bracket steals.
DSC_0003.JPG
 
Back
Top