Printing milling fixtures

HEPHAESTUS

Registered
Registered
Joined
Aug 7, 2020
Messages
29
I'm new to owning a knee mill. Not new to 3d printing. Hobby / amateur machinist status. I'm wondering if anyone here has had any success printing custom holding fixtures?

Here's what I'm wanting to do:

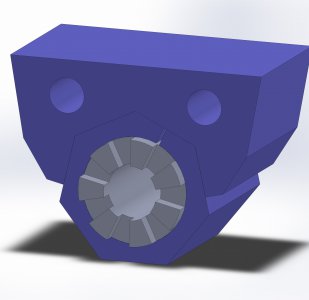
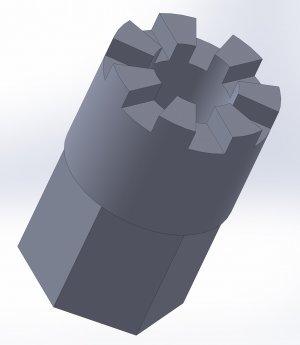
I will 3d-print the blue 7-sided collet and vise block in these pics. Then I will center on the part ID. Using a 1/4" end mill I'll offset my center by 1/8" along one axis. Then I will run the mill all the way through both sides of the round part. This will cut one edge of one tooth and the opposite edge of the opposing tooth. The rectangles imposed on the round part in the one pic will be my cuts. By rotating my block I'll just run the cut along the same axis again all the way through. After repeating this 7 times I should have all 14 cuts done accurately. I'll probably rubber cement the piece into the collet so that it doesn't rotate on accident when I am rotating the collet / it isn't in the vise. Anyone see any issues with this idea?

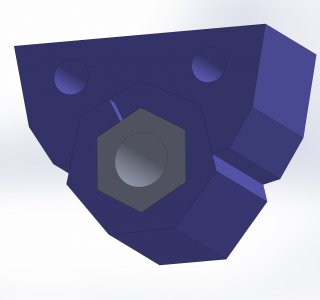
I'll probably also print a 6-sided collet so that I can flip it over and cut a hex on the other side for the socket.

Think these will be rigid enough with the vise clamping on them?
 

Attachments

  • crank yanker cut pattern.JPG
    crank yanker cut pattern.JPG
    327.3 KB · Views: 157
  • crank yanker machine assy.JPG
    crank yanker machine assy.JPG
    207.2 KB · Views: 162
Interesting idea!
I have never done or seen anything done like that.
It's a 3D printed collet for a awkward shaped work-piece.

As you know, the rigidity of the plastic holder will be greatly affected by the infill percentage you use when 3D printing it. That will also affect how hard you can tighten the vise.

A couple more thoughts:
I have seen people using cyanoacrylate adhesives to hold awkward shapes, but not rubber cement.
The CA adhesive can be released with heat; but do NOT breathe any fumes!
It would be great to find a filament and adhesive combination that are both soluable in the same solvent, then just soak the entire thing after machining.
I wonder if a band-saw slit in the plastic holder would allow the vise to squeeze it more fully; much like other collets.
Accuracy will depend on many factors:
-how accurate the seven-sided angles are; I guess you'd print it with the hollow axis vertical so it doesn't "slump" during printing.
-how accurate the two-angled "holder" is
-how well the metal shaft fits the centre hole of the holder. If the shaft is too big it could stretch the plastic, if the shaft is too small then the plastic gets deformed by the vise. Either one could change the angles so they're not quite right.

If you try it please let us know how it works out.
It could become a new tool in my tool box!

Thanks for posting!
-brino
 
Last edited:
.......and by the way, if you haven't checked them out there are some good you-tube videos on making one too....although I do NOT remember how many "splines" they needed.

-brino
 
Not going to get into the logistics of the 3D part as I have zero experience there, but I would also look twice at using rubber cement. It hardens by evaporation which, inside the two non-porous parts may not ever happen or if it does will be very slow. A chemical reaction to harden up — like cyanoacrylate, polyurethane, epoxy, etc — may be a better choice. It’s like using aliphatic resin for vacuum bag gluing — no air once the bag is evacuated and the glue just sits there!

-frank
 
Interesting idea!
I have never done or seen anything done like that.
It's a 3D printed collet for a awkward shaped work-piece.

As you know, the rigidity of the plastic holder will be greatly affected by the infill percentage you use when 3D printing it. That will also affect how hard you can tighten the vise.

A couple more thoughts:
I have seen people using cyanoacrylate adhesives to hold awkward shapes, but not rubber cement.
The CA adhesive can be released with heat; but to NOT breathe any fumes!
It would be great to find a filament and adhesive combination that are both soluable in the same solvent, then just soak the entire thing after machining.
I wonder if a band-saw slit in the plastic holder would allow the vise to squeeze it more fully; much like other collets.
Accuracy will depend on many factors:
-how accurate the seven-sided angles are; I guess you'd print it with the hollow axis vertical so it doesn't "slump" during printing.
-how accurate the two-angled "holder" is
-how well the metal shaft fits the centre hole of the holder. If the shaft is too big it could stretch the plastic, if the shaft is too small then the plastic gets deformed by the vise. Either one could change the angles so they're not quite right.

If you try it please let us know how it works out.
It could become a new tool in my tool box!

Thanks for posting!
-brino

If you look closely the "collet" does have a slit in it. And yes, I am printing them with the hole oriented vertically using PETG for now. I'm using max wall layers and 98% infill so the pieces are basically solid for max possible rigidity. My plan for the rubber cement was just to prevent the piece from turning in the plastic "collet" when I have it loose outside of the vise. I suspect the clamping force would be enough to hold it in place while in the vise. I could be wrong.

Can you link me to those YT videos? I've tried looking high and low but I guess I'm not using the right search terms because I'm not turning up anything.
 
Just thought about this, but if I mill my hex on the opposite end first, I can print the collet with a hex on the other side and that will prevent it from spinning, no glue needed!
 
If you look closely the "collet" does have a slit in it.

Okay, sorry, I missed that!

Can you link me to those YT videos? I've tried looking high and low but I guess I'm not using the right search terms because I'm not turning up anything.

here's one:

and a CNC version from NYC CNC:

I know mr pete (tubal cain) had one too, but I did not find it this round.....

Hopefully viewing the ones above will bring some more into your yt recommendations.....

-brino
 
Ok, found them.......here are the mr. pete videos....

part 1:

part 2:

-brino
 
Ok, found them.......here are the mr. pete videos....

part 1:

part 2:

-brino

Thanks for those links. I'm watching them now. In the mean time here is version 2 of the fixture as well as the part I'm trying to achieve.
 

Attachments

  • crank yanker machine assy.JPG
    crank yanker machine assy.JPG
    426.5 KB · Views: 176
  • crank yanker machine assy 2.JPG
    crank yanker machine assy 2.JPG
    343.2 KB · Views: 175
  • steel crank yanker.JPG
    steel crank yanker.JPG
    305 KB · Views: 145
Man, you had me excited! All those videos are using either a CNC or an Index Table. If I had those this thread wouldn't even exist! LOL
 
Back
Top