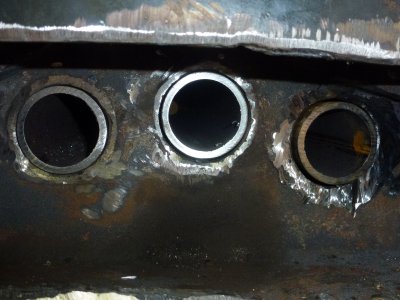
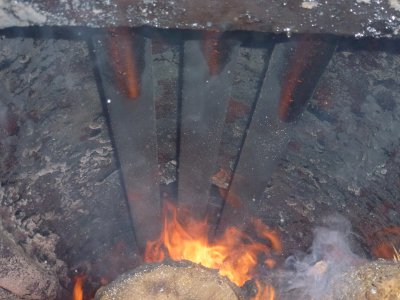
Replacing heat transfer pipes in a boiler.

cathead

CATWERKS LTD
Registered
Joined
Feb 7, 2013
Messages
2,545
It's starting to cool off significantly up here in northern Minnesota with temperatures in the 40s at night. The pipes in the boiler were
made of 1/8 inch wall schedule 40 pipe and the new pipes are going to be schedule 80, almost 1/4 inch thick. The first part of this
process is to cut into the water jacket to get to where the ends of the pipe are. After that one needs to use a hole saw (I used carbide.)
and a 4.5 inch angle grinder in preparation for welding in the pipes. The main difficulty is lack of space to work so two of us ran the
grinders for many hours to grind off old weld. This is a pressurized boiler so the welding job has to be good. The plan is to do a root
pass or two with 6011 rod using DC positive and finishing up with 7018. P1030253.JPG
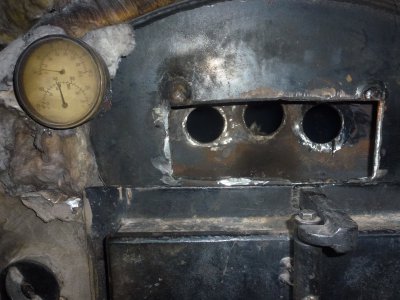
The boiler has a fire in it still since I heat my house and shop with it as well as my domestic water. Here you can see a rectangular hole that
was cut with a plasma cutter to get to the pipes. You can see the three holes where the new pipes will be installed. I lowered the water level
in the boiler and just have a tiny fire just so I can take a shower and wash dishes. Also I hear the blower in the basement coming on in the night
to keep the house warm. P1030249.JPGP1030249.JPG
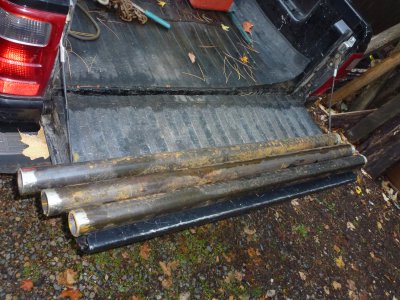
These are the new schedule 80 pipes to be installed hopefully today. P1030250.JPG
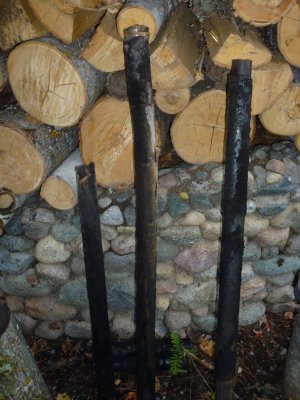
These are the old pipes, Two of them came out of the stove in two pieces!


I will make another post as this process continues. I'm not a professional welder by any means so hope it all goes back
together with no hitches. I will use the "whip and pause" method on the root pass.
 
Really interesting. Didn't know there were any more higher pressure boilers out there for home use.

At the turn of the last century there was a movement to move to low pressure steam for heat due to the risk of boiler explosions. As it turns out, one only needs about an ounce or two of pressure to fully heat a building.

My old house (1851) was initially heated with stoves in crucial rooms. One old stove remains. The house was converted to low pressure steam in sometime around 1920, I am guessing. I use about 1.5 lbs of pressure, only because I want to see the needle lift off the zero peg. If I use too much pressure, my heating is poorer and I use more fuel.

All kinds of steam heat are amazing.

Please post up some more!
 
The pipes were a little long to my liking so had to remove them and cut off about 3/8 inch from one end.
I decided that there would be less pipe to impede my work and I will be able to well not only on the side of the pipe but to the
face as well. P1030255.JPG

Ten psi seems to work fine on my system. Come to think of it, that's what I use on my pressure canner too! I have seen as much as
30 psi if the damper happen to stick. There is a pressure relief valve on the system of course. If one ever has to let off steam, it is
amazing how much steam gets released!!
 
This boiler has been running continuously for the most part for thirty years so in that amount of time
I have a pretty good awareness of what is safe and what might be considered risky. My college
physics and chemistry classes gave me a good understanding of Charle's law and Boyle's law as well
as other factors relating to temperature and pressure. I am partial to pressurized boilers because under
pressure the oxygen is unavailable for oxidation reactions in the boiler that cause rust.

The welding of the heat transfer pipes is somewhat difficult as there is not sufficient room to angle the
SMAW rod properly and slag removal is not easy either. Today I may try some 6010 rod and may
experiment a little with TIG welding and see how that goes. At any rate, it's going back together soon
for another run.

If one is running a non pressurized stove, the options are to run a steel tea kettle style unit and add
some chemical to retard rusting or to run a stainless steel unit. Most of those I have seen run
somewhere between ten and fifteen years before ending up at the scrap yard. My boiler was made
by an old friend of mine who used flat material to roll the cylinders for the boiler using a roller. That
in itself was impressive but to watch the man build boilers was enough to have him build one for me.
His name was Ole Berge and he will not be forgotten. He was also a machinist and I spent many days
watching and observing how things are done on a lathe. He is credited with getting me into hobby
machining. Hat's off to Ole!:encourage: He was the king of "outside the box thinking" when doing repair
work on machinery and I soaked up every little detail I could. I will never match up to Ole in his
machining abilities but due to the fact that we were both Norwegians gives me a fighting chance.

Now, if Ole were, here, he could weld up the boiler in an hour. I need to take my time and do a
good a job without him.:frown: I remember asking Ole about something with some degree of
difficulty and his response was a forceful "you can do It" in his Norwegian brogue. That's something
I will never forget.
 
Wow, this was a bigger job than I had envisioned! At any rate the boiler pipes are welded in place with no leaks as far as we can tell.
To determine if there were any leaks(which there were) we used an air pressure nozzle around the inside of the pipes from the
fire box side using a spray bottle with some dish soap added on the water jacket side so any air leakage would form bubbles one could see.
These spots were marked and ground out and rewelded. So with that part done, the water jacket holes can be filled back in and
the boiler will be back in business. The main problem with boiler repairs is to gain access to the area that needs to be repaired I found.
Anyhow, life is a learning process and I must say I am a bit smarter now. Hopefully the repair will hold up a long time so I don't have to
worry about it. Cleaning of slag is a big concern in any welding project. The difficulty is that some areas were not readily accessible.
So, If I learned anything from my experience, I would have to say that grinding and cleaning of slag is paramount in making welds
that won't leak under pressure. As always, thanks for following along and have a pleasant evening.
 
With a little help from my neighbor and the use of his Hobart MIG welder, the boiler is back to it's usual self
presently running about 9 PSI at 160 degrees Farenheit. As the weather cools off, it will be necessary to
increase the temperature to 180F or so. There were several leaks noted and rewelded before I added
water. I'm pretty impressed with the MIG so might be a candidate to get one. The boiler is completely
full of water and the bladder tank higher than the boiler is what holds the pressure on the positive side. The
boiler holds about 150 gallons of water and takes about a half hour to warm up to 160F or so from a cold start.
My system circulates the hot water through two hot water heaters and two air radiators and is all done with one Taco
007 circulating pump in a circle. This saves considerably on regulators and zone pumps and the like. The heat for the
house and shop is controlled with simple thermostats that come on when the temperature drops off below
the set temperature.P1030263.JPG
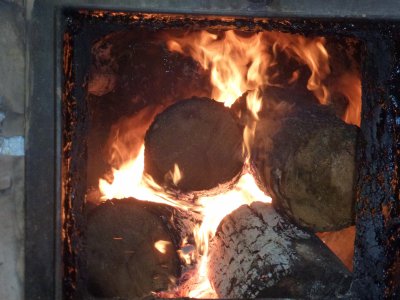
Yes, that's a pretty robust fire but I am heating up the boiler from a cold start with 45 degree F water.
P1030264.JPGAnd the 3 new schedule 80 pipes taking on some BTU!!
I'm burning some low BTU basswood today which is pretty low on the totem pole for firewood.

This means I will be able to have a warm shop this winter and be able to use my lathes and mills and welders
and what ever else is needed. I am so relieved from at least one scourge in my life so hoping for the best.
I'm getting closer to figuring out what is wrong with my Bobcat 853 injection pump so hopefully will have
that solved by the time the snow flies.


Thanks for following along and all the best wishes from Northern Minnesota.
 
Back
Top