Router bit for roundover chamfer mill in aluminum?

mcdanlj

Registered
Registered
Joined
Aug 24, 2018
Messages
306
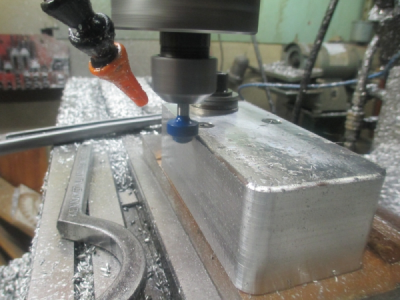
I don't have a roundover mill bit. I want to put a roundover on some sharp edges in acrylic and aluminum. I do have ¼" shank carbide router bits including a roundover profile that I bought for woodworking some years ago. I expect they are fine for acrylic; any reason not to use them for a few corners on 0.25" 6061T651 aluminum plate as well?

I did put nice edges on the acrylic using polished ground SEHT inserts in a 45⁰ endmill. I had been wondering how I would do that. I had six .22" sheets, which I stacked together in my vise, and then clamped together near the top edge that I was milling, and had no problems with chattering. It left me with a reasonably optically clear edge. I expect to stack them the same way to round over the corners, and I'm hoping for a matching edge surface when I do that.

On the other hand, I'll be cleaning the acrylic flakes out of random crevices of the mill and nearby areas of the shop for the rest of my life. And I'm sure it will only get worse when I round over the corners!
 
The carbide tipped ones work great on aluminum. I use them in all metals including stainless steel. Sometimes I even use them in wood :grin:

Corner rounding an aluminum housing

286587
 
You already have 1/4" shank bit, run her till she blows, then buy a 1/2 shank bit for durability.
 
I've used router bits to round over aluminum without any trouble, though I tend to take pretty light cuts out of caution.
If you have a shop vac, set it up to suck the flakes up while you're rounding to minimize the mess.
 
@Nogoingback my shop vac lives by the mill for that reason, though it was very ineffective for the acrylic.

I've been pondering designs for a mill head vacuum attachment to do that hands-free (and run it most of the time) but I haven't yet come up with a good design. If I do, I'll almost certainly be utilizing my 3d printer. Everything I see online is a dust boot for CNC; I just want something that moves a lot of air to pull a substantial amount of chip flow into the vac without obscuring my view of the magic metal shaping going on. This seems possible to achieve...
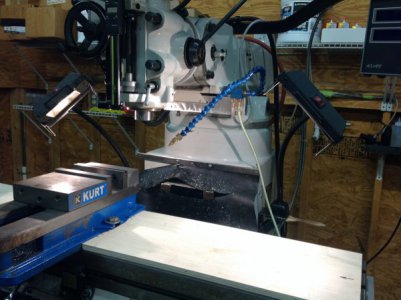
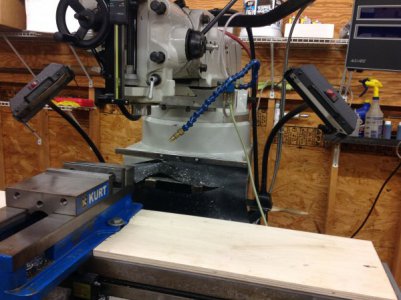
Several years ago, I saw a Tom Lipton youtube clip (Oxtools) where he showed plywood covers he made for his mill table (not the point of the video - just happened to be there). I made a pair for my milling machine out of half inch furniture grade scrap plywood a friend had given me. They're contoured to butt up nicely against my vise and extend over the entire table. The last few days, I've been milling a lot of white plexiglass, and as you would expect, white flakes are all over the place. EXCEPT on the milling table. Nothing in the wells or the T-slots. Not a 'solution' but sure makes clean-up a lot easier.

Regards,
Terry
 
I use carbide tipped router bits in all common metals without much consideration at all. I just remove the bearing first. They come in handy for other things.
 
@tjb oh, I have plywood and a jigsaw, sounds like a great idea. Thanks!
The plywood was first ripped to the table width. Then, with the plywood set square on the table, I placed the vise as close to center as possible on top of the plywood, visually indicated it, and marked it with a Sharpie. After that, it's a relatively simple matter to cut the plywood with your jigsaw. It's not rocket science, so perfection is not necessary, but obviously the closer you get it, the better it's going to be. I'm very pleased with the way mine turned out.

I thought about fitting a couple of lathing strips to the back that would run in the t-slots but, frankly, it doesn't appear that that's necessary. It definitely works. After milling, you can just pick up the plywood and brush it off into your scrap container and your done.

Below are a couple of photos I took for another purpose. They only show one side, but you'll get the idea.

Regards,
Terry

286620286621
 
Back
Top