Router table surface options

Analias

Active User
Registered
Joined
Oct 13, 2012
Messages
175
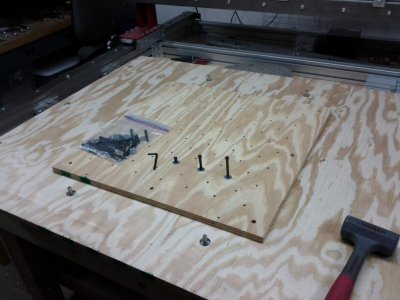
I have a CRP-4848 CNC router table that I built a couple of years ago. The table has performed well, but the one rough spot in the build was surfacing the table. I know that most folks just bolt down a 3/4" piece of plywood or MDF, then simply fix their work to the table surface using wood screws. This works fine for wood and where you are not too concerned with repeatability, but I would like more options. I would like to handle aluminum and plastic. I want to be able align the work parallel to the X and Y axis with some accuracy. I want the option of using clamps. The table size I'm trying to address is 57" x 54".

Most options I have looked at come at a substantial cost. A 5/8" cold rolled steel sheet can be had for $560 and I could drill and tap a hole pattern for tools and clamps. This is the most flexible for me, but the router would have to drill the holes - a problem since I have a 2.5Kw Chinese water cooled spindle with a minimum speed of 4K. T-Slots would work, but they are priced in the same range if spaced 2" apart and 60" long. I would love to have a aluminum surface with t-slots, but that's at the $1300 range.

As a short term option I created a 24"x24" tooling plate made out of 3/4" plywood and steel 1/4-20 steel wood anchors. it's anchored to to the table using a couple 3/8" steel dowels. This has worked fine until the 1/4-20 hex socket bolts I'm using want to get cross threaded and get stuck. Removing the munged anchor and bolt usually means destroying the anchor and the hole housing the anchor is shredded some. I'd like a larger, more robust, permanent solution.

I guess I'm looking for some options that don't cost an arm and a leg. The table is sitting idle until I can come up with a solution that doesn't cause frustration. I would welcome any ideas that folks have.

I have some 50mm x 50mm extruded aluminum t-slot stock (think 80-20 stuff). I could rip it in half if I could come up with a reliable way to do that. I have 9 pieces at 75" each, 18 pieces total after ripping. That's enough to cover the 54" x 57" surface by spacing the rails every 3" with a 1" wood spacer between them. Ripping and mounting the rails would be challenge. I would appreciate any ideas if this is even possible. The image below is the profile of the extruded aluminum stock.
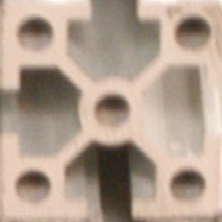
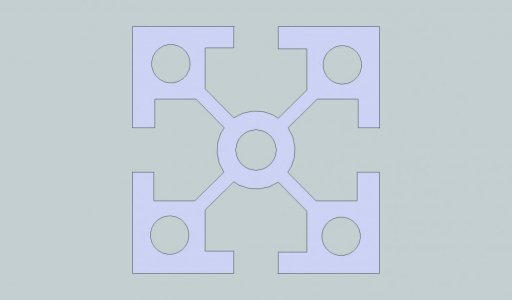
50mm X 50mm t-slot profile.png
50x50-Aluminum-Profile.jpg

Here's what I'm trying to surface.

IMG_20121125_184445.jpg

50mm X 50mm t-slot profile.png 50x50-Aluminum-Profile.jpg IMG_20121125_184445.jpg
 
A cool idea for clamping that i considered when i built a CNC router in Grad school, was to use an MDF/plywood buildup to create t-slots. We ended up using a vacuum system instead, but it was very simple, and easy to build /replace.

The idea is to cut up 3/4 or 1/2" material into strips, 3-4" wide (the width can be larger if desired). Cut two sets of strips, say one at 3" and another at 4" wide. Place the 3" strips about 1" apart, and lay the 4" strip centered on top, to make a T. Viola, MDF t-slots! The idea was to use glue, no fasteners, so that you never have a problem cutting through, and can surface cut the entire area without worry. When the top board gets too thin, surface it all off of the base strips, and lay down new top strips.

You can make your own t-nuts with 1", or slightly under, wide strips of MDF with an insert in the middle, or tap a hole in a piece of aluminum.

Its a pretty versatile system, and really cheap and easy to use.

-Cody
 
We'll here's my $0.02.

* MDF top, either just bare, or covered with melamine
* Drill holes with your router to form a grid 2" on center as you suggest, then drive threaded inserts such as these http://www.mcmaster.com/#92105a002/=oy9b2t. They are about $13 per hundred. If you do them every 2 inches, that could be quite expensive. If you get creative with spacing (some areas with higher hole density, some with lower) you could probably bring the total cost down lower to a more reasonable level. If you really need higher density, you could have a tooling plate that mates with this hole pattern.
 
My router table is similar to as described by code red. I took a sheet of 3/4 mdf, ripped it into 4" strips, then attached them to my substrate with

http://www.ebay.com/itm/8020-T-Slot...701?pt=LH_DefaultDomain_0&hash=item5633441a7d

laying in between. Then I just use the standard 8020 1/4-20 t nuts and 1/4-20 cap screws to hold down work.

Also, with MDF you can surface the table to eliminate any warpage by cutting the table true to the axis plane. Not sure how you would deal with this with a solid metal top? I doubt it would come dead true unless you somehow got a giant blanchard ground piece of steel?
 
We'll here's my $0.02.

* MDF top, either just bare, or covered with melamine
* Drill holes with your router to form a grid 2" on center as you suggest, then drive threaded inserts such as these http://www.mcmaster.com/#92105a002/=oy9b2t. They are about $13 per hundred. If you do them every 2 inches, that could be quite expensive. If you get creative with spacing (some areas with higher hole density, some with lower) you could probably bring the total cost down lower to a more reasonable level. If you really need higher density, you could have a tooling plate that mates with this hole pattern.

Wow, I really like this idea. The 1/4-20 are the cheapest. I am curious how well the flanged hex driven inserts stay in the wood? I know it's more expensive, but I am tempted to consider the steel high-strength hex drive 3/8-16 inserts. I could then standardize on the same hardware I have on my X3 mill. The only real problem is the insert length, they are 1 3/16" meaning I would have to double up bed material and give up a bit of Z axis. Any thoughts on using 3/8-16 over 1/4-20?

http://www.mcmaster.com/#90192A132


Sent from my Xoom using Tapatalk 4
 
Ouch! That's 2256 inserts using a 48x47 checker board pattern. I better shop around for bulk pricing.

I might also want to fab a tool to help insert them straight. I was thinking a simple block drilled for the outside diameter of the insert to keep it perpendicular to the table surface. If the outside diameter of the threads for the flanged inserts is smaller than the flange I may have to do something closer to tapping stand to hold the hex driver and insert perpendicular.
 
Ouch! That's 2256 inserts using a 48x47 checker board pattern. I better shop around for bulk pricing.

What spacing? 2256 would be a tight pattern.
I'm too tired to do the math.

Edit: never mind, I got it
 
What spacing? 2256 would be a tight pattern.
I'm too tired to do the math.

Edit: never mind, I got it

Actually you're right. It's too many. The count would be 1152 for 1" spacing on a 48x48 table for a staggered pattern. It is too late for doing math.

Sent from my Xoom using Tapatalk 4
 
Last edited:
I glued screwed 2 pieces of 3/4" MDF and fender washer and screwed from underneath through the unistrut table bed. Then I surfaced that second layer with the router and used the router to cut 1/6" deep channels to layout 8020 T Track. I then used 3" long thin (4mm maybe?) flat head screws, drill and countersunk the T track (8020 does not come with holes), and screwd it down using fender washers underneath - no way it is lifting and screws still slide along the T Track. Between the 8020 T Track I then layed plain 3/4" (3rd layer) MDF strips down and used nylon bolts that were counter sunk - no glue and no danger of bits getting ruined. This 3rd layer sits above the t-track. Then in one spot I cut a grid for a vac table in one section and drill through all three sheets for the 2" PVC for the vac clamp.

A hint in all this is to draw it all, including table web, in cad or vcarve so you know where the unistrut/base is and you leave room for washers and nuts.

Also since the 2nd layer is the surfaced layer you can easily change out the 3rd nylon bolted on layers out.
 
Why not use the rounter to build yourself a vacuum table from plate aluminum? cut the slots on the bottom and top, mount a big vacuum pump to the bottom side. suck down some mdf and let it hold down your material with a board that is sacrificial? Tim

- - - Updated - - -

Why not use the rounter to build yourself a vacuum table from plate aluminum? cut the slots on the bottom and top, mount a big vacuum pump to the bottom side. suck down some mdf and let it hold down your material with a board that is sacrificial? Tim

Another method is to use double sided sticky tape and tape down the material to a plastic sacrifical plastic board. We built lots of parts that way at work. Tim
 
Back
Top