Shars D-Bit Grinder

currinh

Registered
Registered
Joined
Dec 11, 2019
Messages
25
I recently purchased a Shars “Universal End Mill Cutter Drill Bit Grinder Sharpener”. While far from Universal it seems to be a decent D-bit or Single Lip cutter. Here’s a pic of the suspect:

Shars-1.jpg

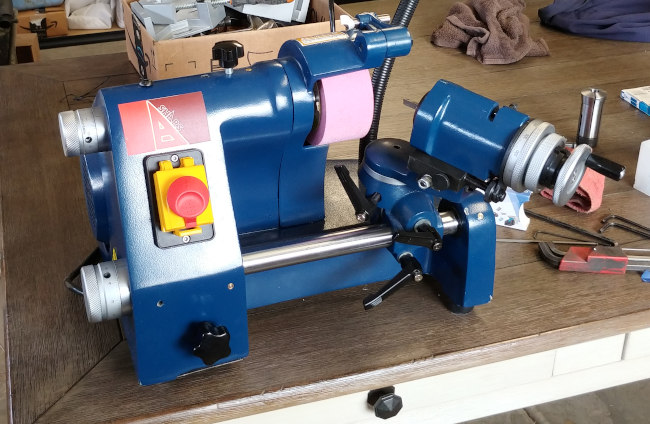
I’ve done some reading but just starting to use the machine for real. Thus I have questions. :)

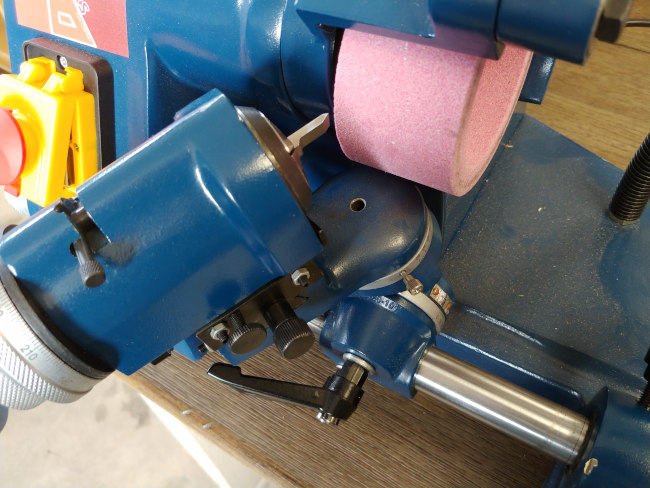
I disassembled the lower portion of the work head for clean up and to ream a hole in the center of the rotating table. I figure this will be needed to grind a radius. I have some ideas for this but first..

I’d like to grind a lathe threading tool. Something like the pictures below.

ThreadTool-1.jpg

It just has a 60 degree included angle with, say, 5 degree relief on left and right faces. Let’s leave the top flat, no back relief. Extra credit for the radius shown on the right hand side. How would you grind this tool using a d-bit grinder? Note, on the Shars you can’t rotate the “table” far enough to grind the right hand face as the head interferes with the wheel cover and/or the wheel.

I’ve come up with two alternatives each having drawbacks. The first depends on a square 5C collet and it’s ability to rotate the tool. Set the “tilt” to zero, the “rotary table” to 30 degrees, and the tool flat to the “table” (5C rotation=0). Now rotate the 5C 5 degrees and grind the left face. Next rotate the 5C -175 degrees from original zero and grind the right face. But, I understand you should grind into the cutting edge and the right side is backwards. Probably a touch up with a diamond stick would fix this , at least for HSS. However, I don’t see a way to grind the radius with this set-up. Also on the Shars you can only lock the 5C rotation at specific points, and 5 degrees isn’t one of them.

Shars-2.jpg

The second scheme is to set the “tilt” to 5 degrees, the “rotary table” to 30 degrees, and the tool flat to the table. This will work for the left side face. For the right hand face, the “tilt” is reset to -5 degrees, and the “table” to -30 degrees. The back side of the grinding wheel is used to grind this right hand face. This scheme doesn’t require a square 5C collet, the lathe tool holder could work. But I’m hesitant to grind on the back side of the wheel. Also the graduations for tilt don’t go negative.

Shars-3.jpg

I think we can get the radius with this second scheme but in two parts. Just swing the “rotary table” through an arc using each set up for part of the radius. (Here one has to set the center line of the rotary table to go though the center of the radius to be ground.) Note there are no “rotary table” stops to prevent going too far.

I suspect there are better ways. I’d be real interested to know how you go about this.

Thank you.

Hugh
 
Hi,

Have you looked for a copy of the "Deckel Operating Instructions" PDF that's floating around on the internet? That has some information on operating this class of machine. Might give you some hints. There are limitations to this machine as you are discovering, however there are usually workarounds.

Dan
 
So a funny thing.....

I've recently bought a 1968 Deckel SO grinder and just so happened to be going through the same sort of stuff on my own (trying to figure out if I can do the ends of a 2 flute end mill). When I saw your post, I considered it a challenge.

First off, setting what you call the "rotary table" to 30 degrees for a start. It occurred to me that you are missing out on using the collet rotation. The whole red-dot thing when setup for a D bit that then gives you a 180 stop. So setup your square lathe threading bit so you have red dot in window and the top of the bit level or horizontal and the sides vertical. Then when you swing to one end of the 180 one side will be in the correct position (almost) and the other end of the 180 collet rotation will have the other side in the correct position (but upside down).

This is a really good start, now all you need to do is dial in some rake on each of the sides. I took a good look at the collet and spin adjustments on my Deckel, and GEEE, guess what? they already figured in this sort of thing.

I've got a degree scale on the back end off the barrel and it want's to show zero with the bit top horizontal and the red dot in place. you can back off the bigger knurled knob and advance or reduce the collet rotation. So the trick is to dial in 5 deg of rake on one side, then when you do the other you have to do it in the opposite direction because the bit is upside down.

The only error is that the compound angle will make the setting you want not-quite 30 and not quite 5. The question is how much?

I'm not much of a math guy and couldn't find any good stuff on line that explained how to to the calculations in a way I could understand.

So why not do it by trial and error? That would be kind of a pain with real stuff and it would be really hard to measure it anyway. Next best thing is to simulate it!

I built up a crude joint model in Fusion 360 along with a model bit as described. I then set it up so it looked right and had fusion tell me what it measured. A sort of binary search then got down to "exact" to 0.0000 (I only have measurement numbers displayed at 4 digits). And BTW - just using 130 and 5 deg end up with grinder cutting with .1 deg of what we are shooting for.

The numbers I ended up with are: 29.88 deg instead of 30 deg (rotary table) and 5.76 for the rake (collet rotation, + on one side - on the other because it's upside down).

A thing to note is that the rake angle is not going to be that critical, for threading you do want the total tip to be 60, but it's not going to kill you if it's a little off. (depends on the work you are doing). There's no reason you couldn't free hand swing the holder to put a small radius on the tip. Or just use a diamond hone.

Hope this helps. I could post some pictures and explain more if needed, but it's too late now.

And thanks! I've now got a CAD model I can use when I encounter other head scratchers of setups.
 
Last edited:
These grinders are more universal than you might think/get told about at first glance. A bunch of posts on this forum about Deckel, Shars and Alexander versions debunking the supposed limitations.

It would be worth your while reading the S0, S0E, S01 Deckel manuals easily found online. Also find the Alexander 2CG and Kuhlman manuals. While each covers similar materials, each also has a bit of extra clarity for some grinds. Esp. tip radius grinding.
None of the manuals cover end mils, four facet drill tips etc. For that you need Stefan G's YT channel.
There is also a very worthwhile article in Model Engineers Workshop issue 283 (Aug 2019) on enhancing these grinders for drills, end mills, gear cutters and slitting saws etc.

The biggest challenge I find is contorting my 3D visualization to working out the sequence of grinding. As shown above, a CAD model helps with that as does practice/experimenting.

For some of your grinding on those HSS lathe tools you will need to flip upside down to get the opposite side done.

Gerrit
 
I suggest grinding your 60-deg flanks first, using the lathe tool attachment, and include your side relief in those two steps. Make all angle settings using the pivots. The spin indexer has other purposes, it is not used to include relief in square bits. I mean, it can be, but it's not prudent. So you place your flanked and relieved 60-deg tool in the lathe bit fixture, top side up. Center it and set the point just a touch over center on the pivot indicator mark (shop mod) sighted below the tool tip. Then set the back tilt to 5 degrees. Free the yaw pivot, and work the infeed as you radius the tip by yawing it back and forth into the wheel. Pivot all the way until the tool flanks almost touch the wheel, both sides. Did I mention you're using the proper cutting face of the cup wheel? Sorry. Only use the face. There's more than 180 deg of tool presentation available at that position on the face of the wheel.

You can accomplish a ton of operations on the Sheckel (Shars-Deckel!) tool grinder. You can make fixtures to expand the possibilities. The only problem is there is no guidebook, so it's up to you to break the code and make it work for you.
 
I too have the Shars grinder. I have to admit I haven spent much time with it.
If I had mire experience maybe I would have a better handle on it.
I keep telling myself I’m going to sit down and devote some real time to learn all the accessories and it’s basic functions.
 
These things take some getting used to and making a few jigs. They can actually grind the flutes on end mills quite nicely as well as the ends. A two flute is easy enough by just copying the angle on a new one. 4 flute, it is easiest to just grind out the center. The nose radius on your threading tool is a lot quicker to do free hand. There are very good videos on line.
 
Hi,

Have you looked for a copy of the "Deckel Operating Instructions" PDF that's floating around on the internet? That has some information on operating this class of machine. Might give you some hints. There are limitations to this machine as you are discovering, however there are usually workarounds.

Dan
Dan:

Thanks for the reply. You started a cascade of replies, good info.

I do have the Deckel manual and it's helpful. Also the Quorn book by Chadock is helpful.

Thanks.
 
So a funny thing.....
I think your method is similar to my first. It would work but not reasonable to grind the radius on the tip. A method to cut radius would be useful for more than this tool.

I've done similar calculations and I think it would be possible, but it's been a long time. A bunch of vector manipulations. But from your results it doesn't seem to help much. With the dials on the Shars it would be hard to get any closer than a degree or so. I don't think I could measure those differences anyway.

This method grinds one face into the edge and the second away from the edge. I've heard you should grind into the edge but don't know how important it is? May depend on the material?

Thanks for the help.
 
These grinders are more universal than you might think/get told about at first glance. A bunch of posts on this forum about Deckel, Shars and Alexander versions debunking the supposed limitations.

It would be worth your while reading the S0, S0E, S01 Deckel manuals easily found online. Also find the Alexander 2CG and Kuhlman manuals. While each covers similar materials, each also has a bit of extra clarity for some grinds. Esp. tip radius grinding.
None of the manuals cover end mils, four facet drill tips etc. For that you need Stefan G's YT channel.
There is also a very worthwhile article in Model Engineers Workshop issue 283 (Aug 2019) on enhancing these grinders for drills, end mills, gear cutters and slitting saws etc.

The biggest challenge I find is contorting my 3D visualization to working out the sequence of grinding. As shown above, a CAD model helps with that as does practice/experimenting.

For some of your grinding on those HSS lathe tools you will need to flip upside down to get the opposite side done.

Gerrit
Gerrit:

I have one of the Deckel manuals but don't remember which version it's for. Are they different? I'll look for the others and the Model Engineers Workshop issue. I also have Chadock's book on the Quorn grinder. It also has some good info.

I've understood you should grind into the edge rather than away. So it's OK to do this on HSS. Should it be avoided on other cutting tools (like carbide)?

Thanks for the help.
 
Back
Top