

-
Welcome back Guest! Did you know you can mentor other members here at H-M? If not, please check out our Relaunch of Hobby Machinist Mentoring Program!
You are using an out of date browser. It may not display this or other websites correctly.
You should upgrade or use an alternative browser.
You should upgrade or use an alternative browser.
Show me your Rotary Table hold down fixtures
- Thread starter Janderso
- Start date

- Joined
- Apr 14, 2014
- Messages
- 3,215
One thing I had forgotten is that i made a number of quick and dirty T bolts for my rotary table out of grade 2 carriage bolts. I have 3/8" and 5/8" T nuts and clamping kits, but the slots in the rotary table are 1/2". I put a 1/2" carriage bolt in a collet on the lathe, turned the OD of the head to 11/16" and faced off the top of the crown so it would slide in the slot. The 1/2" square under the head locates the bolt so it doesn't turn when a nut is tightened on a standard milling machine clamp.
It's a little difficult to tell from the picture, but the rods sticking through the clamps in the first post of the thread "How Many Graduations are Necessary or Practical" are actually upside down carriage bolts. The nice thing is they only take a minute or so to modify and come in all the standard diameters and lengths that are common for T slots.
 www.hobby-machinist.com
It's a little difficult to tell from the picture, but the rods sticking through the clamps in the first post of the thread "How Many Graduations are Necessary or Practical" are actually upside down carriage bolts. The nice thing is they only take a minute or so to modify and come in all the standard diameters and lengths that are common for T slots.
How Many Graduations are Necessary or Practical
A some might already know I've been working on a HSS lathe tool sharpening fixture on and off for a while. I'm to the point I've started putting degree graduations on the table. I have hard stops at each 5 degree and 10 degree mark, but was wondering how useful or practical it would be to...
www.hobby-machinist.com
- Joined
- Oct 31, 2016
- Messages
- 2,653
One other thing you need to do with carriage bolts is remove the angle from the square. It was pointed out to me by another forum member (I forget who) that the angled squares can damage the slots. I use modified carriage bolts in all of my T slots.
- Joined
- May 23, 2017
- Messages
- 110
Here is my 6" RT and 12" RT. I made a plate from 3/4" hot rolled, that I rough cut with an OA torch, then mounted in a 3 jaw and got a pilot round so I could flip them and do the rest of the lathe work. I used the RT to drill any of the bolt circle holes needed to mount the chuck from the back side of this plate, as well the top side hex head cap screws. Then it was a matter of bolting the assembly down on the mill and use an indicator to get the chuck body concentric to the RT.
Attachments
- Joined
- Oct 11, 2016
- Messages
- 3,876
thanks @davidpbest that was a great video!
I made a 2024 aluminum plate, 12" square for my 6" rotary table. I use it as an expendable set up plate, drilling holes as I need them. I milled slots and keys for precise alignment.
I made a 2024 aluminum plate, 12" square for my 6" rotary table. I use it as an expendable set up plate, drilling holes as I need them. I milled slots and keys for precise alignment.
- Joined
- May 23, 2017
- Messages
- 110
OK, After seeing post #25, Dabbler's post, I think I understand the OP's question, a mounting plate for the RT to the mill table.Here is my 6" RT and 12" RT. I made a plate from 3/4" hot rolled, that I rough cut with an OA torch, then mounted in a 3 jaw and got a pilot round so I could flip them and do the rest of the lathe work. I used the RT to drill any of the bolt circle holes needed to mount the chuck from the back side of this plate, as well the top side hex head cap screws. Then it was a matter of bolting the assembly down on the mill and use an indicator to get the chuck body concentric to the RT.
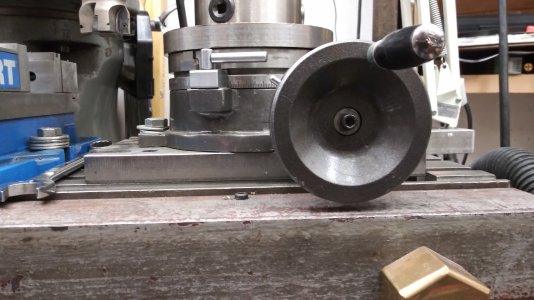
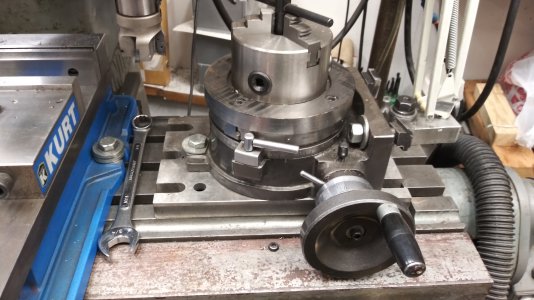
I put my 6" on a riser plate as the crank interfered with the table top, so I moved my RT from the storage shelf to the mill and took some photos.
The table also came with index hole plates, which I've never used. But I don't think my riser plate is thick enough for them to clear. So if the OP is still about, keep that in mind.
Attachments
- Joined
- Sep 1, 2020
- Messages
- 794
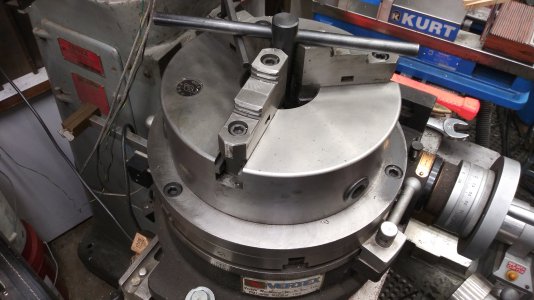
For what it's worth, I was getting ready to pull off my chuck from the table to hold a rectangular part. This piece of 4.5" bar from the bin. I drilled a radial pattern of 3/8" 16 tapped holes. Some of the others were in there and they proved to be helpful. It's a simple idea I'm guessing many have had but it was enlightening to me.

Less thick would be fine. I may make a bigger one at some point.
I got the idea from this lathe fixture I started on with 7.5" disk. If I only had another...

maybe this will give someone else an idea. I think it will save me time.
Less thick would be fine. I may make a bigger one at some point.
I got the idea from this lathe fixture I started on with 7.5" disk. If I only had another...
maybe this will give someone else an idea. I think it will save me time.
I hope I understood your question but Fixtures for Rotary tables are always challenging. I find that the mitee-bite style eccentric or wedge workholding type work very well because they take up little space. One thing I have done is make a bunch of Long T-nuts with many different-sized tapped holes. I also found that simple 2 piece vises work well because they can be placed anywhere on the table. I have made a lot of one-off toe clamps to hold work and they were usually made specifically for each job.
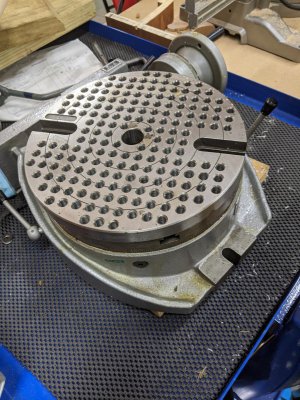
A few years ago I spotted this hardened and drilled/tapped round fixture plate in the local Craigslist. Didn't have a particular use for it, wasn't even sure what it was for, but for $20 I couldn't pass it up.
A year or so later I bought the 10in rotary table you see here for my mill. Lo and behold the round fixture plate fits the rotary table perfectly!
Now I have a number of ways to clamp to my rotary table: 1. using the t-slots, 2. Using a 8in lathe chuck, and 3. using the round fixture plate. Now if I only had more RT projects.
Attachments
- Joined
- Jul 19, 2019
- Messages
- 116
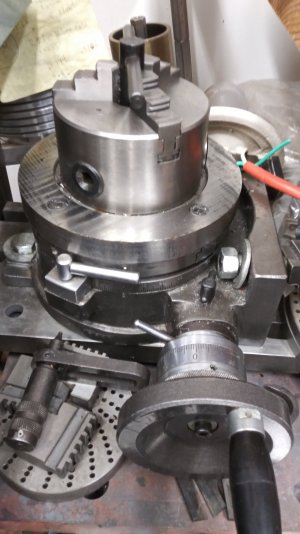
I've been pondering this myself, and this sounds like the exact solution that I need. Thanks for sharing guys!I made an adapter so that i can easily mount my lathe chucks centered on the rotary table. This allows me to move work pieces from the lathe to the mill and back without having to remove them from the chuck. It saves time and improves accuracy.
I know a lathe chuck only holds some of the work pieces you'd want mounted to a rotary table, but maybe this approach will help with your current task.