Silver Solder vs. Loctite Retaining Compound

JRaut

H-M Supporter - Diamond Member
H-M Lifetime Diamond Member
Joined
Mar 9, 2018
Messages
465
Alright, it's a question that's been asked and answered before, but I'm going to ask it again here.

I'm working on building an Edwards Radial 5 engine and the plans call for silver soldering an assemblage of two steel gears and a bronze bush; see photo below.
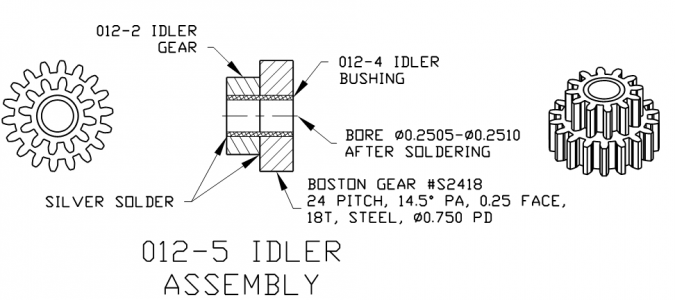
1599132059717.png

I've never silver soldered anything before. Certainly open to giving it a try, but this part in particular seems 'easily ruinable' by a novice silver solderer. I'm afraid I'll get solder in all of the gear teeth and everywhere else.

The load on this part will be quite small -- all it does is spin on an idler shaft and turn a 'cam ring', which activates the poppet valves. The temperature will be essentially the operating temperature of the motor, probably a couple/few hundred F.

I've got some Loctite 603 Retaining Compound on hand. Would that do the trick in lieu of silver soldering? Would a different Loctite Retaining Compound work better (i.e., Loctite 620 - high-temp retaining compound)?

There doesn't seem to be enough 'meat' in the small gear to allow me to pin the two together. So it'd be all silver solder, or all Loctite.
 
Due to the parts being small it will be a little fiddly to silver solder.
However, based on your skills in manipulating small parts from your excellent build thread (linked again for anyone that hasn't seen it yet!) I am certain you can handle it.

In fact, I am not sure that I can give you any real advice.....but if I had to, I guess I'd say :

1) get a torch and practice on some similar sized scrap parts
2) the bushing will help greatly with part alignment
3) use flux to coax the solder to the faces where you want it to be
4) you can also use soot to "mask" areas that you do not want solder to stick to (simply holding the gear with tweezers over a candle flame)

Please share your progress on this, here or in your build thread!

-brino
 
Last edited:
Silver soldering is a pretty easy task. Just make sure you clean your parts of oils. Use flux, heat the part and when you apply the solder it will suck it into the joint like magic. When you flux only put where you want the solder and it will only flow to that area. Get a low temp solder so your not cooking the parts.
 
I'm a big fan of Loctite 609 (green bearing retaining compound). In my experience it is as good as welding for pin/sleeve applications like you have here as long as it doesn't get really hot (50% of full strength at 130*C).

Here is from their website "Typical applications include rotor to shafts in fractional and subfractional horsepower motors. Locks bushings and sleeves in housings on shafts. Augments press fits"

I've even used it to place pins in cast iron and later machine them. It is a great product.
 
have you visited the model engine makers site,, odds are someone there has worked on this..
 
4) you can also use soot to "mask" areas that you do not want solder to stick to (simply holding the gear with tweezers over a candle flame)

I did not know about usinng soot for masking solder - Thanks Brino! Also did not know about Loctite 609. Learned two things today before 8 AM - wow!

And to the OP, this part looks big enough for even a novice solderer to take on after just a bit of practice. As other have said, flux only where you want solder, heat the part and apply very little solder and watch as it 'wicks' into the space between the bushing and the two gears. You may have to turn the part over and solder both gears separately to assure penetration.

Stu
 
I used to silver solder full time. Here are a few of tips:

First: Use EasyFlo 45 or similar 45% silver brazing solder without cadmium. That will be plenty strong enough for your application, its safer to use, and takes less heat for first melt. Try to find a thin wire type 0.050" or less. Smaller the solder thickness the easier it is to heat and work with.

Second: Use this flux: Harris Stay Silv It is the flux I've used for years and was in use back when I was doing this full time silver brazing PCD tips to Tungsten Carbide. Home Depot used to stock this. Not sure if they still do. The link is from amazon. Not expensive. That tub will last you for years. When it gets old and crusty 10 years from now just add a little water and remix it.

Third: Prepare your parts: Silver solder provides a bond as strong as the parts its bonding to if they are clean and free of grease. The melting temp is hot enough to turn most contaminates to soot and that will block the solder from adhering. So clean with good solvent first. The flux will do the rest.

Fourth: Apply flux only where you need the silver braze to go. The silver braze will not stick to unfluxed areas. But the flux will bubble slightly when it's heated so wear eye protection and practice a couple of times on scrap prior to doing the part.

Finally the procedure is as follows: Use oxy (acetylene, NG, or Map) gas torch (propane torch is not hot enough). Use a #3 - #5 tip with oxy acetylene, #5-#7 with oxy NG, or whatever you can with map gas. Point is to be able to heat the part and maintain the heat where you want the solder to flow.

Heat the part thoroughly until the flux becomes clear liguid. That's the point where the solder will begin to flow. Dip the end of the solder in the flux and begin to apply to the part, using the torch to aim the heat at the solder briefly. Maintain the heat where you want the solder to flow. It will flow toward the heat. Once the solder is applied fully, allow to cool for a few moments. Then carefully and slowly set the part into warm water. The warm water will separate the flux from the part after soaking for a few minutes.

Hope this helps and good luck.

Best Regards,
Bob
 
Last edited:
Wow, thanks everyone for the information!

You've convinced me to give it a whirl with silver soldering. It's always been something I've wanted to add to my capabilities arsenal, just haven't really had the opportunity.

Anyway, I ordered some Stay Silv flux and some 45% silver solder. Should be here in a few days.

I don't have an oxy-fuel torch setup (and frankly, don't have much appetite to get one). Some cursory online research says that a MAPP torch w/o oxygen will get hot enough, particularly for these small parts. Anyone agree/disagree?
 
Hi JRaut,

Yes, I did not give your print a close enough look. Map gas may work fine with these small parts, however I've found that the Map torch tip is not as easy to control. For this application it should be ok. But be sure to practice on some scrap first to be sure. Good Luck.

Best Regards,
Bob
 
Also, the drawings call for only 0.001" clearance for the silver solder to fill.

Seems quite tight to me, but what do I know.

Should I shoot for a few thou instead?
 
Back
Top