This breaks my heart.My school doesn't have a single CMM on campus (super underfunded engineering program -- I'm transferring after the summer). Although a CMM would be perfect, sadly that option is out.
-
Welcome back Guest! Did you know you can mentor other members here at H-M? If not, please check out our Relaunch of Hobby Machinist Mentoring Program!
You are using an out of date browser. It may not display this or other websites correctly.
You should upgrade or use an alternative browser.
You should upgrade or use an alternative browser.
Small Epoxy Granite Filled "Watchmakers Lathe" Design Question
- Thread starter shermama96
- Start date
- Joined
- Mar 26, 2018
- Messages
- 2,724
My thought on measuring the dovetail is this. If your top surface is truly flat (you may need to blue it), flip it upside down on a surface plate. Now take two short dowel pins large enough to contact the surface plate AND somewhere around the middle of the dovetail (This won't work is your dovetail is too shallow as the dowel pins would become unreasonably large). Make sure to hold the rail and both pins firmly onto the surface plate and take a reading over the pins. subtract twice the diameter of the pins, and this is your dimension at the point of contact. Now since you won't know the EXACT point of contact, this won't give you an absolute measurement, but if you repeat the measurement along the length of the rail, it will tell you any taper or change in form.
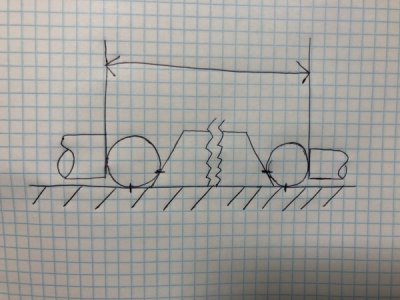
Here is a rough drawing.

Here is a rough drawing.
- Joined
- Mar 13, 2017
- Messages
- 36
My thought on measuring the dovetail is this. If your top surface is truly flat (you may need to blue it), flip it upside down on a surface plate. Now take two short dowel pins large enough to contact the surface plate AND somewhere around the middle of the dovetail (This won't work is your dovetail is too shallow as the dowel pins would become unreasonably large). Make sure to hold the rail and both pins firmly onto the surface plate and take a reading over the pins. subtract twice the diameter of the pins, and this is your dimension at the point of contact. Now since you won't know the EXACT point of contact, this won't give you an absolute measurement, but if you repeat the measurement along the length of the rail, it will tell you any taper or change in form.
View attachment 273237
Here is a rough drawing.
I was thinking this too, would almost certainly need a second person to check and a solid 3-4 inch mic. Although I know this is bad practice, I did set up the lathe on the grinder magnet and indicate in the front dovetail flank to run parallel to the machine ways and then ran the indicator on the backside. For the full 15 inch length there was about 5 tenths deviation. Not sure how solid the measurement is, but it's better than reading 20 thou.
Last edited:
- Joined
- Mar 13, 2017
- Messages
- 36
I plan to start machining the headstock on Monday and I am there are some design/manufacturing issues I'm trying to work out.
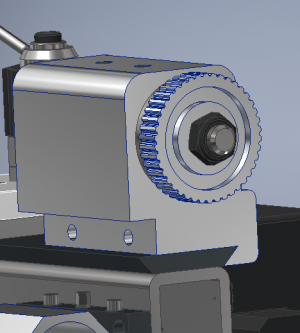
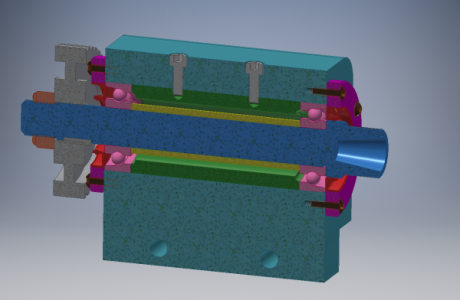
The headstock locates itself on the dovetail and gets affixed by a moving clamp with a dovetail milled into it and two SHCS.
The first issue in the headstock design itself. Two match ground pre-load spacers are suspended between two angular contact bearings. The problem would be boring a hole with a tight enough tolerance for the proper bearing fit along the 4 inch length without any taper in it. I was thinking about trying to come up with some line boring setup on the lathe.
Maybe I could turn two shouldered bearing seats on either end which would make the boring job a lot easier. The issue there is that it might be difficult to indicate the giant piece of cast iron into the four jaw to the point of virtually no run-out after machining the first seat. Then If I can do that it might be difficult to grind the internal pre-load spacer to the exact distance between bearing shoulders. I am under the impression that even a couple tenths difference will result in improper pre-load, I think at that point I'm just being major OCD.
It is also essential that the axis of the spindle be parallel to both dovetail mating surfaces, or really parallel to the bed otherwise the off axis rotation would induce a taper in all parts made on the machine. I have to decide if it will be easier to machine the dovetail then the bearing bore, or vise versa. I thought I could machine the bearing bore and then install the bearings and ER collet chuck. Then load some ground linear rod in the ER collet and use that to indicate the central axis of the spindle to be parallel with both mating surfaces of the dovetail.
I also started thinking about the saddle. I've come to the conclusion that I can't run ground on ground ways and to avoid scraping I think I'm going to try using Moglice injectable bearing epoxy. I know most of you must be thinking I'm insane to spend the crazy penny for Moglice for a dinky little lathe like this. On a machine this small I'm looking to get dynamic stiffness however I can and I'd imagine having full bearing contact would be essential to a well functioning machine. I think I read somewhere that machine manufactures intentionally grind a slight angle into the cross slide way on the saddle to avoid the faced ends of parts coming out convex and bearing on the center and instead come out slightly concave so the face bears on its periphery. I'm wondering if I should try to do the same. I can't imagine the slight angle is more than a tenth or two out along the length.
If anyone has any weigh in on any of these issues I'd really appreciate it. Hopefully I'm not being too much of a PITA, none of the professors at my current school have any idea about machine design and I really don't know who else to turn to.
Thanks again,
Sherman
Aquire a cylindrical grinder that does external and internal work this will do the spindle and bearing bores to your satisfaction, if this is not possible you are stuck with the traditional method of trial and error, keep making them until it works.
The Swiss have been making small lathes for hundreds of years so do as they do, I have never ran a Swiss lathe but the concept is damn near perfect for small parts.
Good Luck
The Swiss have been making small lathes for hundreds of years so do as they do, I have never ran a Swiss lathe but the concept is damn near perfect for small parts.
Good Luck
- Joined
- Mar 3, 2017
- Messages
- 745
I surface ground the the dovetail today and I've been trying to think of some way to measure across pins ...
Could you machine a mating element, just an inch or three long, and cut a slot so that a feeler gage could
be slipped into the gap? A little stack of feelers can be a very accurate gage, if somewhat less convenient than
a digital readout. A mating element with a socket into which you can attach a dial indicator would be
a possible alternate (but beware the hard tip of an indicator dragging along cast iron parts).
Consistent width is probably more important than exact width (which will relate to gib adjustment).
A mating dovetail-socket block will also be a useful jig in gaging the carriage dovetail socket, you can
use a pair of dowels and internal micrometer on the jig and the carriage, and keep cutting the
carriage socket until there's room for the gib.
- Joined
- Mar 13, 2017
- Messages
- 36
Aquire a cylindrical grinder that does external and internal work this will do the spindle and bearing bores to your satisfaction, if this is not possible you are stuck with the traditional method of trial and error, keep making them until it works.
The Swiss have been making small lathes for hundreds of years so do as they do, I have never ran a Swiss lathe but the concept is damn near perfect for small parts.
Good Luck
I was planning on using a cylindrical grinding fixture for the spindle considering its 55-58 HRC. Obviously I can't use this for the large headstock, but we do have an old toolpost grinder in the shop that accepts super small grinding wheels, the type that go into a dremel, maybe a little bigger. I wish I had access to a real cyl. grinder with large stiff wheel/arbors. Maybe making a cartridge spindle would make life easier. It'd be much easier to hold a ~2" cylindrical part than an almost 4" square eccentric part.
I appreciate the help, I wish I knew how to give a thumbs up on this forum.
- Joined
- Jul 2, 2014
- Messages
- 7,594
Look to the bottom right of every post here. There is an icon with a thumb sticking up. Hover over it and see the multiple choices available. Just clicking on the icon will give a thumbs up to the message you are in. There are more options, hover to see them before clicking on the one you want to give to the poster.I appreciate the help, I wish I knew how to give a thumbs up on this forum.
- Joined
- Jul 2, 2014
- Messages
- 7,594
It works! Thanks...

