Spindle bearing woes

Hi Izzy,

OK ! Lets stop at this point and do nothing else!

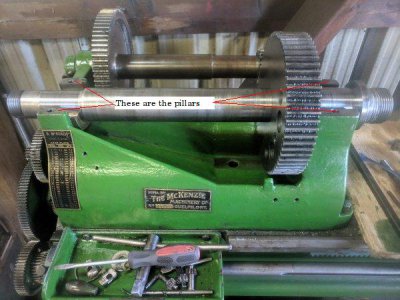
I want to make sure that we are both talking the same language. Refer to my picture.

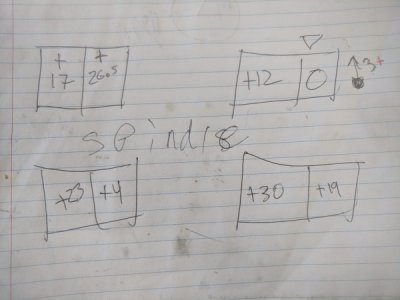
If you remove the headstock and place it on your mill table, making sure that everything is clean and there is no rock. No need to clamp anything down for the moment. Using a dial gauge in the mill spindle, measure the hight differences on each of the pillar surfaces, at each end of each of the four and in the middle where the bolt hole is.

I am not interested in the hight from the base of the headstock casting. I'm just wanting to find a datum point.
So if the front left, left side is considered zero. What is the middle and right edges. Plus 1 thou, minus 1 thou or nothing.
Without changing the gauge hight, compare the other pillars.

Do a sketch and write the figures down.
IMG_20180928_130306.jpg
 
Hi Izzy, Please let me know when you are ready to move on.
 
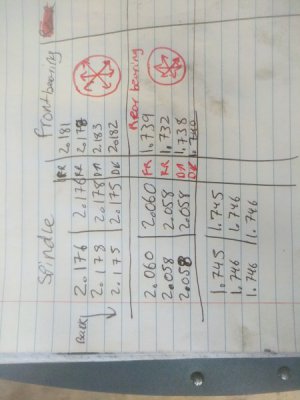
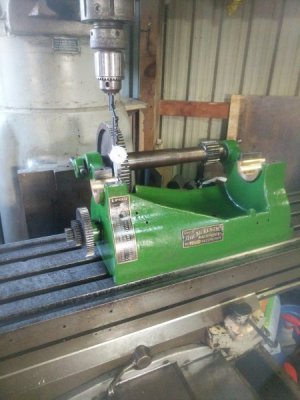
Ok so here's what I got. First picture is exactly what you asked for I checked it with dial test indicator. The surfaces where no where near flat. They had a taper going into the spindle by about 3thou which I've marked in the paper. Second picture is my new measurements of the spindle and bearings again measured without shims to stay consistent. I used my mitutoyo mic for the spindle and a Lufkin inside mic for the bearings. Last image is of the setup.IMG_20181003_180803.jpg1538604570450912831686268856056.jpg15386050148728239820355341352746.jpg
 
Hi Izzy,

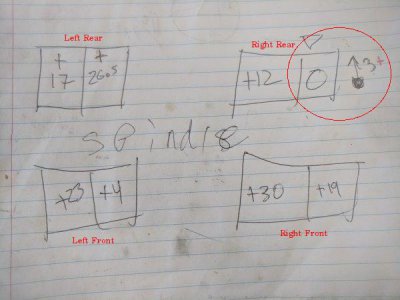
Have a look at this and confirm that you have made the "Right Rear" pillar the zero reference ! The lowest point on the pillars.
Are are the figures you have written the differences from the zero reference ?
I'm assuming that this is looking down onto the top of the headstock, and that it is down flat with no rock.
IMG_20181003_180803.jpg
 
@BaronJ yes that's correct it's a birds eye view and all numbers are in reference to the datum as you asked. And no there is no rock from the headstock it's firmly planted on the table
 
Hi Izzy,

That is some wide range of hight variation ! I would have expected 8 or 10 thou, but 30 thou ! That is some range.
Ok, back to the job in hand.

If I said take a 10 thou cut right across all four pillars on the mill without altering the cutter hight, could you achieve that ?
 
The lathe is from 1920 it looks to me as though the tops have been done using a shaper. Those straight across cut marks are easy to tell. I was almost at the limit of my DTI! I was surprised myself.
Absolutely I could do that so 10 thou from the 0 point? Meaning I'd be taking off 40 on the right front?
 
Hi Izzy,

No, your are right, Ive got it wrong ! I was using the datum as zero to take a cut off the tops. Which is the wrong direction.
It needs to be using the tallest pillar and then take 10 thou off.

What I'm trying to do is level the tops of the pillars. I was going to do it in 10 thou steps.
 
So if you take off 10 thou that would reduce the right front pillar from +30 thou to +20 thou.
And reduce the left front pillar from +23 to +20, the left rear pillar from +26.5 to +20 thou.
The right rear wouldn't be altered.

I hope I've got it right this time. I'm glad you queried it.

Only take a single cut and remeasure.
 
Last edited:
Gotcha, I understand what your doing. I can absolutely do that. I'll take the cut and report back.
Thanks for having the patience to walk me through this, I only wish there was some way I could repay the favor!
 
Back
Top