Spindle Runout Issues on PM-728VT

netmagi

Registered
Registered
Joined
Nov 27, 2022
Messages
49
Purchased a new 728 towards the end of last year and have been having a few problems with it. First was with the fine downfeed binding up, but new parts from PM solved that, and it's smooth as butter now. Next problem was repeatable runout in the spindle wrecking havoc with any tooling more than an inch or so down from the spindle nose. I thought maybe it was my collets, but I invested in some Lyndex and Hardinge collets, and the problems remained.

I eventually realized the only way I was going to be sure what the problem was (or even if there was a problem) was by getting a precision-ground R8 test bar. They are PRICEY, so make sure you're sitting down if you look at getting one, but I picked one up from Glacern, and was disappointed to see the following measured as TIR on my 728:

5 tenths @ 1" down from spindle nose
2.65 thou @ 5" down from spindle nose
4.6 thou @ 8.75" down from the spindle nose

I removed the belt and turned the spindle by hand when taking those measurements.

PM didn't skip a beat and sent a new spindle out right away (their tech support has been very responsive and helpful). The new spindle, however, seems to measure worse then the old spindle, and I'm checking them on v-blocks outside the quill to keep the bearings out of the equation, though, they could, of course, be adding to the problem.

You can see the measurements here:

Curious if anyone else has had runout issues and if so what the resolution was? I passed along my findings to PM's tech support and I'm sure I'll hear back soon.

Since PM doesn't publish a spec, also curious to hear what you guys think *is* acceptable for runout on the 728? It's marketed as best-of-the-best "ultra-precision", so I would certainly think it's better than over 2.5 thou at 5" down from nose.
 
UPDATE:

PM replied and asked that I install it in the machine and test it anyway. Seems a dubious exercise to me given if the bearing journals don't run true to the taper, re-installing it in the machine will only accomplish adding a radial element to the TIR from the bearings, but I'll give it a shot at their request.

Anyone else think different? Am I missing something?
They did the same with me when I had spindle/drive issues with the J-head on my new PM-935. I did as asked, the issue remained, and then they sent me a new J-head. It's a PITA, but I understand their need to follow a protocol to weed out the less-mechanically minded. In the end, I'm sure PM will do what they can to get this resolved.
 
They did the same with me when I had spindle/drive issues with the J-head on my new PM-935. I did as asked, the issue remained, and then they sent me a new J-head. It's a PITA, but I understand their need to follow a protocol to week out the less-mechanically minded. In the end, I'm sure PM will do what they can to get this resolved.
I am having DRO accuracy issues and I currently have only good things to say about their support folks as well....
 
My observation has been that the Taiwanese machines are actually quite bad, and the Chinese machines are better. That said, I only have two examples (one Taiwanese and one Chinese). Chinese manufacturing has improved drastically in the last decade. All my time these days is spent making the Taiwanese machine usable.
 
My observation has been that the Taiwanese machines are actually quite bad, and the Chinese machines are better. That said, I only have two examples (one Taiwanese and one Chinese). Chinese manufacturing has improved drastically in the last decade. All my time these days is spent making the Taiwanese machine usable.
My experience in the past has been that there's higher consistency in quality on the Taiwanese imports. China absolutely can produce the same or higher quality than the typical Taiwanese imports, it just seems incredibly hit and miss on whether they do or not. Both in brand/model, and then again within the same model on different production runs.

This leads me to the root of my frustration with this 728VT. If something isn't right, I'm probably going to notice when using it. That's why I ponied up for the "ultra precision" Taiwanese export 728VT so I didn't have to spend months swapping parts and chasing quality control issues typical of the avg. Chinese machine.

The fine downfeed on my machine was initially so bad I thought surely I must be missing a locking lever or screw somewhere, or just simply not using it correctly. It's clear nobody ever put their hand on it and tried turning it before it was sent out. When I pulled it apart, the groove in the shaft that pushes on the set screw for thrust looked like it was machined with a random rock from the ground, and had a nasty burr left on it as well. It was so hard to turn I had to grip it with a fist. After replacing it, it easily turns with thumb and forefinger, and I want to re-iterate that PM replaced it immediately with no question. I just wish it was caught before it got to me.

This spindle issue is a bigger deal because it's so hard to confirm exactly what's wrong with it. It would be incredibly helpful if PM did the following:

1. Inspect/test these machines before shipping out and provide a report (for ex. max runout @ 4" from spindle face = .001, tested .0007, etc.)

2. Provide what the tolerance should even be. I'm just assuming that I shouldn't have 3 thou of axial runout 4-5" from the spindle when checked with a precision ground test bar. Maybe it should be that bad. . . Who knows. To be fair, they did send another spindle to try when I raised the issue, but my question of "what should good look like", has gone un-answered. If good is .003 TIR @4-5" from the spindle face, then define it. I sure hope max tolerance is more like .001 at 4-5" on an ultra-precision machine, but who knows. Again, the tolerance is not defined.

I think PM has a real opportunity to stand out even further from the competition and to differentiate their own product set by providing an inspection report with tolerance and actual test values before shipping out their Taiwanese made machines. Skip it on the Chinese imports.

Just my .02
 
Installed the new spindle into the quill and it tests worse then the first one, coinciding with the tests I did out of the quill in v-blocks:

6 tenths (.0006) @ 1" down from spindle nose
3.2 thou (.0032) @ 5" down from spindle nose
5.3 thou (.0053) @ 8.75" down from the spindle nose
 
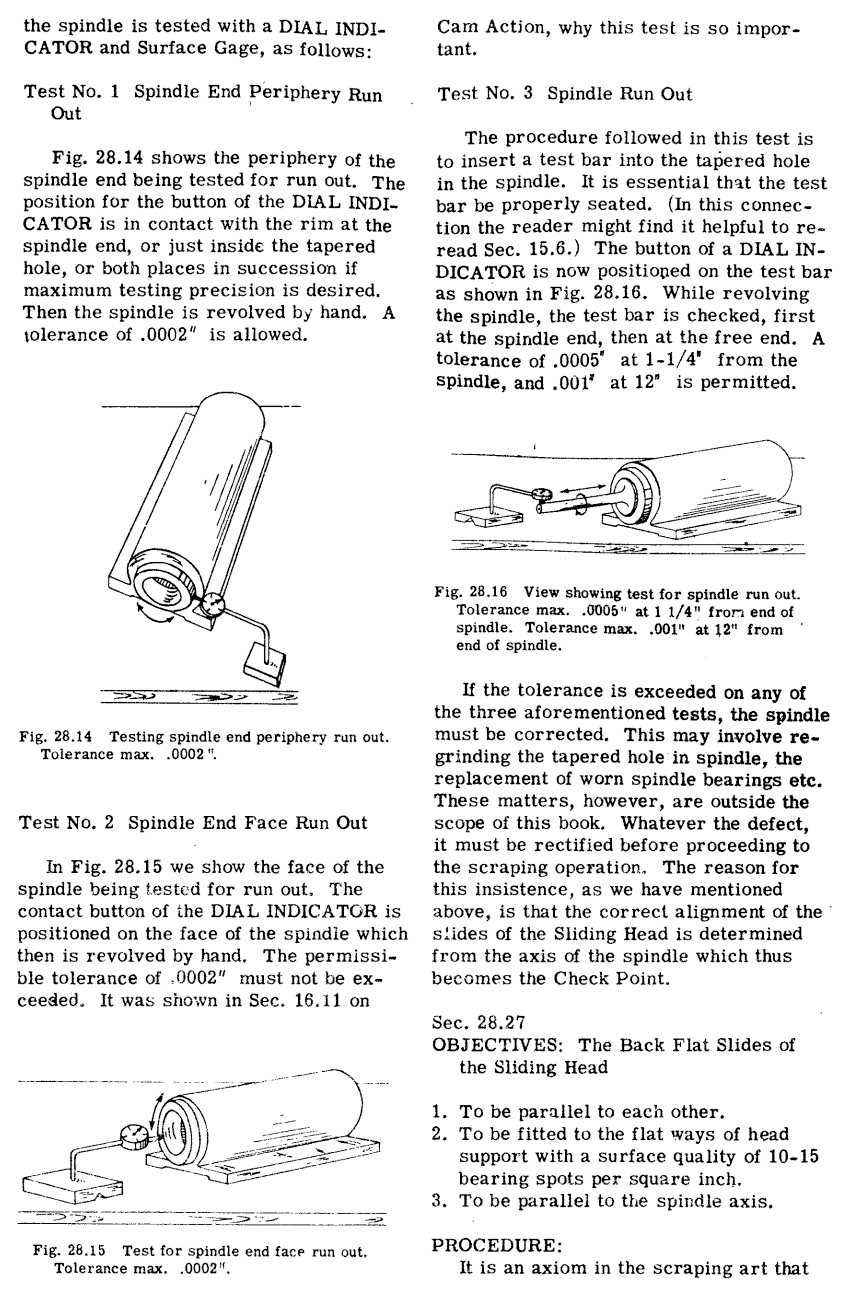
I happen to have my 1955 Connelly book Machine Tool Reconditioning on the work bench, Chapter 28 is for vertical milling machines, Test No. 3 Spindle run out pg 407, Fig 28.16
"...Tolerance max. 0.0005" at 1 1/4 from end of spindle. Tolerance max. 0.001" at 12" from end of spindle."
My guess is for that class of machine and time frame you would of seen a similar spec on new machines.

They have a whole section on using test bars, make sure everything is clean and check fit with marking compound.

Thanks for sharing that.

If I had those numbers I'd be very happy. I don't think I'd want to see more than the .0005 at 1 1/4, given the impact to tooling in that sort of sweet spot range where most of your cutters will be, but even double the 12" number (.002) at 12" would probably be fine. .

That book is probably anticipating a higher amt. of radial runout, likely due to 'std-quality' bearings being less precise on avg back then, but expecting much less axial runout then what I'm seeing in both of these spindles.
 
I happen to have my 1955 Connelly book Machine Tool Reconditioning on the work bench, Chapter 28 is for vertical milling machines, Test No. 3 Spindle run out pg 407, Fig 28.16
"...Tolerance max. 0.0005" at 1 1/4 from end of spindle. Tolerance max. 0.001" at 12" from end of spindle."
My guess is for that class of machine and time frame you would of seen a similar spec on new machines.

They have a whole section on using test bars, make sure everything is clean and check fit with marking compound.
Here's an excerpt showing that specific procedure. If not allowed, apologies in advance and I'll happily remove:


spindle_measurements.jpg
 
Back
Top