Squaring a Sherline 8-Direction Mill

neonachronism

Registered
Registered
Joined
Aug 26, 2020
Messages
12
Hi all,

I'm still very new to this, so while I tried to read everything I could, I'm sorry if I missed some pertinent information.

About a week and a half ago, I received the 8-Direction Upgrade for my 5400 (actually a Lathe Vertical Milling Column, 15" Column Upgrade [added later], and 12" XY base). It has a DRO hand wheel on each axis. I'm still using the lathe headstock/motor on the mill.

I think I've managed to square up everything, but the headstock's rotation is off.

My tools are:
A Mitutoyo DTI.
A Noga NF1022.
A Beall ER-32 collet chuck and a Techniks 5/16th collet, purchased new, for holding the Noga.
A Starrett No. 20 square, from ebay. I validated this while squaring up the mill; once the column was dead square, I moved the square to the other side, and it still read dead square.

Here's what I did:

I measured the flatness of the bed with a DTI. Left-to-right differed by about 0.5 thou over roughly 4 inches, front-to-back, about 7 thou over roughly 3 inches.
I squared the column around the z axis with a DI (I repeated this step several times over the course of the procedure, as tapping the column put it out of square).
I then squared the column over around the x and y axes by first holding the square against the side and tapping until light came through evenly through the gap. Then, I swept across the square with the DTI and tapped the column until the needle no longer moved. For the y axis, I also made sure it read square from the other side.

Finally, I checked the orientation of the headstock by reading the height of the left and right sides of the mill table. I usually used the DI here to avoid having to push the DTI needle across the "ledges" from the T slots and edge of table (this is also why I used it for squaring around the z axis, as described above). Initially, the left side reads 15 thou lower than the right, over 9 inches. If I put counter-clockwise pressure on the headstock while tightening it, the difference is lower, but still at least 5 thou.

Am I doing something wrong, or is there something wrong with my equipment?

I wonder if I damaged something while installing the 15" Column Upgrade - I'm still having trouble with the z axis hand wheel; given consistent hand wheel movement, occasionally the headstock will stop or slip. I've been working under the assumption I just have to get the gib and hand wheel backlash adjusted properly, and have been making attempts for several weeks. The orientation of the saddle does appear to change with the gib adjustment, but doesn't have a major effect on the headstock orientation.

Thanks in advance,
Elliot
 
Welcome to H-M Elliot,

I think, I understand what you are describing.... but some picts would be helpful.
 
Thanks for reading.

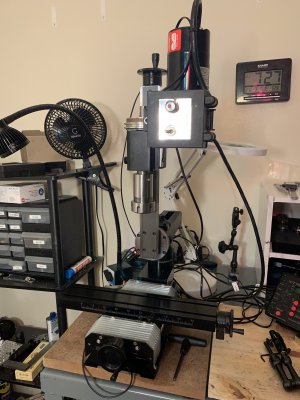
Here's the mill:
2020-11-03 19.27.43.jpg

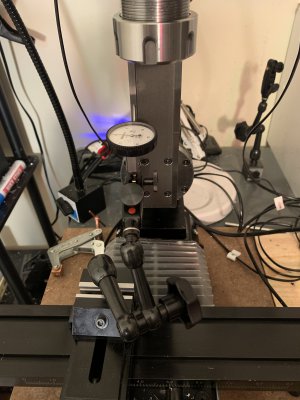
Squaring around the z axis (rotating around the column).

2020-11-03 19.36.26.jpg


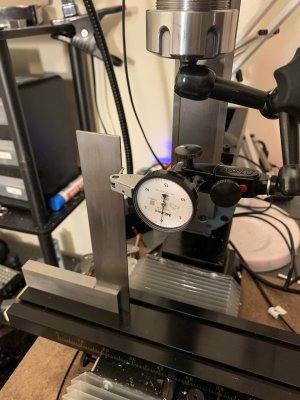
Squaring around the y axis (lean of the column left and right). Is this tram? I was never clear on whether tram only applied to the headstock or the entire column. I also did the mirror image of this, and got the same result.

2020-11-03 19.45.10.jpg

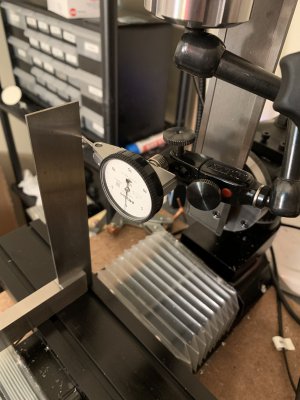
Squaring around the x axis (lean forwards and backwards)
2020-11-03 19.46.25.jpg

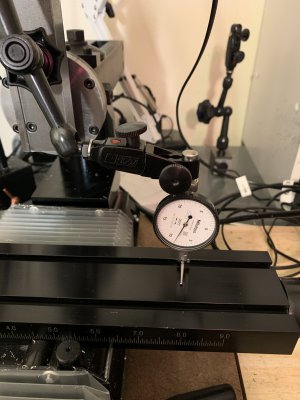
Checking the spindle against the bed. Here, I zeroed the indicator on the left side, and rotated the headstock so that the indicator reads the right side of the table; it's 8.5 thou high. This is with the headstock rotate counter-clockwise as far as allowed by the key. If I take out the key, I can get it to read 0, but they warn to only take light cuts while doing so.

2020-11-03 19.48.41.jpg

Are there any other pictures that would be helpful?
 
Welcome to HM, Elliot!

I've owned a 5400 mill for about 35 years so I'm familiar with it but have not used an 8-Direction mill so whatever I say has to be taken in that light. I will say that when Sherline came out with the Model 2000 mill, I thought it was cool as it sought to duplicate the movements of a real mill that would allow for a lot of versatility. My reservations about it at the time were that there was so much potential for movement and reduced rigidity that I never got past looking at the pictures. I admit that these reservations were all a figment of my imagination, though.

It seems to me that in pic 2, you are assessing the rotational position of the round base by comparing the readings between the two flat parts of the column/ways. Once you get them even, you're supposed to make a witness mark that aligns with the zero index mark on the round base.

In pic 3, you are not aligning around the Y-axis; you are aligning the vertical orientation of the column. As the head moves up and down the column, deviations to either side will show on the DTI. The goal is to get the column perfectly vertical. At that point, the index marks of the rotating joint just behind the bottom of the column should read zero if there is a witness mark there; if not, make one.

In pic 4, you are aligning the "nod". This is the vertical orientation of the column in the fore and aft direction. Again, there is an index on the side of the horizontal ram near the bolt should read zero when you have it dialed in to zero.

In the last pic, you are checking for tram. If all the other movements have been zeroed and are dead on then theoretically the column should show zero difference when you sweep the DI to the left or right of center along the X-axis. Similarly, there should be zero difference when reading the front and back of the table in the Y-direction.
EDIT: Tram is simply aligning the vertical or Z-axis with the X and Y-axes so that a cutter held in the headstock will cut accurately in both X and Y.

There is potential to get this mill dialed in very accurately because of all these adjustments. However, there is also great potential for something to move under load. I have Sherlines rotational column attachment that is identical in principle to what you're checking in pic 3 and I have had that thing move under heavy cuts; just a heads up.

Hope this helps.
 
Last edited:
Thanks for the corrections and insights, Mikey.

Other than my mangled terminology, I'm 99% sure I've done all you say.
Of course, I'm really new at this, so I don't have much confidence in my confidence :)

I was thinking I might go back to the regular base and seeing if I can can get it in to better shape. If nothing else, it should be less liable to rotate while adjusting the vertical orientation of the column.
 
If I owned that 8 direction attachment, I would use the short/stock length column on it. The 15" column is great on a 5400 mill but there is going to be a lot of leverage on the column with the 8 direction configuration; the shorter column would reduce that potential for movement. You are going to find that the Sherline mill is surprisingly capable but it has to be as rigid as you can make it. Much of the rigidity comes from adjusting the gibs properly; once that is done, this mill will cut as well as mills much larger.
 
Thanks for the heads up.

I tried the regular base again. I was able to square the column, but am still working on the nod (It seems like its going to be back and forth a lot with shims). So far, though, it's experiencing the same issue.

There is a caveat, though - with the regular base, I was using a spacer block. I thought I wouldn't need it for the 8-direction base, but with it, there's enough wiggle room with both keys to get it down to about 2 thou over 10 inches.

So for the moment, I'm thinking I'm going to put the 8-direction base away until I'm more experience, and for the time being finish setting up the regular base and not have to worry so much about rigidity and the various components slipping.
 
Very wise, I think. I suggest you get the gibs adjusted the way you want them, then tram the mill, then use it. In all the years of using this mill, I have only wanted more room in Z. I got that by adding the riser block under the column, riser block under the headstock and the 15" column itself. This gives me all the room I need for the projects that will fit on this little mill.

A Sherline mill set up as above will run a 3/8" coarse pitch roughing mill at a full diameter (3/8") depth of cut in aluminum in a slot cut. Not too bad for a little mill that you can pick up and put on a shelf. Just remember to rough in the conventional direction. You can finish in a climb cut at small depths of cut.
 
Any tips for adjusting the gibs? I haven't found much information about it, so I just tap it deeper until the hand wheel feels a little firm.
 
The Sherline gibs are made from an engineered plastic that is amazingly wear-resistant. My lathe and mill are over 35 years old and are still running on the original gibs. What is even more impressive is that there is no demonstrable wear on the sliding elements so there is no loss of accuracy. Not only that, they haven't required adjustment in well over a decade. I do NOT baby my machines so I am a big fan of Sherline's gibs.

I don't know how others adjust their gibs. What I do is to knock them loose and pull them out to make sure that they and the area they contact are completely clean. I lightly oil the contact surfaces with a light hydraulic oil. I have been using Norton's sharpening stone oil on my Sherline machines over the last decade or so. This is a highly refined white mineral oil that works well.

Once everything is clean and oiled, I insert the gibs and grab the element that is being adjusted. Say we're doing the headstock of the mill. Remove the motor and speed control so you're just messing with the base element that moves along the ways of the column. Push the gib into position while gently rocking the base with your hand. You will find a place where base moves freely but there is ZERO play as you try to rock it. That is the setting you're looking for. It is NOT about how the hand wheels feel when you rotate them; it is about the absence of play when the moving element moves over the dovetailed ways. Lock the L-shaped gib retainer down lightly; you do not need to gronk down on that set screw. Just snug will do it. All Sherline gibs can be adjusted this way and they will stay in place even under heavy loads.

My habit is to clean and lightly oil the column or lathe bed after every single use. With this regimen, your machine will run smoothly for years. Moreover, if the gibs are adjusted as above it will handle cuts that you wouldn't expect such a small machine to take, nor will it require tons of torque on a hand wheel to get things moving. Sherline machines run smoothly without a lot of effort if they are adjusted properly.
 
Back
Top