- Joined
- Oct 17, 2022
- Messages
- 8
I have been working on an old Powermatic 11 inch, which is honestly in pretty good shape, but I have been fighting a random striation showing up in my surface finish when trying to do the finish pass when turning. Changing Feeds and speeds have been ineffective in resolving the issue, and the truth is it is only a cosmetic blemish. My assumption was that it was rooted in the headstock bearings, largely because it happens with or without the tailstock being used, so that pretty well rules out the live center. I can not feel anything in the headstock, but we are talking about something in the order of probably less than a half a thou, so not really surprising.
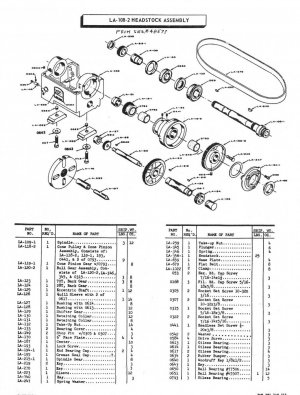
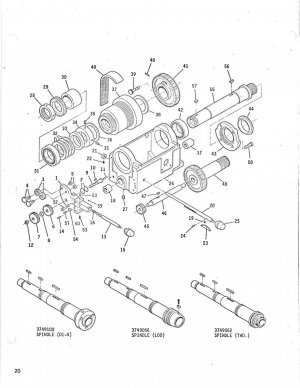
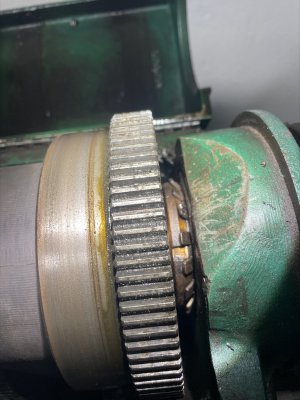
I have researched the procedures for adjusting the headstock bearings, but there is nothing in the manual, and nothing has turned up in online searches. I was going over the parts diagram to see what I was missing, and when I went back out to the lathe and opened the cover and looked, I discovered a major difference between the drawing and the actual headstock. I then consulted the parts diagram for a 200 model to confirm my suspicions, and came away with quite the revelation. The Powermatic manual is just plain wrong. If you compare the two drawings, the Model 200 shows a takeup nut immediately following the right spindle bearing, and the spindle is clearly threaded there. The Powermatic manual shows neither the takeup nut nor threads on the spindle. On the other hand, a closer examination of the actual headstock spindle shows that it is in fact present on the Powermatic lathe.
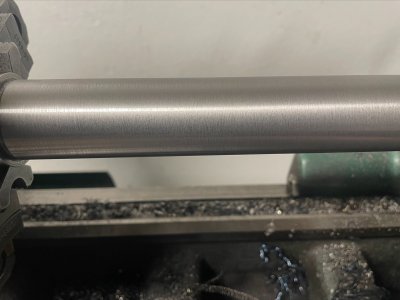
In any case, I figured it was worth a try to give it a little bit more preload, so I bent the tang and tightened it slightly, probably only turning it about 10 degrees or so. I chucked up a 12" piece of 1 1/2 stock I had laying around and ran a couple of passes, and inspected the surface. I could find no evidence of the previously mentioned striations. I ran at various feeds and speeds, from a very aggressive cut with a carbide insert, to a cleanup pass with a very sharp Carboloy BL6. I ran the cleanup pass at a depth of cut of .002 at about 450 RPM with a .0032 feed. It isn't a perfect finish, but smooth from end to end, with no evidence of the random striations, and would polish up very nicely if I was so inclined. Since there isn't any reference to the preload in either the written section on maintenance, nor in the parts diagram, I had to just wing it as far as adjustment, but it would seem that I got it right. Ran the spindle for about a half hour at med to high speed, and no extra heat on the bearing, so I am thinking I didn't over do it, but if anyone has an actual preload proceedure, I would appreciate it.
I have researched the procedures for adjusting the headstock bearings, but there is nothing in the manual, and nothing has turned up in online searches. I was going over the parts diagram to see what I was missing, and when I went back out to the lathe and opened the cover and looked, I discovered a major difference between the drawing and the actual headstock. I then consulted the parts diagram for a 200 model to confirm my suspicions, and came away with quite the revelation. The Powermatic manual is just plain wrong. If you compare the two drawings, the Model 200 shows a takeup nut immediately following the right spindle bearing, and the spindle is clearly threaded there. The Powermatic manual shows neither the takeup nut nor threads on the spindle. On the other hand, a closer examination of the actual headstock spindle shows that it is in fact present on the Powermatic lathe.
In any case, I figured it was worth a try to give it a little bit more preload, so I bent the tang and tightened it slightly, probably only turning it about 10 degrees or so. I chucked up a 12" piece of 1 1/2 stock I had laying around and ran a couple of passes, and inspected the surface. I could find no evidence of the previously mentioned striations. I ran at various feeds and speeds, from a very aggressive cut with a carbide insert, to a cleanup pass with a very sharp Carboloy BL6. I ran the cleanup pass at a depth of cut of .002 at about 450 RPM with a .0032 feed. It isn't a perfect finish, but smooth from end to end, with no evidence of the random striations, and would polish up very nicely if I was so inclined. Since there isn't any reference to the preload in either the written section on maintenance, nor in the parts diagram, I had to just wing it as far as adjustment, but it would seem that I got it right. Ran the spindle for about a half hour at med to high speed, and no extra heat on the bearing, so I am thinking I didn't over do it, but if anyone has an actual preload proceedure, I would appreciate it.