Tenths - and Microns ? (Straight Edge Stuff)

graham-xrf

H-M Supporter - Gold Member
H-M Supporter Gold Member
Joined
May 27, 2016
Messages
3,469
For me, and maybe most of us, getting things to better than about 25 microns (0.001") is all we need. Pushing the limit of my skill, then 10 or 12 microns (about 5 tenths) can be done. I do have a tenths dial gauge, but a 5-tenths type, commonly 0.01 mm is much more convenient.
I don't know how good is my freebie granite surface. I just have have to trust. Similarly with the only straight edge I have, which is longer and wider than I need. You have to bring stuff to it. It sits on its Bessel support points, and is a bit corroded at one end for the first 50mm or so, but I can see the scrape marks, so again I trust.

Now I find Gena Bazarko, Ukrainian I think, who has a method to find out the surface plate profile, AND the straight edge profile, even if both are not very flat /straight. The thing is, he gets it to microns, or even sub micron accuracy. OK - he uses a mikrokator, (also called Abramson's movement), with insane capability of 1 micron per division. Forty millionths is nothing like what I need, but it is the method that is interesting. Basically sweep the plate under the straight edge, then from underneath, the straight edge itself, placed upside down on blocks, then turned over and done again, from the top - plus some spreadsheet math. The method likely takes some patience and dedication to metrology. It looks like it is a bit of an effort!

This trick should work, even with "regular" dial gauges instead of mikrokators, if you don't need 1 micron accuracy.
 
Last edited:
OK, you have my curiosity. What in this world are you doing that you need to measure things in microns?
 
Haven't watched the video, but sounds similar to Robin Renzitti's repeat-o-meter and similar work. He is another good youtube machinist who pursues the limits of machining. I find it interesting to see it done, but can also tell that it takes time and dedication that I would have trouble putting in to it at that level. I'm admittedly a hack even at the hobby level, I can hit .001" with effort, and measure to tenths of an inch with care. I'm happy if I can get good bearing fits and interference fits to work. Time and learning are slowly improving my skills. But I think without having at least put in the effort to achieve hobbyist level accuracy, it would be challenging to appreciate these people's skills.
 
OK, you have my curiosity. What in this world are you doing that you need to measure things in microns?
My whole point was that Geno's method is good, even if we just scale it back a bit, into our comfort zone, and use a regular 0.0005" or even 0.001"indicator.Typically, even an average granite, or iron, surface should be better than some tenths, even if the stuff you place on it is only needing to measure to (say) 0.001".

If you plan to make, or check, a straight edge good enough to try on (say) lathe ways, or a mill slide, it needs to be somewhat better than 0.001" along its length. Two to four tenths is common, which gets closer to Geno's plate accuracy.

Geno, and Robin Renzetti, and a few others have their own reasons for owning micron resolution kit. I don't need stuff like that, but I would like to discover if the granite and straight edge I do have are good enough to get up stuff to check my machine surfaces. I would hope for a bit better than 25 microns (about 0.001".
 
Last edited:
Haven't watched the video, but sounds similar to Robin Renzitti's repeat-o-meter and similar work. He is another good youtube machinist who pursues the limits of machining. I find it interesting to see it done, but can also tell that it takes time and dedication that I would have trouble putting in to it at that level. I'm admittedly a hack even at the hobby level, I can hit .001" with effort, and measure to tenths of an inch with care. I'm happy if I can get good bearing fits and interference fits to work. Time and learning are slowly improving my skills. But I think without having at least put in the effort to achieve hobbyist level accuracy, it would be challenging to appreciate these people's skills.
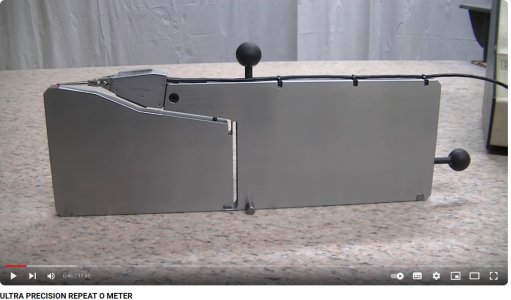
It is not actually the same as repeat-o-meter principle. The gadget he slides about is the equivalent of one using a dial indicator mounted on a stand, except he has a much more accurate dial. Repeat-o-meter, known from the 1950's, does exactly the same thing, but make a better job of sampling a small local area average, going after the undulations. To get at overall flatness, there is an auto-collimator as a more convenient way than using a high precision level stepping.

Renzetti made his versions of both. His indicator was electronic, at one millionth per division. He called it his "quick and dirty", apparently relatively easy to make, and one can use a DTI instead of B&S LVDT device. Even his "quick-n-drty" is out of my league!

Renzitti Repeat-o-Meter.png
 
Geno, and Robin Renzetti, and a few others have their own reasons for owning micron resolution kit. I don't need stuff like that, but I would like to discover if the granite and straight edge I do have are good enough to get up stuff to check my machine surfaces. I would hope for a bit better than 25 microns (about 0.001".
I have thought a bit about going down that rabbit hole for the same reasons as you, including some large straight edges and even larger surface plates. Currently have a fairly large lathe cross slide apart, and did some touch-up work on the compound ways for example. Looked at auto-collimators on ebay, for example. But I am also in a fairly industrial area, plenty of machine shops around, so I would think I could find someone that does surface plate calibration work. Realistically for me it would be a better plan to pay someone to do the calibration. A Biax scraper is on my long-term wish list too, I can't hand scrape long enough to really do a complete job.
 
I have thought a bit about going down that rabbit hole for the same reasons as you, including some large straight edges and even larger surface plates. Currently have a fairly large lathe cross slide apart, and did some touch-up work on the compound ways for example. Looked at auto-collimators on ebay, for example. But I am also in a fairly industrial area, plenty of machine shops around, so I would think I could find someone that does surface plate calibration work. Realistically for me it would be a better plan to pay someone to do the calibration. A Biax scraper is on my long-term wish list too, I can't hand scrape long enough to really do a complete job.
Biax is crushing expensive, and you don't really need one. You can use an angle grinder with a flap wheel, used in a particularly gentle manner, to reduce the really high areas, heading to a closer flat. At the stage you abandon chalk for blue spotting, a Dremel-style die grinder with those rubber abrasive cones and wheels is great at doing what the scraper folk do, but much, much faster. Finally, if you want the surface to get to 20+/in^2, go for the classic hand scrape pass, perhaps with the oil retaining pattern finishes like Robin R does. My initial scraping effort was successful on one of those Chinese settable angle plates, the very same as the one Stefan "upgraded". I used the die grinder. I won't be hankering after a Biax.

There is a YT content guy, Alex, who shows us how you can use cheaper steel plate, and a special way of sharpening the carbide angles on the scraper, and to have it cut on the steel, to make a very functional straight edge. One still needs some kind of reference to get it there, but looking through Gena Bazarko's videos, he used three bits of construction girder, and he got there faster using sandpaper. Then he went bonkers, and chose to lap them together instead of scraping. The variant of the original Whitworth 3-plate method, but Geno's straight edges are uncompromising, because there seems no limit to how far he will go.

In the end, there are only two surfaces that will slide over each other without binding. That would be a plane, or part of a sphere. With abrasive between them, alternating to not let the top one go concave (like in telescope mirror grinding), you get close. Add a temporary third surface , and it forcibly gets you there. I don't have the patience, obsession, nor the fit enough body to do all that scraping (or lapping). I take the power tool speed-up route.

 
Back
Top