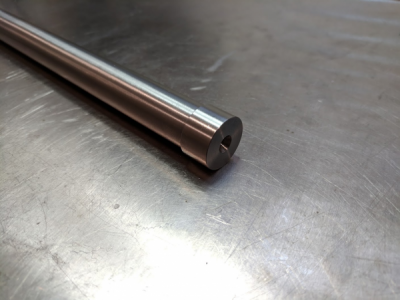
Test bar

FTR, he didn't machine the morse tapers. Only the Jacobs tapered ends he turns down to a matching straight diameter. So it gives the user practice turning down to certain diameter on more than one piece. To make things easier ensure the arbors are not hardened at the Jacobs ends, like this.
 
Return it..... wait until the bar you wanted is in stock. I have the “edge” bar; it’s great. I bought it (even though lot’s of guys suggested/explained making one was cheaper and easy) because I knew it would be accurate. So much can be made in the shop, but setup equipment I generally leave to experts with certified checking and tolerance. Buy cheap, buy twice. My guess is that you have waited some time trying to decide if you should buy the “edge” bar...... so what’s a few weeks longer?

Good luck.


Sent from my iPhone using Tapatalk
 
OK, here is the way to make an accurate test bar for testing between centers. An accurate tail stock is not needed. In fact, this is how you get your tail stock properly aligned:

Thanks Bob for the detailed explanation. Out of curiosity, is there a reason for making the plugs at the end of a tube? Is there a reason that this would be preferable over turning down the centre of some solid bar to leave a shoulder at each end?

Only reason I ask is that I tend to buy full lengths of 1.5" bar (the biggest my spindle bore will accept) so I have plenty of the stuff on hand. As an added bonus it's about half the price per meter if I order a full 5 m length from a local supplier! My tailstock is out and I have some longer pieces I need to turn down shortly so I'll definitely be doing this one way or another shortly!
Heavy makes things sag. The rod can sag, and so can the centers mounted in the rod. Lighter, to a point, disturbs the machine less. Too flimsy, and you have a different problem. Still, you could use a 1.5" rod as it is, turn all the rod except for the ends down .060" or so to produce the collars, and then do a good job of making 2 accurate collars, identical in diameter, concentric with the centers, and cylindrical, not tapered.

Edit: If you make one from the 1.5" solid rod, please try this test afterwards. Put an indicator on the top of the tail stock center near the test bar and zero it with the rod mounted and the tail stock and the quill locked. Then read it again with the rod removed, being careful not to disturb the indicator setup while removing it, and check for any change in height from the weight of the rod. I have no idea what the results might be, and it will be influenced by the sturdiness of the tail stock. The spindle end might be able to be tested as well. "A good test is worth a million hobby machinist opinions."
 
Last edited:
Hey Bob! I am in the process of making a new test bar by the method you described. I have made the bar with the plugs inserted. I have drilled the centers. I am uncertain about this:
"Clean and lubricate the test bar centers with oil and mount the test bar between centers, snug, but so it can still be rotated against the centers with little effort. Lock the tail stock spindle. Now, get a good, sharp!, turning tool and take a light but real cut on the plug O.D. at the tail stock end, doing a really nice job of it. "
Do you really mean to not use a drive dog for this operation? I am not sure the bar will drive properly with just a friction fit? I think a drive dog would be necessary. Alternatively, I may try it with one end in the 3 jaw and the other on a center. The error from the 3 jaw will be much reduced by the bar length and I feel like this would give an acceptable result with no taper on the collar.
In fact, you could calculate the taper. Assume a .003" TIR for my Bison chuck. My bar is 10" long and the collar is 1/2". If I measure in the middle of the collar (1/4") from the end, then .003 / 40 = .000075" TIR for the collar. I can't measure that.
Robert
 
Last edited:
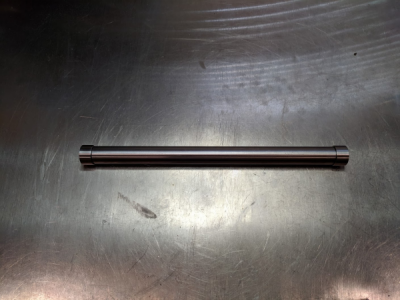
Completed test bar:


294100

294101

10" long with collars that are about .850"

I did not follow your instructions exactly Bob. First I drilled the plug centers before I pressed them in since my lathe has a very small spindle bore. Then, I used a 3 jaw to hold one end while the other was on a center when I made my finishing cuts. Seemed to work fine. It probably helps that my tailstock is already pretty close.
As far as I can measure, the collars are within a couple of tenths in diameter. When I reverse the bar I get no appreciable change on the dial.
I used 1144 steel because I had some in a convenient diameter. It would have been nice to use tool steel and grind the collars after hardening. Probably unnecessary.

Robert
 
That turned out really nice, Robert! We all need to do the most we can with the machines, tooling, and other resources we have, including our brains, to find ways forward when we appear to be at a dead end. You have done just that, and have found success. There is always more than one way to make a tool or part...

Your test bar is certainly prettier than mine! (Took some photos with my phone, but don't know how to get them to my desktop yet, going there now...)
 
Thanks Bob. I think drilling the centers first is OK as long as you don't damage them in pressing them in. I put some brass over the centers during this operation.
OK- Lets see your test bars out there!
Robert
 
Back
Top