Well, this weekend's machine festivities were as boring as the move, thankfully. It was quite easy to get it down off of the pallets and onto the floor. This is how it went:
First, I flipped the head back upside down for stability.
Next, I removed the bolts that I used to secure the two pallets together. An air impact wrench made quick work of that.
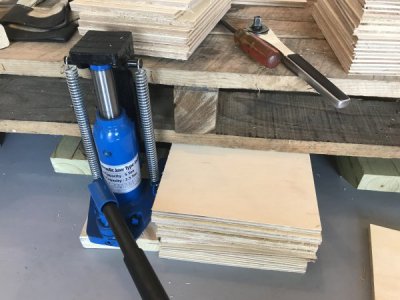
I made a couple of stacks of my plywood, just enough to fit under the factory pallet, and placed them under the middle runners. I used the toe jack to lift the front of the factory pallet enough to slide one more piece under each of the runners and set the machine back down on the stacks. I should note that I never trust hydraulic jacks. I never lifted the machine more than the height needed to add or remove one of the plywood squares. Even if the jack had failed suddenly, the machine would only have dropped a half an inch...not enough to topple it, although probably enough to let the big artillary out, so to speak.
Next, I did the back side.
Once the factory pallet was on the stacks, it was no longer sitting on the custom pallet.
I planned to slide the custom pallet to one side, but I was not about to stick one of my booger hooks under there, so I used an improvised hook to pull the pallet out far enough to expose the screws that I had assembled it with.
A few minutes with the drill, and I was able to remove the right runner. A note to anyone that my try to emulate this setup..do not put a screw in the inner section of the runner. I had to do a little finagling to get it out far enough to reach this other screw.
Anyway, once it was out, I pushed the inner pallet over with a 2x4 and unscrewed the other side, and removed the left runner. At this point, the machine is sitting only on the inner runners of the factory pallet. There is no safety to keep the machine from tipping over if too much pressure is put on the outer edges of the pallet. It was solid and stable, and in reality I bet you would be hard pressed to actually tip it, but I would not recommend putting anything heavy on or standing on the remaining pallet...and keep hands and feet out from underneath it, too.
The custom pallet's center runner and 2x4 crossbeams still remained, so I drilled a couple of holes with the hole saw so I could access the screws that joined them.
I unscrewed the screws of a cross beam, removed the crossbeam, and slid the rest of the assembly forward, exposing the next set of screws. This was repeated until all crossbeams and center runner were removed.
To lower the machine, I simply jacked up the front, removed a board, set it back down, and then did the same to the back.
The machine and factory pallet were on safely on the floor shortly. I was able to remove the last 2 boards in each stack by placing the toe jack under the side of the pallet, next to the lower cross beam, and letting it all the way down to the floor. This will not be an option when dealing with the actual machine, but we will let future Morgan deal with that.

To get the machine off of the factory pallet required the partial destruction of the pallet. This involved cutting some of the upper cross beams and all 4 runners in strategic spots. I forgot to take pictures of this part, but I hope this MS Paint notes will make it clear what I did. It is very important to note that after the runners are severed, the machine would effectively be sitting, unbalanced, on the factory pallet's lower center cross beam. Not a desirable condition. I put a couple of 1 x 6 boards that were long enough to support both runners under the portion of the factory pallet that would remain intact. One in the front and one in the back. I placed them just inside of where I planned to cut the runners.

First, in order to get a reciprocating saw blade of sufficient length far enough under the machine to sever the inner runners, I had to raise the machine up by 3 boards. The toe jack was too tall to fit under the machine, so to get the first boards under, I used that Gearwrench pry bar. It worked very well. I put a piece of cardboard (not shown) between it and the machine to keep from gimping up the paint. Once the first board was under each corner I could use the toe jack again.
When all 4 corners were up on the 3 boards, I commenced to cutting (the holes are so I can get the saw blade in to start).
I only cut the boards at the front of the machine, leaving the back intact for now. After the cuts were made on both sides, I slid the severed part of the pallet out of the way and placed my stacks of plywood under the front corners of the machine base. I then jacked the machine back up, removed the boards on the sides and set the machine back down on the newly placed stacks. I used a bit of cardboard between the jack and the machine, like I did with the prybar, to protect the paint. After the front of the machine was sitting on the stacks, I repeated the above operation with the back of the pallet. I cut out enough of the pallet to be able to support the machine with my stacks, but left enough so that the machine would be supported by the center portion of the pallet while I removed the rear part of the pallet.
When the machine was sitting on stacks on all 4 corners, no longer touching the pallet, I carefully and gently slid the center section out. All that sawdust was slippery on the floor, so a quick cleanup was in order before then next part.
The remainder of the operation consisted of repeating the jack up, remove board, set down, go to other side and repeat. I did it front-back instead of side to side, since it was more stable that way. Also, on the first lift, the stacks were slit further inward so that each of the machine's "feet" were fully supported. When I would let it down, I would just crack the valve on the jack a little until it started creeping downward, and then stepped out of the way and waited for a minute.
Before long it was sitting on the last board. I broke out the prybar again and lifted it enough to get the last boards out. I had a buddy pull the boards, as I was busy holding the machine up. That big pry bar made it very easy to lift. I did not have to strain at all.
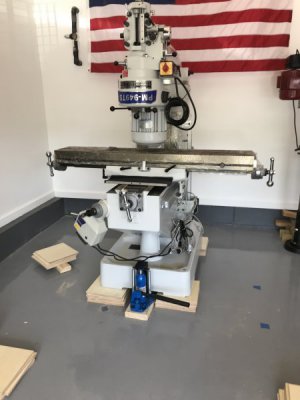
Before this operation started, I squared the machine up the way I wanted it and tested the full travel of the table and ram to make sure it had clearance. Once on the floor, it had shifted position only slightly. We were able to square it back up by lifting a little with the pry bar and pushing it the 1/4" needed.
There it sits. It was pretty easy and at no time was the thing in an unstable condition. We were very careful, as we were during the move. The hardwood plywood was important, I think, because I was able to smash regular plywood in my vice much more easily then this birch. The plywood did not even get any impressions in it. It was worth the 15 extra bucks for the nice stuff.
If anyone tries this method, please know that you do so at your own risk. It worked for me because I am very careful and thoughtful about every operation and spent at least 3 times the amount of time it took to do it thinking about what could possibly go wrong. I think this is a good method for lowering a machine if you dont have a proper crane or forklift. Your milage (and conditions) may vary.
I hope that someone will find this thread helpful. I hope that is not too many pictures...someone told me yall like pictures.