-
Welcome back Guest! Did you know you can mentor other members here at H-M? If not, please check out our Relaunch of Hobby Machinist Mentoring Program!
You are using an out of date browser. It may not display this or other websites correctly.
You should upgrade or use an alternative browser.
You should upgrade or use an alternative browser.
Tricks of the Trade
- Thread starter tjb
- Start date
- Joined
- May 3, 2017
- Messages
- 1,997
You guys are doing great! It seems to me these are the kinds of things it takes hands-on experience to learn. Exactly the kind of things we neophytes need to hear.
Thanks, and keep 'em coming.
Regards
Thanks, and keep 'em coming.
Regards
- Joined
- Feb 17, 2013
- Messages
- 4,407
Tom Lipton has authored two books of tips & tricks - Metalworking, Sink or Swim (305 pages) and Metalworking, Doing it Better (344 pages). I have both. As far as I can tell, Doing it Better seems to include all the content of Sink or Swim, with some new stuff added. Not to say they aren't both good books. But if you have neither, I'd suggest just buying Doing it Better.
- Joined
- Oct 16, 2019
- Messages
- 6,595
Tom Lipton has authored two books of tips & tricks - Metalworking, Sink or Swim (305 pages) and Metalworking, Doing it Better (344 pages). I have both. As far as I can tell, Doing it Better seems to include all the content of Sink or Swim, with some new stuff added. Not to say they aren't both good books. But if you have neither, I'd suggest just buying Doing it Better.
I have the latter and I agree that it’s excellent content.
- Joined
- Aug 1, 2019
- Messages
- 340
Dealing with backlash when using a manual mill can be problematic for some, especially for beginners. Here is a tip on how to deal with backlash that really isn't very difficult but does require some planning, discipline, and consistency from the machinist.
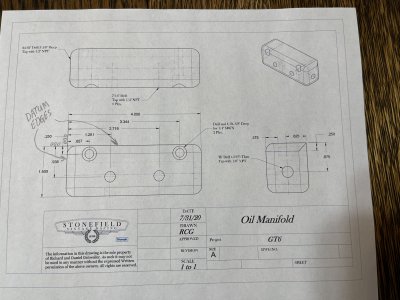
Let's cover planning first. I almost always set up my drawings and jobs with my datums ( or zero, zero edges ) on the upper edge and the left hand edge of my work piece, as in the drawing below. All of my movements will then be in the X+ and Y- directions. There are parts that need to be handled differently, a round part with a bolt circle for example, but once you establish your zero point, the technique works the same.
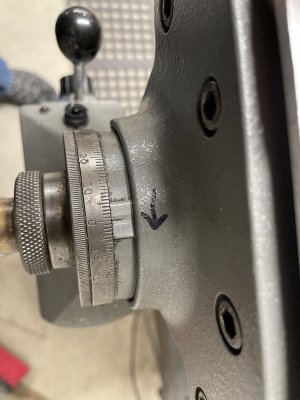
The discipline and consistency comes into play when you pick up your edges or center point and make your moves. Using an edge finder, ( I run mine at about 600 RPM ) pick up the datum edges of your work piece being sure that you move into position by tuning your cranks clockwise. Then carefully zero out your dials. With a round part, use an indicator to find center and again be sure that you move into position by turning your cranks clockwise. Now the backlash will always be removed when the numbers are climbing, you don't have to worry about remembering which way you set it up.
Always, and this is important, be sure that when you make your moves, you move into position turning the cranks clockwise so that the numbers on the dial are climbing. Even if you have to move an axis backwards to get to a position, as you would drilling a bolt circle in a round part, over shoot that position and come back to position turning the crank clockwise. Always move to a position turning your cranks clockwise, Consistency!
Even though I have a readout on my mill, I always set my dials this way and approach positions in this manner. An added benefit is that if your power goes out, you don't have to pick up your edges again. You simply crank back to your zero zero position and reset your readout!
When I started my apprenticeship, everything in the shop was manual, so you learned to be consistent when dealing with backlash. When we got our first readouts, (some of the very first in our area) no one trusted them and always used this technique as a double check of the readout. We were surprised to find that the readouts were showing more movement than the dials did. This was especially prevalent on our older machines. We determined that this was due to worn lead screws. When the nut moves from the thin worn thread section of the screw to a less worn area the screw thread, the thread acted like a ramp and pushed the table more than the dial showed! We started trusting the readouts a little more after that.
I hope that some will find this a useful and not confusing way to handle backlash.
Richard


- Joined
- Jan 20, 2018
- Messages
- 5,664
This is something I have always done myself and stressed to others. Draw the part so the dimensions run the same way the part will be made. On flat work, that's with 0,0 at the top left corner. Only dimension between features when that dimension is critical. On round parts, draw with the small end (and 0) to the right, just like it will look in the lathe. There will always be exceptions where this can't be done, but it should be done whenever possible. Provide as much necessary info as possible on the drawing. Don't make the machinist reach for a calculator, he'll probably get it wrongLet's cover planning first. I almost always set up my drawings and jobs with my datums ( or zero, zero edges ) on the upper edge and the left hand edge of my work piece, as in the drawing below. All of my movements will then be in the X+ and Y- directions.
View attachment 356149
edit: Richard, your titleblock needs default tolerances.
Last edited:
- Joined
- Aug 1, 2019
- Messages
- 340
You are absolutely correct about the title block! The only reason that I don't have one, and not really a good reason, is that at this stage of the game I only make drawings for parts that either my son or I are going to make and we both understand the needs of the part. Anything that is critical, I will specify a size range. Back in the days when we had our manufacturing business, our drawings always had default tolerances.This is something I have always done myself and stressed to others. Draw the part so the dimensions run the same way the part will be made. On flat work, that's with 0,0 at the top left corner. Only dimension between features when that dimension is critical. On round parts, draw with the small end (and 0) to the right, just like it will look in the lathe. There will always be exceptions where this can't be done, but it should be done whenever possible. Provide as much necessary info as possible on the drawing. Don't make the machinist reach for a calculator, he'll probably get it wrong
edit: Richard, your titleblock needs default tolerances.
Thanks for the observation,
Richard
This was my initial thought when I saw the beginning of this thread. The Metalworking-Doing-Better Book is excellent, full of ideas and techniques.Tom Lipton has authored two books of tips & tricks - Metalworking, Sink or Swim (305 pages) and Metalworking, Doing it Better (344 pages). I have both. As far as I can tell, Doing it Better seems to include all the content of Sink or Swim, with some new stuff added. Not to say they aren't both good books. But if you have neither, I'd suggest just buying Doing it Better.
Ariel

