- Joined
- Mar 24, 2016
- Messages
- 41
I could be messing it all up lol. From reading online it seems like the way to center everything up. Never really done it before so it seemed logical and was a fun project.

Makes perfect sense now Ted. If I use the dial indicator after the cut it will read zero cause it’s following the same path as the cut. I was using the mic to measure the size of each end then DTI to gauge my adjustments of headstock or tail stock.One thing to keep in mind is after taking a cut on both shoulders you'll need to check for taper by measuring both shoulders with a mic. Don't use the test indictor for this. Using a dial test indicator will only tell you if the piece is springing (deflecting) away from the cutter while you are taking the cut. If there is no spring in your test piece during the cut, the test indicator will always read 0 between the two shoulders because the carriage will be tracking in the same path as it did during the cut.
After turning a test bar with two shoulders with the same diameter (as miced), then you can use that test bar again to check alignment using a test indicator. Knowing that both shoulders measure exactly the same, the indicator will show if your lathe is properly aligned or not. So, you can use an indicator if you have a test bar with two identical diameter shoulders to check alignment, but not to measure the two shoulders after taking a cut.
Hope I'm explaining this well enough and it makes sense.
Ted
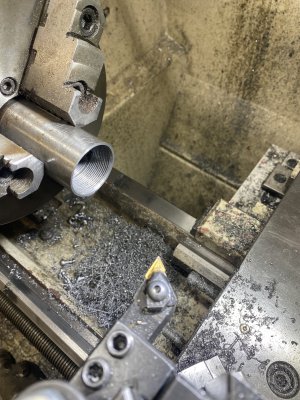
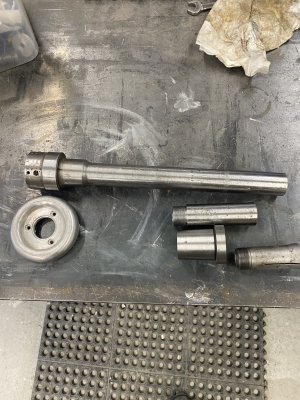
Morning Mikey, I had two goals I was trying to to do. First one was true the headstock due to cutting tapers. For that part I chucked up some one inch mild steel in the three jaw only, no tail stock. I made the tests bar which showed to .007 bigger on the tail stock side. Took measurements both with DTI and micrometers then would recut after each adjustment. Once that was completed I wanted to zero my tail stock so I cut a taper in the three jaw and used the bar I made from truing up the headstock to mount between centers to check. Found out the Jack screws were loose on the tail stock during this lol. For both tests I would cut .002 of each end of the test bar. On my lathe that is one mark one the wheel.
For the best accuracy on adjusting tailstock you need to do this:Morning Mikey, I had two goals I was trying to to do. First one was true the headstock due to cutting tapers. For that part I chucked up some one inch mild steel in the three jaw only, no tail stock. I made the tests bar which showed to .007 bigger on the tail stock side. Took measurements both with DTI and micrometers then would recut after each adjustment. Once that was completed I wanted to zero my tail stock so I cut a taper in the three jaw and used the bar I made from truing up the headstock to mount between centers to check. Found out the Jack screws were loose on the tail stock during this lol. For both tests I would cut .002 of each end of the test bar. On my lathe that is one mark one the wheel.
Morning Mikey, I had two goals I was trying to to do. First one was true the headstock due to cutting tapers. For that part I chucked up some one inch mild steel in the three jaw only, no tail stock. I made the tests bar which showed to .007 bigger on the tail stock side. Took measurements both with DTI and micrometers then would recut after each adjustment. Once that was completed I wanted to zero my tail stock so I cut a taper in the three jaw and used the bar I made from truing up the headstock to mount between centers to check. Found out the Jack screws were loose on the tail stock during this lol. For both tests I would cut .002 of each end of the test bar. On my lathe that is one mark one the wheel.
Thanks for the video I been watching his videos all day now lol. The guy is really amazing teacher, explains and shows stuff really well. Would have never thought to do it like that with an old log lol.For the best accuracy on adjusting tailstock you need to do this:. A little tedious but accurate.
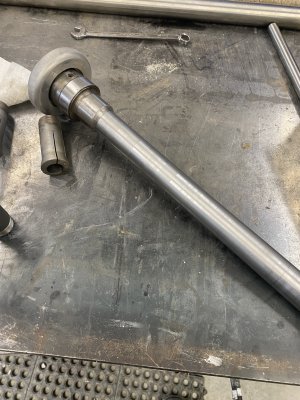
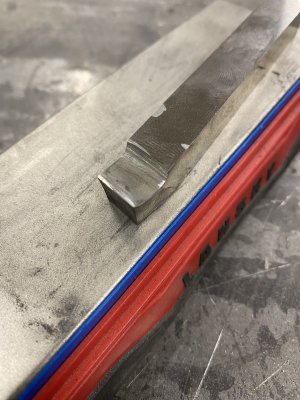
I need to play around and learn to grind some HSS. I have played a little but get to impatient lol. I will get some made up then try this all again. Never even crossed my mind about the carbide insert not working, so much to think about machining lol, love the challenge. I will say after what I did do I’m not seeing the taper I was. Before I was struggling to make threads work because the taper was so bad. So I did another little project today. Basically I had an old collet draw bar from a south bend lathe. I modified it to work in this lathe by adding an extension. Once I was done I took a fine cut all the way down it with very little tapper. The bar is 16” long and at the tail stock end I measured 1.3515 and headstock side 1.3520. However my finish was less had some changes down it. It feels smooth to the touch but visually could be better I think. Might be the carbide? My cut the depth was .006Okay, thanks. The main reason I asked was that you are using an inserted carbide tool to take 0.002" deep cuts and unless the nose radius of your insert is 0.004", radial cutting forces are causing deflection that will make accurate cuts very, very difficult to achieve. The result is that you cannot tell if any discrepancy you are seeing is due to actual misalignment or deflection. When we are working in the very low thousandths to ten thousandths range, radial forces can make a big difference in the results.
If I were you, I would do several things:
- Use a well ground and sharp HSS tool for your test cuts. If you are unable to grind one, sing out and I'll hook you up with someone who can. A tool like this can take a very small cut with minimal deflection and will give you the most accurate result possible.
- If you wish to align the headstock, turn a 1-1.5" OD work piece with about 3-4" sticking out of the 3 jaw and take a skim cut to remove the skin, then 0.003" to true it up, then 0.001-0.002" and go for a good finish. Mic the end, the middle and up near the chuck. If there is a difference, move the headstock and repeat your cuts until there is no difference.
- I suggest you align the headstock first, then level the lathe, then align the tailstock ... in that order.
- To level the lathe, use a level and fine tune it with a 2-collar test.
- To align the tailstock, mount a 10-12" long 1.5 - 2" OD bar between centers and turn a short section of the chuck end of the bar down about 3/4" long as in bullet 2. Mount a DI on the cross slide and zero it on that turned section, then flip the work piece and put that turned section on the tailstock dead center. Without touching the cross slide feed wheel or the DI (you do need to lift the needle of the DI as you traverse to the other end), move the DI down and read that turned section. If it reads zero then the tailstock is aligned. If it does not, adjust the tailstock until it does.
I need to play around and learn to grind some HSS. I have played a little but get to impatient lol. I will get some made up then try this all again. Never even crossed my mind about the carbide insert not working, so much to think about machining lol, love the challenge. I will say after what I did do I’m not seeing the taper I was. Before I was struggling to make threads work because the taper was so bad. So I did another little project today. Basically I had an old collet draw bar from a south bend lathe. I modified it to work in this lathe by adding an extension. Once I was done I took a fine cut all the way down it with very little tapper. The bar is 16” long and at the tail stock end I measured 1.3515 and headstock side 1.3520. However my finish was less had some changes down it. It feels smooth to the touch but visually could be better I think. Might be the carbide? My cut the depth was .006
Ok here goes first try, going to see how it cuts MikeyThe question you need to answer is: how much did that insert cut off when I dialed in a 0.006" depth of cut.
If the bar is hardened or semi-hardened and your depth of cut is less than 1/2 the nose radius of the insert then I contend that you didn't cut off much at all. You have to understand that you need to take a depth of cut deep enough for the insert to actually cut consistently; that depth is 1/2 the nose radius at minimum. Moreover, radial forces will rise (so deflection will get worse) until your depth of cut gets to about 0.010 or more larger than the nose radius. If you really want to know if the insert is cutting, dial in your nose radius + 0.010" and make a pass. Then the insert will cut and then you'll know if what you're doing is making a difference.
If you need to take small cuts, and you do when leveling and aligning, then switch to HSS that will deflect far less if the tool is properly ground and sharp. A good tool will take a 0.001" deep cut without deflecting much at all if you know what you're doing.