Turning threads off rod fine but now rod advances out of chuck.

. . . I decided to turn the hex edges off about 2/3rds of the coupling to leave a shoulder to grab the front of the jaws and stop any slip back. Nice I thought just as Murphy came in and sat down.

Take my first cut on the new improved method and the stud turns in the coupling and advances into the tool bit! Goodbye carbide tool bit. So I put a 5/16 nut on the back of the "hex" thinking that would lock it . Nope, bye bye 2nd carbide tool bit.

So I said F it and ordered a brass coupling nut and a couple new tool bits from McMaster. Two questions

1. why did the thread unspool after I turned the hex off the back half? can't figure that out.
2. On the coupling coming tomorrow -better to put two hex nuts behind it. or once again bisect the coupling ?

Regardless of the job I’ve had during my working career I was first and foremost a troubleshooter. When a problem develops my first question was usually, “What has changed?” After reading all 8 pages I don’t see that your first change, after which the problem developed, was ever addressed. When you turned down the OD and made the shoulder, the shoulder no longer had pressure on it from the chuck jaws. It became resistance to the remaining pressure exert by the jaws. That combined with the reduced area upon which the jaws pressed means that the grip on the workpiece is reduced. Maybe make a new threaded collet with a round part that contacts the full length of the jaws and a smaller shoulder, maybe only 1/4“-3/8” long. One slit plus two deep reliefs should give great grip. ER collets do well for this kind of work, too.

The smartest engineer you know needs to consult his textbooks. The information above regarding thread depth is much better than “3 turns.”
 
And is not true.

Rule of thumb is 1.5X the diameter of the bolt for steel and 2X for aluminum.

If you're only chucking three threads on soft crap material like off the shelf threaded rod you're likely to deform it.

3-4 threads may be doable in an extreme situation, say turning the head of a short cap screw down using a collet, but other than a situation like this......Why?

No need to play fancy games with things said around the lunch table, hold everything the best you can.
I'm talking about how many male threads need to engage in a female socket in an assembly- 3 is full strength. I prob misunderstood if this is about chucking threads in a chuck bc I never do it, or not if I want to use the rod.
 
Regardless of the job I’ve had during my working career I was first and foremost a troubleshooter. When a problem develops my first question was usually, “What has changed?” After reading all 8 pages I don’t see that your first change, after which the problem developed, was ever addressed. When you turned down the OD and made the shoulder, the shoulder no longer had pressure on it from the chuck jaws. It became resistance to the remaining pressure exert by the jaws. That combined with the reduced area upon which the jaws pressed means that the grip on the workpiece is reduced. Maybe make a new threaded collet with a round part that contacts the full length of the jaws and a smaller shoulder, maybe only 1/4“-3/8” long. One slit plus two deep reliefs should give great grip. ER collets do well for this kind of work, too.

The smartest engineer you know needs to consult his textbooks. The information above regarding thread depth is much better than “3 turns.”
appreciate your thoughts, thanks for addressing the mystery here! It bugged me enough to post about it bc you really want to know what is happening with your own operations! No question removing that third reduced the grip, what I didn't say bc you really bring it to light - is that my tap bottomed out and only left trace threads over the last 1/3 - so when I removed 1/3 from the other end I actually cut the threads by 50% so I think you are on to something. I don't agree that the overhanging area becomes resistance tho -it has diminished clamping power but is still clamping - stick your finger in there if you doubt it! But I have basically done what you suggest. My 2nd - what I call a crunch bushing- is about full length of jaws but unthreaded. I think it's a mistake to thread a bushing/collet that holds threaded rod. I did it at first - it seems right but I don't think so - it provides incline engagement potential which if it happens your screwed. Better to grab the threads with a softer material and immobilize them. Back to the mystery - what your theory does not account for is the wobble I noticed after I rounded the shoulder. I think I rounded it improperly chucked on the hex. I don't work with hex much - is it easy to get that in a 3 jaw so it seems right but is just off?
 
Ok. Your last comments give me more clarity. I was too focused on the internal threads. You’re most likely correct that the piece became off center when you turned it down. I’ve had to work on a lot of things that were already threaded lately and I’ve been holding them in 5C collets until I recently got an ER40 chuck and collets. The collets are short enough that sometimes the workpiece can be inserted from behind so I can work on the threaded end. I know it’s not a cheap solution but it’s a good one. Another option might be to use copper pipe as the holder. Just get some that’s about the right size from the home improvement store and cut it to length. Slit it so it can close almost completely around the threads. After that’s done, anneal it. Heat it with a propane or oxy-acetylene torch and quench it in water. Copper doesn’t harden like ferrous metals can when quenched. The order of operations is important. As purchased the drawn copper pipe is fairly hard and easy to cut so you need to anneal it last.

A friend showed me this technique and I found it to have good concentricity.
 
ER on wishlist but can't justify right now. I usually justify when I find a good deal. Have many 5c but not 5/16, but but but- that problem is solved delrin makes a perfect crush bearing bc it's hard but softer than any metal we work on. Copper sounds very good. But sizing it locally would all be plumbers dimensions which give me googlitus. I dont work with copper, it's very soft which would seem good for grabbing threads. hardened copper? Sounds like a jumbo shrimp!
 
Lots of posts for what should be a simple task. Here is a setup that I often use for modifying screws

Screw Turnining.JPG
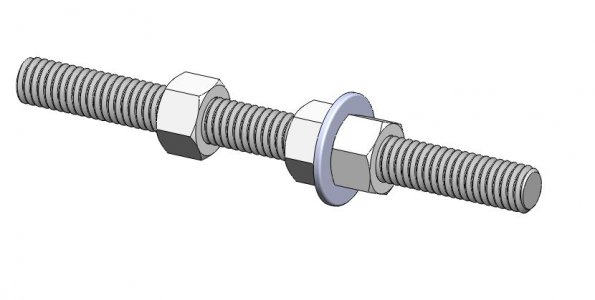
It consists of three nuts and a flat washer. The rear nut is floating and serves to hold the screw thread concentric with the spindle axis. The second nut is the drive nut for the assembly and in conjunction with the rear nut holds the assembly in the chuck jaws. The washer seats against the front faces of the chuck jaws and fixes the assembly longitudinally. The front nut is a jam nut which fixes the screw thread to the two rear nuts.

In use, the two front nuts and washer can be adjusted for a constant stick out so when mounted in the chuck, there is a consistent position for turning. A simple jig would facilitate this adjustment.

I have a carriage stop on my lathes and I will set this for a turning stop. I will use a spacer between the carriage and the stop equal to the length of the turned section. I extend the end of the screw slightly past the cutter position and face the end of the screw. Then I remove the spacer and turn to the carriage stop. This arrangement allows me to quickly make multiple passes without worrying about the end of travel while turning to a consist ant length.
 
Excellent approach thanks I like it- but no reason to be a dick about the conversation we've all been having before you stopped by. Discussing things is pretty much what forums are all about. Your approach is obviously solid and especially simple but it's not the end all. It's fiddly and time consuming to set up on changeovers when doing a large run. What I came up with jointly by listening to some guys share their ideas over 8 pages is a crunch bushing that will do everything yours will do but do it in about 1/10 the time. You see that right?
 
I’ve tried but haven’t had good results trying to use nuts to center bolts and threaded rod. The only way it works is if the nuts are concentric and the fit between the threads is tight. Try the copper pipe trick. I recently had to change the 82 degree taper of a bunch of 1/2” screws to 90 degrees and used copper pipe to hold them in the chuck. It really worked well.
 
Since this thread is so long with lots of different suggestions/ thoughts, I figured I would add some of my own. It may or may not add to the OP original problem, but may help think about future projects.

The info about the smartest engineer who said 3 threads are needed for greatest strength, may be right, but only for a given size of thread.

I was alway told that generally, you only need the length of the thread equal to the diameter of the thread. But, when you start doing the actual calculations, you need to know a lot more variables. What is the materials type of threads. Aluminum, vs steel is going to make a big difference.

Fine thread, or course thread? Fine thread usually has a higher clamping force, and shear force, and thus a higher torque number too. But when you think about it closely, this is because the root of the threaded bolt is bigger in diameter, because the threads are not as deep as coarse ones.

What type of class fit. And are the threads in tolerance? The class of fit is basically how much metal to metal interlap contact is there theoretically. If I am single pointing threads, I can make over size the pilot hole size in the female thread but still get a tight fitting thread even though the root diameter is much bigger than tolerances call for. You would not realize it is not as strong a thread as normal.

A couple weeks ago, I was making a change on a part I was fabricating. I was reducing the length of thread engagement, and I needed to verify that I still had the needed strength. I needed to know the material, pitch of thread, diameter of thread, and the class of thread to make the calculation. Still then, I am still slightly over whelmed with the actual math needed to make the calculations. I am not a degreed engineer, I just play one at work.

But I work in hydraulics. If one of my threads fail, someone can get hurt. So we needed some math backup to quantify our changes were sufficient for job at hand.

Threads can be a huge rabbit hole to run down, realizing how many different variables it can have.

Oh, I have also been finding a lot of problems with store bought nuts lately. It seems quality control is a big problem in factories today. The threaded holes can be off .030” perpendicular to the nut end. I sometimes have to take a trueing cut on the nut, so it will tighten down properly. In order to do this correctly, I tighten it down on my threaded part so I know I am machining the face consistent to the thread. I can’t trust the threaded hole to be in alignment with the hex body. This is fun because I usually use Nylock inserted nuts, and I need to use the face I am facing off, for the locking to the threads. ( usually these nuts are 1-1/2” or 2” x 12tpi. A lot bigger than most of you deal with in home shops, but my problems can be the same, just on a bigger scale)


Sent from my iPhone using Tapatalk
 
I like the idea of using copper but what about sizing- locally copper pipe is all sold in OD, 1/4, 3/8, 1/2 not easy to get that to fit- Do you remember the size you used? You can make the slit wider I suppose to make it fit. I can see this as a great way for a lot of people w/o fast access to delrin rod - or who just need to work on a few pieces.
 
Back
Top