- Joined
- Oct 16, 2017
- Messages
- 338
I was not sure where to post this thread so it is here. Purpose is a little bit of documenting, bragging (can I do that?) and sharing what I learned.
When I purchased my little Asian lathe (PM1340GT) I knew nothing about turning metal so I did not want anything standing between me and getting started. Hence I purchased the polyphase version. One year down the line I was ready for three phase.
The Motor
I read a few industry white papers on electric motors and their compatibility with VFD's. I have attached one paper by ABB entitled "VFD and Motor Insulation Stress". Bottom line is most modern continuous duty motors will work fine with a VFD. I elected not to spend money on a +800USD "VFD Rated" motor. I'm not running critical task equipment where people may die if it fails; it's just a little Asian lathe.
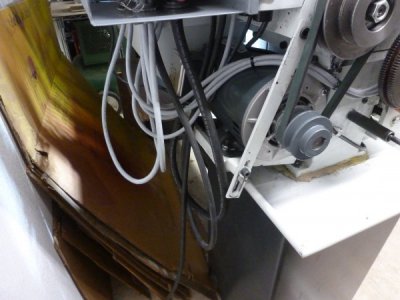
The second consideration was physical size and power. PM okayed 3 HP and said this was a common upgrade. Based on the most compatible NEMA frame and 3 HP rating, I selected a Marathon 056T17D3304, a 15HZ frame. Plenty of room between the air intake and the chip pan. I had to drill new holes for the motor mount.
Then I started a conversation with Mark Jacobs on pulley sizes and started thinking about gear ratio. On this particular lathe the motor pulley ratio in high range is 1:1 therefore I could use the lathe high range nameplate rpm to calculate the headstock drive ratio. For the PM1340 the ratios are (spindle rpm / motor nameplate rpm) [edit by request]

By knowing these ratios, the effect of various motor pulley diameters can be examined. Mark suggested a 3" pulley which was a damn good pick because the speed range using the larger pulley on headstock comes close to the maximum nameplate rpm on the lathe (1800). Can it be driven faster? Probably. Do I need it driven faster? No.
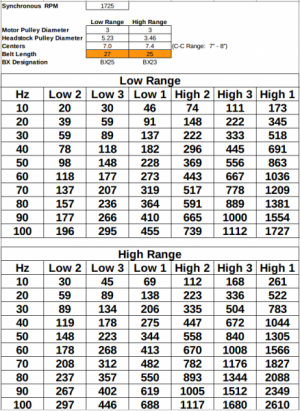
The double 3" pulley requires two belt sizes to utilize high and low range. I will stick with a BX25 in low range. The headstock pulley cannot be reversed. I "upgraded" to notched "X" belt, no performance improvement over a standard v-belt that I could tell. Looks cool though.
The Enclosure
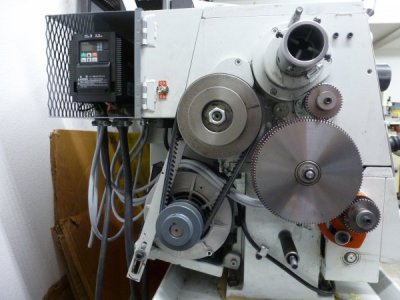
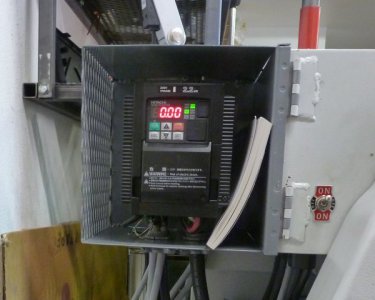
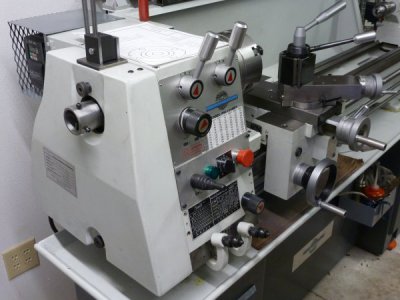
I do not think a NEMA enclosure is needed. Ventilation, protection from debris and ease of access are the design constraints. I built a small steel ventilated enclosure and attached it to the original electrical box access cover. The rear is recessed to make space for the terminal strips. I like the idea of keeping all electrical on the lathe. The work light that came with the lathe is 24 VAC so I kept all of the original circuitry in place to take advantage of the 24 VAC transformer.
The Control Circuitry
Aside from the obvious controls, two key safety standards are emergency shut down (ESD) and unintended start protection (USP). This can be accomplished with a relay or by using these features built into some VFD models. I noticed that my Ellis drill press takes advantage of ESD and USP integral to the Mitsubishi D700 VFD. A very compact hookup.
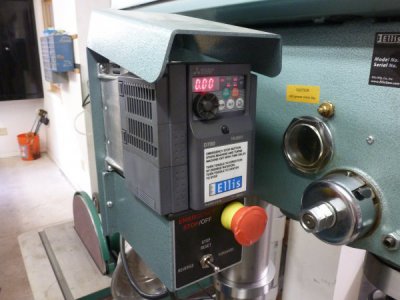
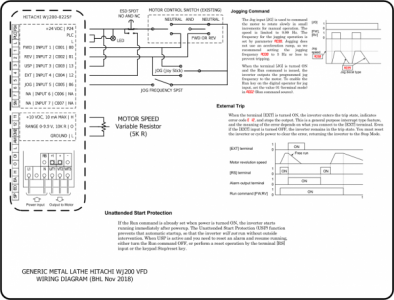
I know zip about VFD's but noticed the Hitachi WJ200 is popular for this application so why not?. After a couple consultations with Mark I decided on the following control circuit -
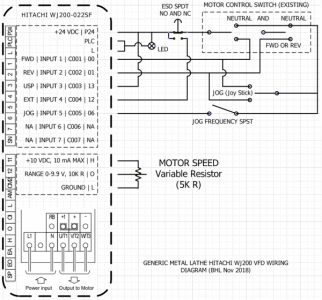
The LED is on when there is power to the VFD. Jog is active only when the motor control is in neutral. Jog speed can be at the VFD motor frequency or the VFD jog frequency (5 - 10 Hz). Jog can be FW or RV. When the ESD is depressed the lathe will not start until the ESD switch and VFD are reset. The lathe will not start if power is applied to the VFD with the motor control switch in FW or RV. Not shown is a double pole switch that controls polyphase power to the VFD. I did not install a filter on the motor wire and yes it kills my shop radio but does not interfere with the mill's DRO or my neighbors pace maker.
The Hookup
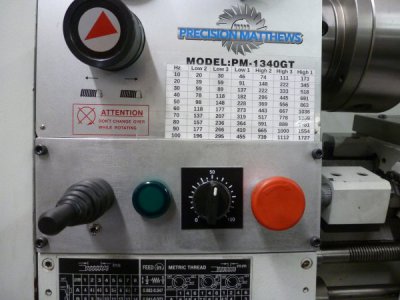
I replaced all of the stock controls with similar from Automation Direct and they were expensive (made in Italy, right next to the Ferrari factory). All of the 24 VDC control wiring is 18 AWG, 4 conductor, shielded. The only places I used terminal lugs were the VFD power terminals and the terminal strip on the rear of the VFD enclosure. I utilized the existing motor control switch wiring. I replaced the stock control panel with 1/8" aluminum for better support.
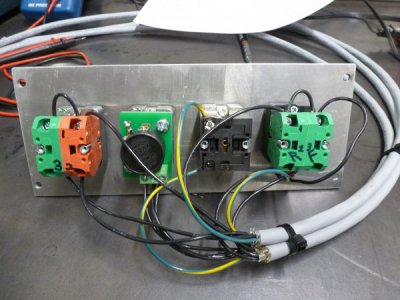
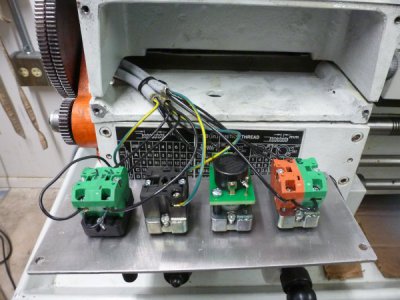
The POT is scaled linear such that 50 on the dial is 50 Hz and 100 is 100 Hz from the VFD. No external readout needed.
Does It Work?
I will probably add a breaking resistor at some point.
The Cost (USD Dec 2018)
Who said this was going to be cheap? I would rather DIY and know what I got rather than get factory and scratch my nuts when something fails.
Motor, Marathon 3 HP, 3 Phase - 385 (Grainger local pickup, first motor had severe shipping damage)
3" Double Groove Cast Iron Pulley, TB Woods - 30 (Ebay Seller zorotools, UPS)
Controls (JOG, LED, POT, ESD) and 18 AWG, 4 conductor shielded wire - 125 (Automation Direct, Fedex)
VFD, Hitachi WJ200 - 350 (Ebay Seller driveswarehouse, UPS)
Total (w/ tax and shipping) - 855 USD.
Impression
I love it. The 3 phase transmits noticeably smoother power. Being able to fine tune the motor speed optimizes cutting speed, chip production and finish. The added power improves carbide insert performance. The VFD runs cool and the motor runs much cooler than the stock one. Thanks to Mark and all the other VFD posters here for helping me get this knocked out. Someday I'll get a real lathe!
When I purchased my little Asian lathe (PM1340GT) I knew nothing about turning metal so I did not want anything standing between me and getting started. Hence I purchased the polyphase version. One year down the line I was ready for three phase.
The Motor
I read a few industry white papers on electric motors and their compatibility with VFD's. I have attached one paper by ABB entitled "VFD and Motor Insulation Stress". Bottom line is most modern continuous duty motors will work fine with a VFD. I elected not to spend money on a +800USD "VFD Rated" motor. I'm not running critical task equipment where people may die if it fails; it's just a little Asian lathe.
The second consideration was physical size and power. PM okayed 3 HP and said this was a common upgrade. Based on the most compatible NEMA frame and 3 HP rating, I selected a Marathon 056T17D3304, a 15HZ frame. Plenty of room between the air intake and the chip pan. I had to drill new holes for the motor mount.

Then I started a conversation with Mark Jacobs on pulley sizes and started thinking about gear ratio. On this particular lathe the motor pulley ratio in high range is 1:1 therefore I could use the lathe high range nameplate rpm to calculate the headstock drive ratio. For the PM1340 the ratios are (spindle rpm / motor nameplate rpm) [edit by request]
By knowing these ratios, the effect of various motor pulley diameters can be examined. Mark suggested a 3" pulley which was a damn good pick because the speed range using the larger pulley on headstock comes close to the maximum nameplate rpm on the lathe (1800). Can it be driven faster? Probably. Do I need it driven faster? No.

The double 3" pulley requires two belt sizes to utilize high and low range. I will stick with a BX25 in low range. The headstock pulley cannot be reversed. I "upgraded" to notched "X" belt, no performance improvement over a standard v-belt that I could tell. Looks cool though.

The Enclosure
I do not think a NEMA enclosure is needed. Ventilation, protection from debris and ease of access are the design constraints. I built a small steel ventilated enclosure and attached it to the original electrical box access cover. The rear is recessed to make space for the terminal strips. I like the idea of keeping all electrical on the lathe. The work light that came with the lathe is 24 VAC so I kept all of the original circuitry in place to take advantage of the 24 VAC transformer.

The Control Circuitry
Aside from the obvious controls, two key safety standards are emergency shut down (ESD) and unintended start protection (USP). This can be accomplished with a relay or by using these features built into some VFD models. I noticed that my Ellis drill press takes advantage of ESD and USP integral to the Mitsubishi D700 VFD. A very compact hookup.

I know zip about VFD's but noticed the Hitachi WJ200 is popular for this application so why not?. After a couple consultations with Mark I decided on the following control circuit -

The LED is on when there is power to the VFD. Jog is active only when the motor control is in neutral. Jog speed can be at the VFD motor frequency or the VFD jog frequency (5 - 10 Hz). Jog can be FW or RV. When the ESD is depressed the lathe will not start until the ESD switch and VFD are reset. The lathe will not start if power is applied to the VFD with the motor control switch in FW or RV. Not shown is a double pole switch that controls polyphase power to the VFD. I did not install a filter on the motor wire and yes it kills my shop radio but does not interfere with the mill's DRO or my neighbors pace maker.
The Hookup
I replaced all of the stock controls with similar from Automation Direct and they were expensive (made in Italy, right next to the Ferrari factory). All of the 24 VDC control wiring is 18 AWG, 4 conductor, shielded. The only places I used terminal lugs were the VFD power terminals and the terminal strip on the rear of the VFD enclosure. I utilized the existing motor control switch wiring. I replaced the stock control panel with 1/8" aluminum for better support.


The POT is scaled linear such that 50 on the dial is 50 Hz and 100 is 100 Hz from the VFD. No external readout needed.

Does It Work?
I will probably add a breaking resistor at some point.
The Cost (USD Dec 2018)
Who said this was going to be cheap? I would rather DIY and know what I got rather than get factory and scratch my nuts when something fails.
Motor, Marathon 3 HP, 3 Phase - 385 (Grainger local pickup, first motor had severe shipping damage)
3" Double Groove Cast Iron Pulley, TB Woods - 30 (Ebay Seller zorotools, UPS)
Controls (JOG, LED, POT, ESD) and 18 AWG, 4 conductor shielded wire - 125 (Automation Direct, Fedex)
VFD, Hitachi WJ200 - 350 (Ebay Seller driveswarehouse, UPS)
Total (w/ tax and shipping) - 855 USD.
Impression
I love it. The 3 phase transmits noticeably smoother power. Being able to fine tune the motor speed optimizes cutting speed, chip production and finish. The added power improves carbide insert performance. The VFD runs cool and the motor runs much cooler than the stock one. Thanks to Mark and all the other VFD posters here for helping me get this knocked out. Someday I'll get a real lathe!


Attachments
Last edited by a moderator:

