Ways to bore a cannon barrel

Ah, now I understand. It's good that we are on the same page. Proper terminology is highly over rated anyway. :D

Here is one other thing that you may not have considered and I forgot to mention: Did you leave a sharp corner at the bottom of the bore? The general rule of thumb is that the 'corner' at the bottom of the barrel needs to be radiused and should not be a sharp corner. Sharp corners tend to promote cracking in the breech area, definitely not something that you want.
 
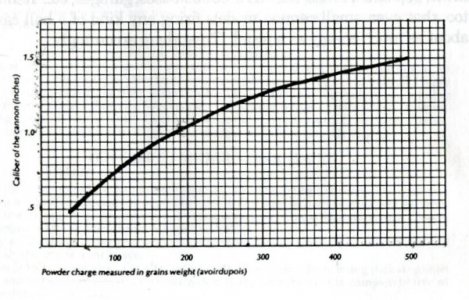
This chart is for black power , the first couple shots I fired out of mine were double charged and I was behind a solid concrete wall 20 yards away in a safe place to make sure it wouldn't blow up, it didn't :eek 3:
The listed charge for my bore 3/4" work fine, dogs close by stay quiet for a long time after it goes off
clamped my trunnions on grove in barrel welded to 3/16 strap haven't had a problem with them.
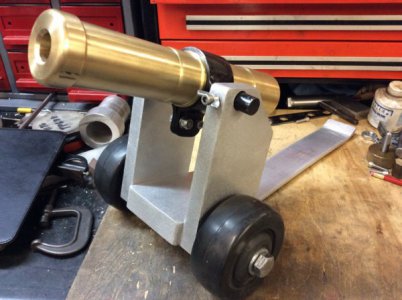
Mine is not a replica , it is fuse fired
IMG_0385.JPG IMG_0395.JPG
I had a lot of extra powder to use up.
 
How are you making out on the final boring of that barrel? Did you consider making up a piloted boring bar (of course then you would need a breech plug)? Ideally, the bed of the lathe ought to be 2x the length of the barrel so as to bore it in one shot. It is going to be a home made job. All it is, is a long bar with a single point cutter at the mid point. The far end (the pilot) does not need to be full size. The hole in the far end (breech end) of the barrel could be the steady for the far end of the bar, or you you install a bushing in the spindle bore of your lathe. You may wish to add a bushing at the muzzle end as well. Clearing chips could be a problem, so only take a small amount (perhaps blow air down the pilot support and leave an opening at the muzzle end steady to clear chips?).

You could also bolt the barrel to the carriage and mount the boring bar between centers (amounts to the same thing).
Basically you would be setting up your lathe as a line boring machine - run some searches on line boring with a lathe.
 
Terry I did leave a radius at the bottom - also this will end up being slightly smaller in diameter for the last 3" +/-.

Thanks for the chart dlane - nice looking finished product!

Chipper - I did the bore in steps from 1/4" on up to 1 1/8" going 2" at a time, using a lot of cutting fluid and clearing chips each segment. Very long mundane drawn out process. My bed is 4', so no issues getting 16" deep in the bore with the steady rest.....I may just try a bushing w/set screw on the last drill bit before reaming....just to help smooth it out a little. Thanks.
 
A 6" vise is overkill for a RF45 style mill. A 4" is more appropiate for that size mill & IMO 5" max. I have a 5" GMT vise on my PM45 & it's slightly too big. Not enough Y axis travel to make use of the 5" full capacity. Better to save your money rather than getting something too big & most importantly the weight. I take my vise of the table quite often, a 6" is still light enough for me to be carried by hand but I'm glad I have a 5". I also have a 4" vise as well. I prefer the 5" though.

But those GMT 6" Premium vises are pretty nice. I'd love to have one but don't need one on my current mill. But if you plan on upgrading to a full size knee mill in the future than the 6" will be perfect.


Here's what the 5" looks like on my mill.
Img_1921.jpg


I couldn't even complete this cut without my bellows & DRO scale getting in the way. Not enough Y travel & the 5" vise is not even maxed out.
Img_7597_zpscb8b5dd7.jpg


Here's what a 6" vise looks like on another PM45 (gt40's)
View attachment 253544

cannwnose04_zpsmu2kris3.jpg
 
Oh ok you could remove tail stock and slide the carriage that way then put a steady rest on. I feel like you'd barely make it but you said you had 40" of bed so it can prob happen. I just think especially for the reamer a nice feed will help with finish.
 
OK I'll look at that possibility tomorrow. Just got the second drill bit today so I'll be switching gears to the bore work very soon. Thanks for the reply and suggestions.
 
No problem like I said in my first post maybe try a copper line with air blast to get the chips out. Let me know how it turns out. I'd like to do the same thing but I haven't found a piece of steel big enough for cheap enough. My lathe should be capable of you can do it.
 
A 6" vise is overkill for a RF45 style mill. A 4" is more appropiate for that size mill & IMO 5" max. I have a 5" GMT vise on my PM45 & it's slightly too big. Not enough Y axis travel to make use of the 5" full capacity. Better to save your money rather than getting something too big & most importantly the weight. I take my vise of the table quite often, a 6" is still light enough for me to be carried by hand but I'm glad I have a 5". I also have a 4" vise as well. I prefer the 5" though.

But those GMT 6" Premium vises are pretty nice. I'd love to have one but don't need one on my current mill. But if you plan on upgrading to a full size knee mill in the future than the 6" will be perfect.


Here's what the 5" looks like on my mill.
Img_1921.jpg


I couldn't even complete this cut without my bellows & DRO scale getting in the way. Not enough Y travel & the 5" vise is not even maxed out.
Img_7597_zpscb8b5dd7.jpg


Here's what a 6" vise looks like on another PM45 (gt40's)
View attachment 253544

CBP04_zpskztt0frt.jpg

CBP02_zpsahh6kl5b.jpg

CBP01_zpsfzpnubmn.jpg

stained02_zpssyhi1ahm.jpg

stained04_zpskk8c5oex.jpg

mockup01_zps8f0wmoej.jpg
 
Back
Top