What's a good technique to use telescoping inside bore gages?

WobblyHand

H-M Supporter - Diamond Member
H-M Lifetime Diamond Member
Joined
Dec 18, 2019
Messages
6,447
So, thought I had a handle on this... Made many successful (consistent) measurements right down to the tenth. But seem to have lost my mojo. Trying to measure in-situ the bore. Can't seem to get a consistent measurement any more. Yes, it has to be my technique. If I reinsert the gage into the bore, I can tell it's not at the true bore diameter. Oh yeah, the boring bar is in the way too. Can't move it far enough away. As it is, the back side of the boring bar is inside the tail stock.

According to my calculations, I should be about 0.0016" under 1.0000" I am trying to hit 1.0000. I now get measurements all over the place. (+/-0.001). The cap I have is 0.9991 (tried to hit 0.9995) doesn't fit in the bore, so I'm pretty sure I am under that.

So I walked away from the lathe. Don't want to make the hole oversize. What is the recommended best practice for using these inside bore gage gizmos?
 
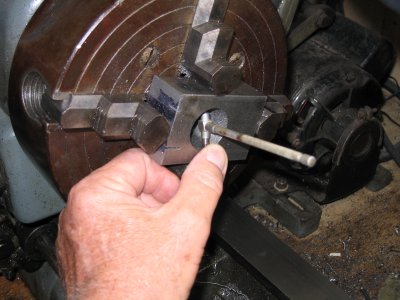
An accurate measurement with a telescoping gage depends on inserting it at a slight angle in the bore, locking it, and rocking it over center only ONE TIME, never reinsert it and wiggle it around, if desired, repeat the measurement from scratch and compare with prior measurements if unsure; this should give consistent results, if the tailstock is in the way of measurement, consider overhanging it past the bed, or remove it. The telescope gage is not like an inside mike that can reenter the bore and feel around for a final measurement, it is a one shot measurement.
 
Even with correct technique, I also don't trust the telescoping guages if real accuracy is needed.

I've popped for inside micrometers, pin gauges and even real bore gauges when its got to be dead nuts on.
 
An accurate measurement with a telescoping gage depends on inserting it at a slight angle in the bore, locking it, and rocking it over center only ONE TIME, never reinsert it and wiggle it around, if desired, repeat the measurement from scratch and compare with prior measurements if unsure; this should give consistent results, if the tailstock is in the way of measurement, consider overhanging it past the bed, or remove it. The telescope gage is not like an inside mike that can reenter the bore and feel around for a final measurement, it is a one shot measurement.
@benmychree Can you explain, "locking it, and rocking it over center one time"? So you lock it and the rock it, which then forces the pin in? I have trouble locking it. The handles aren't very big, so there's not much to grab on to.
 
Even with correct technique, I also don't trust the telescoping guages if real accuracy is needed.

I've popped for inside micrometers, pin gauges and even real bore gauges when its got to be dead nuts on.
Some day... Right now, all I have are the telescoping gauges in this size range.
 
I struggled and struggled trying to get consistent internal measurements. So I feel your frustration. What benmychree is saying is that once the gauge is in the bore at a slight angle tighten the locking nob on the end of the handle. Then rotate the handle down. As the gauge comes to vertical inside the bore pull it straight out. This is one fluid motion. I had a lot of trouble getting consistent measurements until I noticed in one video he had his thumb at the bottom of the bore which kept the gauge in place. Since I started doing that I have been able to get consistent measurements

IMG_3753.JPG

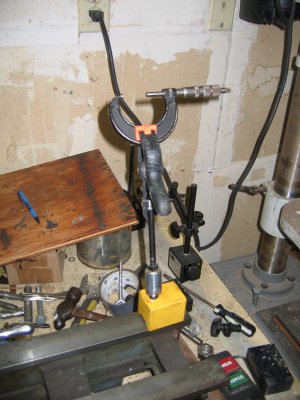
Are you using a micrometer for your measurements? I was never able to get consistent measurements with a caliper. I have a magnetic base with a simple clamp to hold the micrometer that lives on the end of the lathe bed. This also helped a lot in getting consistent measurements,

IMG_3756.JPG
 
@mickri Thanks! Never would have guessed that way of measuring. I'll try that.

@mikey convinced me I needed a micrometer stand. Found one on fleabay and made an offer. Have to say, even with a stand it's tough to measure these gauges. The curved surfaces sometimes wants to slide on the faces of the anvil. I only use the verniers as a quick sanity check, otherwise it's micrometer only.
 
It takes some practice and consistency... I have two sets of General Tso's telescoping gauges that I don't know why I haven't thrown out yet. Maybe it's because they look like tools. I bit the bullet and bought some Helios Germany telescoping gauges, and those are smooth and nice to use. I also use a dial bore gauge, which I absolutely prefer, but it takes time to set up and verify. It's an import, but matches up with micrometers nicely.

What's the difference between a micrometer stand and a padded-jaw vise? :dunno:
 
I used a padded jaw vise before I came up with the magnetic base and clamp I posted above. The only difference was the convenience of not having to walk over to the vise on my work bench and a little easier to read the micrometer.
 
The problem with measuring a bore ID with calipers is that the jaws are not knife edges (at least, not on any of the ones I have). They have small flats. So they can't _ever_ produce an accurate measurement. The larger the bore ID the better, but if you need to get below .001 inch you've got to use something else -- plug gauges, inside mikes, etc. I've been making making my own plug gauges for specific projects, but recently I started pricing out inside mikes.
 
Back
Top