You can drill deep holes with the tool post instead of the tailstock and it's way faster.

strantor

Active User
Registered
Joined
Oct 29, 2012
Messages
1,328
Probably this is one the oldest tricks in the book and I've just managed to browse past every video that demonstrates it. I just figured it out today after years of fussing with the tailstock so I figured I would share. It's a huge a time saver for drilling deep holes, especially if your tailstock locks down with a bolt instead of a cam.

My tailstock only has 2.25" of travel so after the first 2" I would be retracting the tailstock, turning a wrench to unlock the tailstock, pulling it back to clear chips, sliding it back into the hole, turning a wrench to lock it back down, and then advancing the tailstock to drill deeper; that's about 45 seconds worth of non-productive drudgery for every 10 seconds of advancing the bit and making the hole deeper.

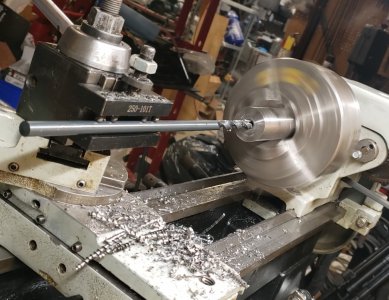
Doing it as demonstrated below you just run the carriage back and forth and forget all about the tailstock.
20221118_204250.jpg

I set the drill bit in position by drilling about an inch into the workpiece using the tailstock. Then, turn off the spindle and with the bit still held in the tailstock Chuck and still engaged into the workpiece, bring the compound in with an empty tool holder and adjust the tool holder height knob until the bottom of the tool holder touches the bit. Then lock the tool holder down and tighten down the grub screws. Once the drill bit is secured in the tool holder, release it from the tailstock Chuck and get the tailstock out of the way. Finish the job by running the carriage in and out until you bore all the way through.

You should also be able to do this without ever touching the tailstock, if before loading your workpiece, load the drill bit into your spindle's chuck and tighten, then clamp onto the protruding bit with your empty tool holder as described above. Theoretically your drill bit is now perfectly aligned with the spindle axis. I haven't tried this method but it works in my head.
 
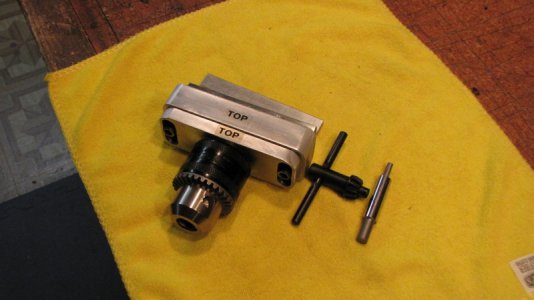
Get yourself a chuck that has a threaded mount. I found a 1/2" capacity chuck with a 1/2 - 20 mount, and it so happened I had a lathe boring bar holder that accepts 1/2" shank boring bars. I think you know what I did from there.

I found that two short pieces of 1/2" drill rod were handy for aligning the chuck, once it was installed on my toolpost. I had previously faced/deburred one end of each. Put one in the headstock and the other in the chuck. Faced ends toward each other. Back the cross slide out and advance the carriage until the two rods overlap as much as possible, then adjust the carriage so the rods are exactly parallel. Pretty easy to do when you bring them up close to one another and eyeball it for a uniformly zero gap between them. Lock the toolholder down. Then back the carriage out and advance the cross slide until the ends of the rods are exactly parallel. Bring the two ends into contact then run your finger across them, easy to determine when they are very close to being aligned. It might be necessary to adjust the toolholder so the drill rods are aligned properly on the vertical (Y??) axis.. Now your chuck is aligned with the spindle axis & you're good to go.

I do have to admit that I haven't checked to see if the chuck is tilted up or down on the vertical axis. Since I used a commercial 1/2" fully-threaded bolt that certainly is possible, considering how they are made. A better approach would be to use another hunk of 1/2" drill rod and single-point thread it, then use that to install the chuck in the boring bar holder.

I found that my toolpost-mounted drill chuck highlighted some fitment problems with my carriage with respect to the bed -- applying a lot of force to the carriage caused it to tip up some when drilling. No big deal, problem observed and corrected. But worth noting since the machining forces are considerably different compared to turning/facing something.
 
You could also use an MT taper holder in your quick change TP . :) On our larger lathes we hooked our tailstock up to the carriage and let the machine do the heavy metal removal . Insert drills and spade drills need a good feed to break the chips . With flood coolant shot thru the tools , this was very effective . :encourage:
 
There are commercial chucks / chuck adapters available for QCTPs. I've never seen it done with a 'regular' holder. Good thinkin'!

GsT
 
You could also use an MT taper holder in your quick change TP . :) On our larger lathes we hooked our tailstock up to the carriage and let the machine do the heavy metal removal . Insert drills and spade drills need a good feed to break the chips . With flood coolant shot thru the tools , this was very effective . :encourage:
Yeah, I had to crank a little harder on the carriage wheel than I'm comfortable with to get the feed force I wanted. And given my recent "come to Jesus" experience on the thread about reefing on the tailstock lock, I'm inclined to find a better way.

The tailstock definitely does have a better (and safer) mechanical advantage, plus it applies force directly in line with the drill, as opposed to driving from all the way down at a point below the ways which could cause some backwards tipping and upwards lifting of the drill as @homebrewed points out.

Your description of driving the carriage with the tailstock sounds like it could be the best of both worlds if I could circumvent the 2.25" travel restriction of my tailstock. I'm picturing some kind of "pawl rack" - not sure what it would be called - picture a sawblade with large teeth, mounted in the tailstock, free to pivot up and down at the point it comes out of the tailstock. It rests on top of the tool holder and the carriage is free to move away from the tailstock, but if you try to move the carriage toward the tailstock, this "pawl rack" will stop you. Now you can lock down the tailstock at the end of the table and never move it. When you feed in with the tailstock, the "pawl rack" pushes the carriage forward and when you want clear chips just lift up on the "pawl rack," back the carriage out, run the carriage back in, drop the "pawl rack" back down, and continue advancing the bit via the tailstock. When the tailstock reaches max stroke, just fully retract it, as you do so the "pawl rack" will slip a few teeth over the tool holder, and you can start advancing again.
 
Pulling the tailstock with the carriage was done on large lathes . Not sure I would try it on anything under say a 15" .
 
Pulling the tailstock with the carriage was done on large lathes . Not sure I would try it on anything under say a 15" .
Apparently I read what I wanted to read, rather than what you wrote. You were talking about pulling the tailstock with the carriage. I was picturing pushing the carriage with the tailstock. That's what I was describing in my reply.
 
Joe Pieczynski demonstrated an interesting method for drilling deep holes using the tailstock using the carriage as a stop for the tail stock. At the start of the drilling, the quill is set at zero at the mouth of the hole, the tailstock locked. and the carriage is moved to contact the tailstock. The hole is drilled to the desired peck depth. The carriage is advanced toward the headstock by the peck depth, the quill is backed out to zero, and the tailstock is loosened and backed out to clear the drill from the hole. With chips removed and the drill relubed, the tailstock is moved to contact the carriage. This process is repeated until the desired hole depth is reached.

Carriage advancement between pecking operations can be done by use of the DRO, if equipped. Without a DRO a piece of stock equal in thickness to the peck depth can be used as a gage to set the distance.

The advantage for drilling to deep depths is that cranking the quill consists of only a few turns per peck.
 
Back
Top