-
Welcome back Guest! Did you know you can mentor other members here at H-M? If not, please check out our Relaunch of Hobby Machinist Mentoring Program!
- Forums
- THE PROJECTS AREA
- PROJECT OF THE DAY --- WHAT DID YOU DO IN YOUR SHOP TODAY?
- Project of the Day Mega-Thread Archives
You are using an out of date browser. It may not display this or other websites correctly.
You should upgrade or use an alternative browser.
You should upgrade or use an alternative browser.
2013 POTD Thread Archive
- Thread starter HMF
- Start date
- Joined
- Feb 7, 2011
- Messages
- 5,039
...fired off an even dozen .22LR rounds and started on a practice cross slide for a jewelers lathe...don't know why tho, the lathe is a pos.
Karl
That isn't even a good start. Need atleast 500 rounds when I go out shooting.:rofl:
- Joined
- Feb 7, 2012
- Messages
- 541
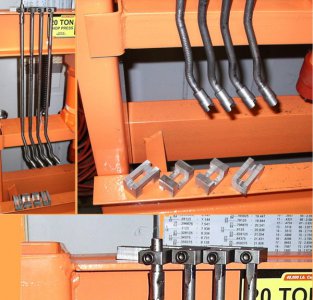
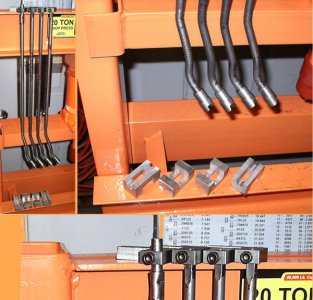
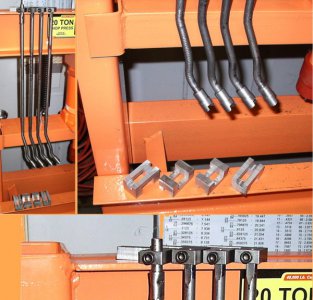
Speaking of shooting - I guess these qualify as POTD. I needed 4 trigger linkage bars for a tripod adapter that I manufacture in small amounts, so I fabricated these up. bars were threaded on one end and the adjustable trigger contact screws in and out for variances in each gun/tripod. Seems none are ever exactly the same. The top piece was cut and milled, and a hole for the bar was drilled. Then I drilled & tapped for a set screw/cap screw for locking it down after minor adjustments are made (if necessary) Finally, the guide block was milled out of aluminum, which sits under the adapter and provide "guidance" for the linkage to ride in. When put all together, it connects a remote trigger actuator on an MG3 Ground Tripod to the trigger on a 1919A4 Air Cooled Browning. Sounds technical, but it just a drive shaft so to speak.  hew:
hew:
Oh well.........back to work

Oh well.........back to work


- Joined
- Apr 2, 2013
- Messages
- 230
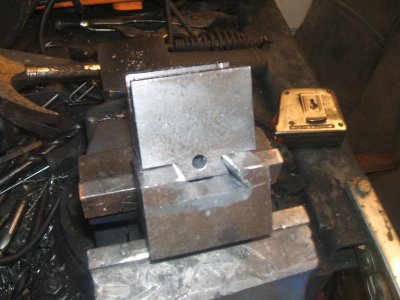
I did some work on my QCTP to see if it would hold up or cause vibration issues with heavy cuts. So, using my nice new R8 ER-40 collet set (only a little pain from the wife when she found out it was $250.00) and milled the dovetails. Mill did really well with no issues and made a nice clean job
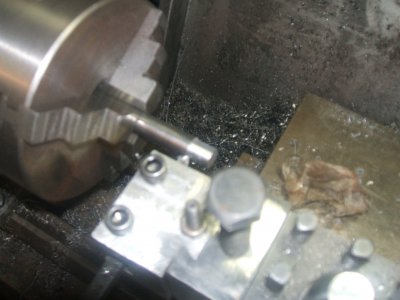
Temporarily put the bolt in (to lock the tool holder height) and took a really nasty cut (from 1/2" bar down to just under 3/8" in one pass), and it did it no problem with no vibration or deflection. May not look pretty but it works well
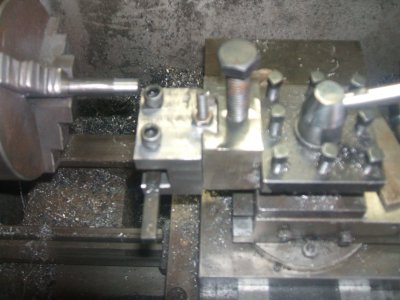
Next step will be to put a handle on the bolt and fabricate a wheel to set the height


Temporarily put the bolt in (to lock the tool holder height) and took a really nasty cut (from 1/2" bar down to just under 3/8" in one pass), and it did it no problem with no vibration or deflection. May not look pretty but it works well

Next step will be to put a handle on the bolt and fabricate a wheel to set the height


- Joined
- Feb 7, 2012
- Messages
- 541
Nice job - don't ya just love it when a plan comes together?  hew:
hew:
- Joined
- Apr 2, 2013
- Messages
- 230
LOL Im just happy I got it done without;
- Breaking any milling bits
- Breaking the mill
- Loosing any blood (or digits)
- Ending up with two perfect dovetail joints with a 1/2" gap LOL
May end up making a QCTP unit that will replace the existing one (once I figure out how to cut a 7" cube of steel down to size lol), but figure I will see how this works over a few weeks. Picked up so many great ideas and "things to build" from this forum I need to start doing some lol.
- Joined
- Jun 22, 2012
- Messages
- 1,552
Pretty cool! And I like the honda in your avatar too! cx500?
Well today I went to my local machine shop and picked up a 6" piece of 3.25 " drill rod to use to construct a fixture to mount a chuck on to attach to an 8" disk to mount the chuck on my newly ordered Enco rotary table. The piece of drill stock came free for the asking however I donated $10.00 to the pocket of the owner for his Christmas party fund that I attend each year. It is great to have a local supply of small pieces when you need them and donating a small amount to keep the channel open is good business.
I then returned to my shop, cut the existing keyway material out of the piece on the mill and took it to the lathe to reduce it to 3". This will become my base material for my adapter. Looking forward to the delivery of my new rotary table in the next couple of says.
I then returned to my shop, cut the existing keyway material out of the piece on the mill and took it to the lathe to reduce it to 3". This will become my base material for my adapter. Looking forward to the delivery of my new rotary table in the next couple of says.
- Joined
- Apr 2, 2013
- Messages
- 230
Yea my 1982 CX500C. Got it 3 years ago to fix up (as I had never ridden one before) and after getting it running well, took it for a spin, ended up in a ditch with a 6" leg gash, and decided I was going to keep it and get my license lol. Love it, helps me clear my head and keep my sanity  Currently fining up a GL100 78 (which takes up half my shop space lol


