Atlas Is Tapering?

great white

Active User
Registered
Joined
Jan 25, 2015
Messages
2,558
Not sure what else to call it.

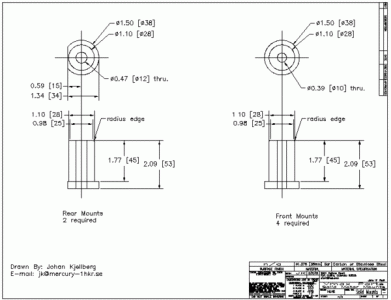
When making these:

vmount.gif

I would get a variance on the diameters (ie: the 1.10/28 mm dimension) around .001 to .003, tapering in as I got closer to the headstock.I still got perfectly usable parts, as what I was making mates to an Al casting which wasn't too fussy on production tolerances itself. I just want to be as accurate as I can be.

That would be working a 4.5" piece with about 3" of stick out in my 4 jaw.

It was in 6061 and I was using freshly sharpened HSS tooling on the QCTP. Tooling stick out was kept as short as possible.

I had all the gibs locked down that I could, except for the z axis (which i needed to make the part).

I was using power feed with the slowest feed rate my atlas has (0.0035 with the gears I have available).

I guess I'm asking if this amount of "taper" is to be expected and if not, where should I start to look to try and eliminate/minimize it?

Please done say something like "get a better lathe". That's not an option for me, financially as much as anything else. I need to get the most out of what I've got....
vmount.gif

vmount.gif

vmount.gif

vmount.gif

vmount.gif
 
Your bed may be worn. The ways tend to be more worn near the chuck, as the tool gets lower it cuts less. If that is the case, I don't think there is much that can be done.
 
i'd be tempted to do a deflection test on the chuck, just for giggles.
chuck up a hunk of sturdy stock and put a dial indicator on the chuck, as to indicate top dead center.
pull up and push down on the stock and note the reading on the dial indicator.
if you have a lot of variance between the readings, you may have some spindle and/or bearing wear.

if the ways are worn, they can be scraped back into precision
 
Last edited:
Your bed may be worn. The ways tend to be more worn near the chuck, as the tool gets lower it cuts less. If that is the case, I don't think there is much that can be done.
My understanding was that the diameter got smaller as he got closer to the headstock, not larger. Was I wrong?


Steve Shannon, P.E.
 
My understanding was that the diameter got smaller as he got closer to the headstock, not larger. Was I wrong?


Steve Shannon, P.E.
Correct.

Diameter smaller the closer you get to the headstock.Seems to indicate its cutting more, not less, closer to the headstock.

At first I thought it was just "spring" in the material as I made the ,025 roughing cuts. But the finishing cuts showed the same taper, even when I ran a reverse "spring" cut on the way back out of the stock. If it were spring in the material/machine, I would have expected to lessen as I made my .002-.004 finish cuts, but the amount seemed to stay consistently out. I thought maybe my carriage might be running crooked somehow or something along those lines. Not sure and that's why I'm asking for what to look at....

i'd be tempted to do a deflection test on the chuck, just for giggles.
chuck up a hunk of sturdy stock and put a dial indicator on the chuck, as to indicate top dead center.
pull up and push down on the stock and note the reading on the dial indicator.
if you have a lot of variance between the readings, you may have some spindle and/or bearing wear.

if the ways are worn, they can be scraped back into precision

I'll give it a check. I dont think scraping is an option. No one around here does that sort of work, shipping the bed somewhere would be outrageously expensive and buying a surface plate big enough for my TH42 would prob cost more than a new lathe.

Normal taper, live with it or work around it.

OK. If so, how do I "work around it"?

Your bed may be worn. The ways tend to be more worn near the chuck, as the tool gets lower it cuts less. If that is the case, I don't think there is much that can be done.

OK, so how do I determine the wear or amount of wear? Looks pretty clean and leadscrew seems to be in decent shape (indicating not a lot of use or possibly a replacement at one time). Drop a straight edge on the bed and try some feeler gauges maybe?

I have an atlas, worn bed lol, need a regrind

Is that just an offhand comment/joke or is there a recommendation in there? I can't tell...
 
Last edited:
Look up "Turning a test bar for a lathe" on the Internet. Basically you will be turning a small shaft (1") between centers in order to determine any taper or misalignment. If the test bar is true, then you know deflection is an issue which could be spindle bearings. Let us know what you discover. Jack
 
Well the comment is that if you own a not brand new atlas lathe, the bed is likely very worn, Mic the thickness of the ways in various locations, check for width and thickness. If it's way outta whack, you need to have the bed reground. Mine needs it. Could scrape it but that's alotta scraping.
 
When cutting a longer piece is it a consistent taper does it just happen in one area (as in a worn spot on the bed). If it is consistent over a longer area and not in just one part of the bed then you may have a twist in your bend. If this is the case you will need to put shims under your lathe.

Now I am not totally sure of this but I seem to remember reading if it is larger on the tail stock end you need put a shim on the bottom front of the tail stock mount.

It talks about testing the lathe for true on the last page of this link. http://www.wswells.com/data/howto/H-3.pdf
 
Back
Top