Atlas Is Tapering?

iron man made a new cross slide and top as well. They are longer than the originals. The 670 cross slide on page 11 in the catalogue is a huge improvement vs the original that comes with the lathe. I had one and it stayed on the lathe most of the time.

I too was chasing the taper issue on my Atlas and as well on the current lathe. I chalked it up to tool deflection as I could run a number of passes at the same setting and still be removing metal at the chuck end of the hole.
Pierre
 
If I where to make another I would not buy the kit. I am glad I did for the first one but I have a couple of ideas that I think would make it better and I would just start with a piece of cast iron.
 
I not an expert, but getting back to the original question... if you're machining about 3" of material and getting .001-.003" of taper I would consider that greater than acceptable. My old Sheldon, which has quite a pronounced bed wear turns +/- .001 over 12" or so. My SB 9A about the same. For my purposes I try to keep most deviations under -/+ .001, particularly if the error is a non-parallel error like taper.

Tool flex should show irregularity about any point along the diameter. The evidence of a pronounced spring cut when returning the tool would confirm tool flex, and I doubt that's the issue.

That pretty much leaves you with spindle misalignment/flex as your culprit. If you can't bring it in with bearing preload adjustments than you may want to check under the headstock for a piece of swarf on the bed. The head may have been removed at some point in it's life and it's not unheard of for there to be a little debris around machine tools. :) Not that anybody HERE would suffer that problem.
 
It could also be chuck misalignment or the bed is flexed also. You should try turning a piece between centers and see what you get. This will rule out spindle misalignment and chuck issues. I had this issue with one of my chucks until I removed the backing plate and re cut the register on the backing plate "on my lathe". The bed on our Atlas's is also subject to being flexed if we did not bolt them down to a bench that is in a single plane. While they do not have to be level they do have to be in a single plane and the easiest way to start this is with a machinist level and then doing the turning test.
 
Thanks GW, you've saved me having to draw what I need for my VMax... I have frame stiffener bars already, they're worth having too :)

The fact you've got a taper (assuming it's a smooth taper, not lumps and bumps) to me says it has to be related to Z movement, and there are only a few things possible, assuming that the bed's not grossly worn: 1) the headstock's out of alignment with the bed (not the first check though!); 2) the bed's twisted, probably the most likely on a light and flexible machine - have you checked for twist, either with a machinist's level (NOT a carpenter's level!) or by making a test bar ("Rollie's Dad's method" I think it's called)?; or 3) it's flex in the material (not that likely with only 3 diameters' stick-out).

Presume all gibs, toolpost / topslide bolts etc. have been checked:

My first check would be for bed twist, if you can beg or borrow a good machinist's level place it on the carriage and observe the bubble for the full length of the bed, ideally it shouldn't move AT ALL. If it does, shim the "low" corner until it's level[1] and bolt back down, go away, have a meal, have a beer, have a night's sleep, come back and check whether it's moved, correct as needed! All lathes' especially lighter, flexible ones, bend under their own weight and need correct support to stay straight and level, take time to "return to zero" - cast iron, steel, bronze and rubber have that in common.

If you can't get a good enough level (I use my granddad's WW1 Vickers-gun clinometer, good to a few seconds of arc), try the "Rollie's Dad's method" - it's all over Google :)

To check headstock and tailstock alignment with the ways turn a large diameter (ideally hollow) foot-long shaft with 2 larger collars at the ends, between centres[2], take really fine finish cuts without moving cross or topslide, mike the collars to be sure they're the same, if they are your tailstock's aligned, next chuck one end (NO tailstock support) and indicate in so it's running coaxial and centred at both ends[3], move the indicator to the carriage and compare readings by moving the carriage from collar to collar - if the same reading your headstock's aligned with the ways.

Actual chuck runout (measurable at the jaws) doesn't really factor into tapers, the tool will always cut a cone or cylinder around the spindle axis, up until the runout's so bad it skips some of the work circumference...

If the bed's grossly worn, all bets are off and no simple adjustments will cure it, you'll have to learn to live with the (actually quite small) taper :(

{Columbo} Just One More Thing - you are cutting the diameter with the carriage, not the topslide, which could be out-of-parallel with the ways...? {!Columbo}

Just my ha'pennorth,
Dave H. (the other one)

[1] level as in the same plane both ends, actual level doesn't matter as long as the ways run parallel!
[2] how do I run a hollow shaft between centres?!?! Loctite in a plug at each end!
[3] a rubber mallet on the free end can help here
 
Not sure what else to call it.

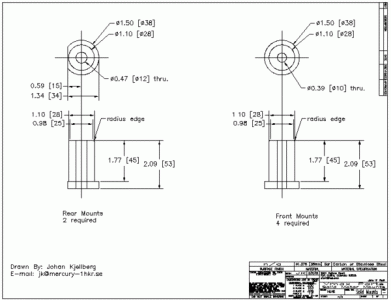
When making these:

vmount.gif

I would get a variance on the diameters (ie: the 1.10/28 mm dimension) around .001 to .003, tapering in as I got closer to the headstock.I still got perfectly usable parts, as what I was making mates to an Al casting which wasn't too fussy on production tolerances itself. I just want to be as accurate as I can be.

That would be working a 4.5" piece with about 3" of stick out in my 4 jaw.

It was in 6061 and I was using freshly sharpened HSS tooling on the QCTP. Tooling stick out was kept as short as possible.

I had all the gibs locked down that I could, except for the z axis (which i needed to make the part).

I was using power feed with the slowest feed rate my atlas has (0.0035 with the gears I have available).

I guess I'm asking if this amount of "taper" is to be expected and if not, where should I start to look to try and eliminate/minimize it?

Please done say something like "get a better lathe". That's not an option for me, financially as much as anything else. I need to get the most out of what I've got....
I have the same lathe and had the same issue. I played with one of the tailstock end floor leveling screws to see if I could make it change for better or worse. I was able to do both. Basically intentionally twisting the bed slightly. I went back through with ptecision levels and leveled the cabinet. Then leveled the lathe to 5he cabinet. Then turned a test bar and recentered tailstock..it was off a bit. In the end I had less than a thousand taper over 6 inches when turning between centers.

vmount.gif

vmount.gif

vmount.gif
 
Back
Top