In the 50's we would visit the park and go all over that battleship. The cranks worked OK then. And it was OK to get up on them a crank them. Parents took pictures and were happy for the kids to burn some excess energy.
Thanks for sharing the memories! We want future generations to have that same experience.
The ship was decommissioned in 1948 and the caretakers for the State of Texas were understaffed and had little funding to take care of the ship. It has been only in more recent years that a real restoration effort has begun. Due to years of poor maintenance, sometimes in the course of disassembly or removal from the ship things get damaged. Rust always wins over time. The area where the 5" guns sit has a low overhead so the barrel assembly has to be removed from the mount and removed separately from the mount. There are only inches of clearance to allow maneuvering the heavy pieces. The first image shows how tight the surrounding area is and the small opening through which the barrels were removed. This gear case was one such victim. IIRC it was bent while the gun was being removed from the ship. When the guys tried to straighten it a corner of the casting broke off. It's a big piece of cast iron. I gave it a shot at trying to braze it back on. It actually went pretty well and with a little more grinding and some paint it will look like it was never damaged.
There were some unique screws that fit on the 5" sights that didn't come out of the sights in good condition. I had a scrap of mystery metal, very likely 4140 considering where I got it (gunsmith friend) and how it machined. I turned the mystery metal into replacement screws. The tip of the screw is tapered to precisely locate it in a receiving hole. The head is 9/16"; the shank and threads are 1/2" and it's about 2-1/2" long. I ended up making 5 or 6 of them. This is the best original and one of my copies.
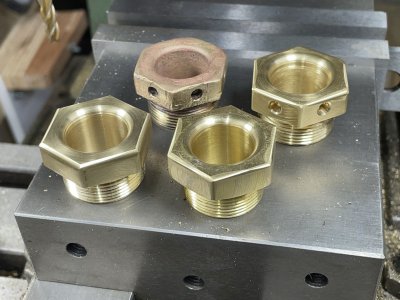
These are nuts that are entry points for wiring in the 5" mounts. The cast one is a bronze original. The reproductions are brass. Some of the mounts had the holes in the flats; others didn't so I made them as needed to match what was already on the mounts. They didn't look right as machined so I softened the hard corners of the nuts with a bench belt sander with a 240 grit belt. All of the nice, shiny brass will be painted Measure 21 camouflage blue-gray. Actually, pretty much everything I make will end up with Measure 21 on it. That's the paint color that the ship had at the end of WWII. There were lots of separate operations on these. The hex stock was 1/8" too big so the first operation was to machine it down by .063" on all flats and then add all of the features. The rounded entries for the wires were done with a hand ground HSS form tool. The inside chamfer on the bottoms were cut with a boring bar.
Engineers in 1910 didn't mess around with a lot of piddly odd dimensions. They were big on using whole inches and regular fractions down to eighths or infrequently sixteenths. The only thing light duty is the clockwork type gears as seen in the analog computer above. The machining everywhere is beautiful and first class. Parts made today might be made less expensively due to CNC but they would not be better.
Right now I'm working on some gears that are about 5" OD and have a 7/8" bore. They had make keys cast into them which tended to break over the years, probably due to poor maintenance and the gun movements being operated without adequate lubrication. The project is to cut away any remains of the cast-in keys and cut new keyways. The key stock is a few thousandths oversized and very difficult to install; even worse to remove so I'm milling it to a tap-in (not drive-in) fit. I'm making a Clough42 style key cutter to use with the mill and setting up in my super spacer that has a chuck on it. That will help assure that the keyways are dead on 180° apart. Pictures to come. . .
Another current job is to chase the threads on some big nuts. The nuts hold the shafts on which the breech blocks swing. The threads are 3" x 10 TPI. Holding and aligning them is at the limits of my 11x27 lathe. Here's the first one I did. The paint on it made it much more challenging to get it centered and held tight. The other 3 that I still have to do were bead blasted first to eliminate the indicating and holding issues. I'm using Joe Pie's technique of threading left to right on these. The material is bronze again.
holy guacamole! The project of getting it water tight(ish) and floating seems huge, but all the details needing to be right for everything else must be almost overwhelming. Even simply restoring the machines in the machine shop is hundreds and hundreds of hours of work
You are so right! Ever since the torpedo blisters were installed in 1925 they have been a source of leaks. BTW- except for when the electricity went out one time the ship has always floated even if surrounded by silt. Even then, she didn't do down very far because of the silt but the water came in at will with the pumps all down. Desilting around the hull was a major operation before the mode to dry dock. Divers worked for weeks dredging the silt away from the hull. She came out of the slip at about 6:00 AM on August 31, 2022 exactly as planned. The amount of leaking over the years has been measured in thousands to tens of thousands of gallons per day. At one time tens of thousands of pounds of foam were sprayed into the torpedo blisters to slow the influx of water. The torpedo blisters wrapped around the turn of the bilge and met the hull in a wedge shape where there were no provisions to remove all of the water so the rusting just kept getting worse. Lots of work had been done to mitigate leaking so by the time she was towed from the San Jacinto Battlegrounds to Galveston I think they said that it was stable at about 2,000 gallons/day. I'll verify that with one of the employees. The leaking did not get worse during the 8 or so hour tow to Galveston.
With new torpedo blisters and other hull repairs that the shipyard has done the expectation is that there will be absolutely no water intrusion from below the waterline. The leakage in the weather deck and other horizontal surfaces still has to be addressed. The goal is a dry ship with some dehumidifying and climate control in certain areas below decks.
David I'm so glad you've started a thread on this. I watched the live stream of the tow from San Jacinto to Galveston and it gave me a bit of a chill to see the old girl "underway" in "open water" even though I knew she was under tow in the Houston ship channel. My one opportunity to tour the ship on a school trip in the 90's was thwarted because she was closed for repairs. I'm looking forward to being able to take my kids to see her once she reaches her new home.
Thanks for the pictures and insight @David2011 . I also have fond memories of touring (playing) on the Texas as a kid and later as an adult with my son. I also remember getting to train and elevate one of the guns on the deck (AA?) I was very happy to see the move to drydock and the expected move to Galveston. Thank you for your volunteer work in helping on the restore of this fascinating window into history.
holy guacamole! The project of getting it water tight(ish) and floating seems huge, but all the details needing to be right for everything else must be almost overwhelming. Even simply restoring the machines in the machine shop is hundreds and hundreds of hours of work
This site uses cookies to help personalise content, tailor your experience and to keep you logged in if you register.
By continuing to use this site, you are consenting to our use of cookies.