Redlineman's Logan 200 Rescue

I purchased a bushing from Logan Actuator, thinking they would be a molded urethane. When I got one, it was actually a black, relatively hard plastic which had been machined on a lathe. The old bushings were rather soft, and allowed the motor stand to vibrate quite a bit. I installed the one I purchased, as well as another plastic one I made myself, and between the two, the lathe runs much quieter.

A side note.....the reason I only bought 1 bushing was a mistake on my part. Looking at the picture on Logan Actuators' site, it showed 2 bushings so you could see both front and side views, so seeing two in the picture, I thought ordering a quantity of 1 would get me 1 set. Not so. If I would have read the fine print, it stated it was for a quantity of 1 piece.
 
On my tail stock, that little key measures 0.093 x 0.490 long x 0.191 deep from face to flat.

I was just at Tractor Supply and they sell small bags of those assorted keys. If you have one close you may be able to get a bag of assorted keys for about the cost of mail order shipping.
 
GREAT Info, Guys!

I know that Woodruff keys are not exotic, but that sort of thing is not very common in my area. There's very little manufacturing, so the hardware is really lacking. I'll check in at TS tomorrow!

Looks like I will try and come up with something for the bushings as well. $30 for bushings doesn't suit my flinty side. Never tried to machine a hockey puck before, but it seems like a pretty good durometer for this. Interesting that harder was quieter.

I just bolted the headstock on for good and I'm fiddling with basic positioning/leveling of the thing right now. The peg leg and lack of solid bushings in the drive box brackets makes it kind of a pain, really.
 
I picked up some Delrin black rod from a local Amish hardware store and turned down two bushings to attach the drive assy. to the headstock. I was going to order what I thought were rubber bushings from Logan but my bushings were 5/8 in. dia. and Scott said he didn't stock that size. I was concerned about using plastic instead of rubber thinking the rubber would eliminate some vibration but the plastic seems to be working fine so far.
 
Chuck Whore

That's right;

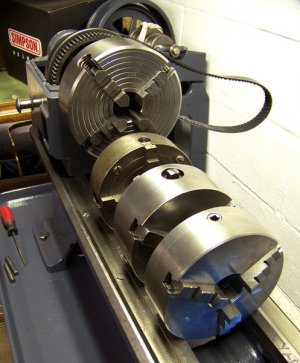
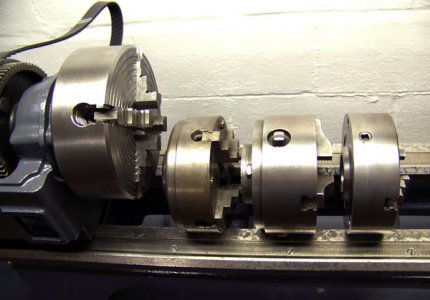
I think I'm becoming a chuck whore. I've now got 4 of them for the Logan.

LoganChucks1.jpg

From Left-to-Right; A really nice Buck 6" 4 -jaw inde #144 that I just got today, a very clean and extremely rare Toledo Timer Co. 5" 4-jaw inde, a super clean and moderately uncommon D.E. Whitton 5" 3-jaw scroll, and the absolutely pristine Logan 5" 3-jaw scroll. Other than needing the correct backing plate for the Toledo, they are ready to work. Apart from the general fun of Ol Arn, I have a particular fascination with chucks, for some reason. I wanted to finish out my little group here with a Westcott - my pre-teens Prentice 16" Gearhead has a Westcott on it - but this Buck came along and was too nice to pass up.

LoganChucks2.jpg

Who needs 4 chucks? Why spend all that money? Yeh...well... I like'em. That's enough. I've got a total of $475 in these things. I figure at new prices for a Bison, I've still got $2-300 left to spend!

:nuts:

Incidentally, the primary drive is waiting on a couple of things. First, I am going to fly cut the back of the mount brackets pictured previously. I don't suppose it is that critical, but it also won't hurt to have them a little more like a matching and even pair, and it's easy to do. Second, I'm still looking for something to make the bushings out of. Call me crazy, call me cheap, call me a cab even. I'll come up with something. Good to know the Logan ones are not 5/8"OD. Now at least I don't feel cheap!
 
I love these old machines;

I have no illusions. This humble lathe will remain far more capable than I, likely for the duration of our time together. I will never make enough chips to get very good simply because I do not have enough excuses to create them, if nothing else. That it is capable once again will be enough. Anything beyond that is a bonus.

LoganDriveboxBrkts5.jpg

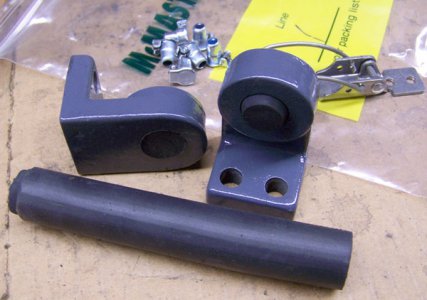
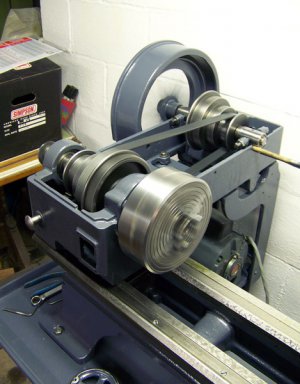
Bits. The Brown Truck brought goodies from Robinsville, NJ. I decided to try some 75A Neoprene for the drive box mount bushings. 3/4" was the smallest available, so the sanding belt brought it down to the needed 5/8. I will reuse the "washer" portion of the old bushings, and these new pieces will be drilled to accept the .375 pins. Lying in the background are some nice new oil hole covers, and a draw latch that will take the place of the missing spring tab that the parts book says used to be there, many moons ago.

LoganSaddle1.jpg

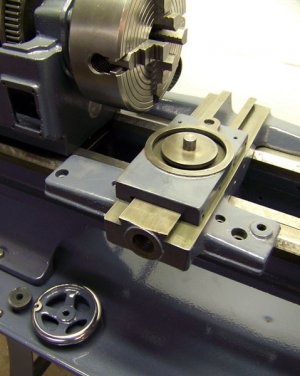
Saddle up. Oiled things up and floated the saddle on way for the first time. I would love to scrape all of this stuff in, as I assume it is not what you would call closely matched. However, at this stage I just want to keep creeping forward, so we will wait on that and a little lapping on the surface plate will have to suffice. Frankly I am more concerned with wear in the nuts & screws than anything. I'd like to enjoy the feel of a nice tight machine some time; something I have never experienced.
 
Watershed Moment

-

1st Run! Yes, I drilled my primary mount bracket pin bushings this morning and got that mounted. 75A might be slightly softer than optimal, but it seems pretty close to what was there. Got things jiggered and plugged in the motor. Hummmmmmmmm....... OK. Hummmmmmm... Crap. Pull that motor, remove the capacitor cover, and the cap is fried. Who knew? Looked perfectly clean on the outside. How very fortunate that I have an identical 1/2HP motor sitting here from God knows what. Thanks Dad. Add a new cap to the need list.

Logan1stRun1.jpg

First impression; this thing vibrates... a lot! All the stuff on the chip pan was a-buzz. Despite the rubber drive box isolaters, she shakes a bit. I had the peg leg sitting on a 4x4. Hmmm... Scrounging around the basement produced a nice piece of medium shag Berber left over from the bathroom. Four 4"x6" pieces stacked under a board brings a HUGE reduction in vibration. That's more like it. Improvise and overcome! Along those same lines and lacking the drive box cover yet, the paint brush stuck in the primary drive to achieve flat belt tension performed flawlessly as well.

The drive takes a ton of fiddling and jiggering to get things lined up and working properly. The old style countershaft holders are extremely sensitive to alignment and bolt tension. Getting it wrong means quite a bit of bushing drag. The motor bracket is awfully hard to get to and not that well designed as far as the bolt slots go. Guess I need to decide on a switch one of these days.

I cycled it through both primary pulley speeds and also those of the three cones. Back gears worked nice and smooth. So far, so good!

We be happy!
 
Too bad on the vibration! Mine is the bench mount version, and the motor drive just barely touches the bench (and no isolator in between). I get no vibration.

Do you think it can be from the fabbed motor pulley? There are two on ePay at the current time. One is listed for a 10", but they want $69. The other is listed for a 9" but would be worth asking more details about, since the auction is only up to $26.
 
You can actually make rubber shoulder bushings if you have a drill press, vise, and the correct assortment of hole saws. I had to make some a while back when I was restoring a PE-237 vibrator power supply for a Weasel radio installation.

Buy probably 70 durometer (Shore A) neoprene flat bar of the correct thickness and just wider than the diameter of the largest hole saw you'll be using. I got mine from McMaster. Cut a wood block just narrower than the bar and thicker than the distance that the hole saw pilot drill sticks out past the hole saw teeth (or you can just remove the pilot drill but you still need the wood block - will help prevent break-out tearing on the bottom of the bushing). Clamp the block and bar in the vise and position the vise under the spindle. The vise must be securely attached to the drill press table. I used one bolted to an X-Y table bolted to the drill press table. Drill the center hole through with a standard (and sharp) twist drill. Then use a hole saw whose ID is correct to leave the proper bushing diameter, adjust the depth stop and cut to a depth that leaves the desired flange thickness. Widen the hole with successively larger hole saws until you get up to the desired flange diameter. Mount this one with more length sticking out of the chuck than the previous ones so that you don't have to disturb the depth stop setting if you are making more than one bushing. Cut through to the wood block and the first one is done. Finish on the bushing side of the flange is nothing to write home about but once installed it's hidden anyway. The colder the shop is, the better the neoprene will cut.

Robert D.

When i was doing mine my rubber bushings #658 were toast. I couldn't find a correct size bushing with a flange on it like the original. I ended up using a non-flanged bushing, a rubber washer and replaced the straight pin with a new pin with a head on it to hold it in place. The "new pin" is really just a partially threaded hex head machine screw with the threads cut off. The rubber washer and bushing came from McMaster Carr but unfortunately can't find the old order with the part numbers. Below is a crude paint drawing. I guess I should really have drawn the rubber washer on the bottom rather than the middle to show the order of assembly correctly.
 
Back
Top