

-
Welcome back Guest! Did you know you can mentor other members here at H-M? If not, please check out our Relaunch of Hobby Machinist Mentoring Program!
You are using an out of date browser. It may not display this or other websites correctly.
You should upgrade or use an alternative browser.
You should upgrade or use an alternative browser.
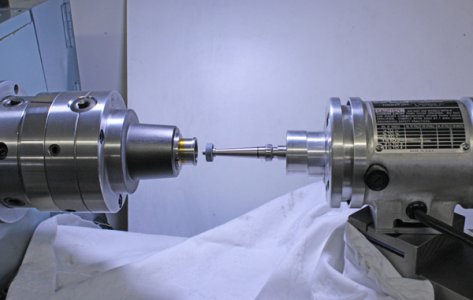
Tool post grinding wheel dressing apparatus
- Thread starter petertha
- Start date
Not sure I agree. Like many things, it might be a function of who is using it, how its set up & multitude of other factors that go into precision machining. Have a look at this post. The TPG gets utilized on quite a few operations where the tolerances & finish is pretty demanding by most standards. Granted its not exactly a stock lathe after some of his mods, but I think in principle its a useful accessory. I'm just beginning my journey but something to aspire to.
.90 cu in, 30,000 RPM, 7.2 HP custom built nitro engine
.90 cu in, 30,000 RPM, 7.2 HP custom built nitro engine
www.modelenginemaker.com
- Joined
- Dec 20, 2012
- Messages
- 9,422
I've wanted a TPG for a long time but I cannot convince myself that I could clean up every single particle of grinding dust that will get on my lathe, even if I covered it up. Maybe I'm just paranoid but yeah, I can't bring myself to do it. If I ever find a beater lathe then I might set that up for a TPG.
- Joined
- Nov 26, 2012
- Messages
- 1,307
The TPG gets utilized on quite a few operations where the tolerances & finish is pretty demanding by most standards.
If I ever find a beater lathe then I might set that up for a TPG.
I just don't put it in words real well.
Yes they can be very accurate. But after using one on my lathe I really don't like the mess.
Better than a beater lathe would be an old cylindrical grinder with the internal grinding attachment.
I bought an old cylindrical grinder for $500 and though it's old it's still very accurate.
Unfortunately it did not have the internal grinding attachment.
So I'm always on the lookout for another to complement this one or possibly replace it.
And I do have 2 tool post grinders. One is set up on an old lathe duplicator bed and grinds tapered stock up to 3 ft or so with
the duplicator off settable tailstocks.
I was concerned by the mess too, meaning fine abrasive dust & getting under the carriage wipers. First I wipe off the way oil between head stock & carriage just as a precaution. Not bone dry but not glistening wet. Then I lay down some old terry towel face cloths accordion style across the bed ways so they don't overhang much to interfere with the rotating lead screw / power feed shaft. On relatively short travel jobs its easy to just use a t-shirt material with small magnet on either end to hold it in position. Then to remove just fold it into itself, vacuum & remember which side is up to replace. If its white is shows any fine debris quite well. I also put a bit of rag stuffing in the chuck just behind the part so dust cant migrate into the chuck mechanism or into the spindle.
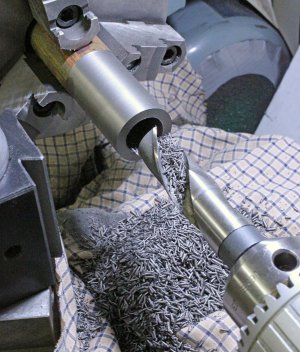
In my case (model 4-stroke cylinder liner) there was only about 0.004" (internal diameter) to remove so not really a lot of material. I was more concerned by abrasive material coming off the wheel dressing operation. The wheel is only 0.75" diameter & I held a vacuum up to it. Do what you can to keep things clean. Now if you have a bigger wheel like a 3-4" doing OD grinding, everything grows proportionately. Much more wheel to dress, more part material to grind. I agree, a dedicated lathe or better yet cylindrical grinding lathe would be nice. Unfortunately with a regular lathe the spindle & tooling all have to be decently accurate & tight so its not like any junker would do. I've thought about a dedicated mini setup like using a knock-off Asian lathe especially for small parts & dedicated spindle motor, but I don't do enough of this to warrant the expense. In hindsight I think regular machining of (in this case cast iron) has the potential for as much or more damaging mess. I do essentially the same rag procedure with CI to keep the swarf & dust off the ways.
There is also a lot you can do with lapping (and often its required after grinding anyways). But its a messy, time consuming ritual & also requires specialized tools. Lapping anything more than 1-2 thou is getting into the inefficient range.
Attachments
- Joined
- Nov 26, 2012
- Messages
- 1,307
Being a mechanic when I think cylinder I think bore and hone.
Now that's a small cylinder, but there is still a way to hone it.
Prime candidate for the Sunnen hone machine.
I have 2 of these old red ones, like this, minus the fancy gauge unfortunately.

Now that's a small cylinder, but there is still a way to hone it.
Prime candidate for the Sunnen hone machine.
I have 2 of these old red ones, like this, minus the fancy gauge unfortunately.
That is indeed the weapon of choice!. I'm envious! Pretty sure that's how all commercial RC engines are done, especially being hard chromed or similar coating. I perused some Sunnen manuals & tooling a while back wishfully thinking maybe I could replicate the expanding arbor mechanism & somehow figure out the stroking manually. But those heads are not exactly trivial & I cant say as I understand the adjustment procedure having only seen them on YouTube vids, never in real life. For example when you make a bore setting, do the stones operate under spring or hydraulic pressure until that setting is reached? Or does it increment X amount every certain number of strokes? Another mystery to me is on tapered liners like 2-strokers (as opposed to parallel bores). Are the stones somehow set at a preset angle & then stroked in the same way?
- Joined
- Nov 26, 2012
- Messages
- 1,307
For example when you make a bore setting, do the stones operate under spring or hydraulic pressure until that setting is reached? Or does it increment X amount every certain number of strokes? Another mystery to me is on tapered liners like 2-strokers (as opposed to parallel bores). Are the stones somehow set at a preset angle & then stroked in the same way?
The stones are pushed out by a wedge that they are riding on at all times. The adjustment dial simply turns a threaded rod that pulls a leaver at the back with a rod that pushes the wedge farther under the stone to extend it and apply pressure to the cut.
Modern machines may be more automated. I've never been around one of the newer ones. The old red ones like I have do nothing but rotate when you step on the "go" peddle. All cutting action is done by the user turning the dial. It has .0001 increments.
I don't know anything about tapered 2 stroke liners.

In a past life (1988-2006) I was an Arctic cat snowmobile, Kawasaki, Stihl, Husqvarna (bikes and chainsaw) dealer.
Lots of 2 strokes there. Never seen a tapered bore in one.
Thanks for the info. Taper may be a 2-stroke RC (most commonly ring-less) engine thing. I'm on the opposite end of the spectrum, don't know much about the bigger stuff LOL. The link I provided in post#12 talks about how hes sets up using defined mandrels. He is a power guru & one of the principle guys behind a well known USA pylon race engine manufacturer.
I'm using Acro barrel lap for the last operation.
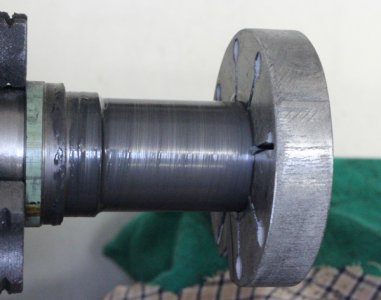
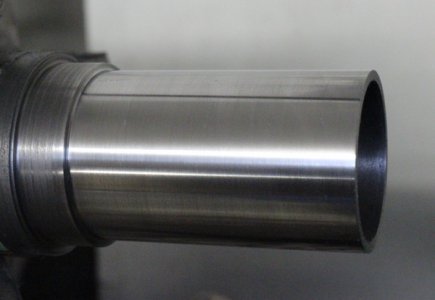
I stopped the TPG operation at 0.0010 - 0.0005" undersized which I was initially apprehensive about because the finish didn't seem awesome to the naked eye but slowly improving on that front. Also its held in a 5C collet (as light as practical) but figured it might relieve itself a bit. Anyways the last but comes off with the lapping tool. Ugh, messy & time consuming. The tapered screw expands the splined brass barrel slightly. Its very much a feel thing. Then you have to clean the liner spotless just to measure. I'm holding 0.0001" according to the dial. But I experienced an unexpected issue. The liner is heat shrunk in an aluminum cylinder & that is another consideration. The OD/ID interference needs to be accurate or the shrink can adversely affect the bore. This is my first rodeo. The next one will hopefully be a bit more straightforward.
I'm using Acro barrel lap for the last operation.
Acro laps Barrel Laps and Blind Hole Laps
www.acrolaps.com
- Joined
- Nov 26, 2012
- Messages
- 1,307
The OD/ID interference needs to be accurate or the shrink can adversely affect the bore.
Defiantly finish your bore sizing after it is assembled in the cylinder.
If running rings a cross hatch pastern is usually wanted for ring seating. Will be shining like a mirror after lapping and then you need to scratch the heck out of it to get a cross hatch. Seems like a terrible thing to do but is normally done with a ball hone shooting for a 60 degree cross hatch if I remember right.
Modern molly rings seat/seal easily. Chrome rings were the problem child's in that area, back in the day!