Edwards Radial 5 build thread --- PHOTOS!

As you complete each piece I am trying to visualize how I would have to make it with the equipment I have available to me. I have no CNC anything. trying to figure out how to make the grooves that you used CNC on. For those grooves I am thinking either a fixture of some sort on the rotary table or getting a second small rotory table to stack on top of my bigger one with the required offset.
 
As you complete each piece I am trying to visualize how I would have to make it with the equipment I have available to me. I have no CNC anything. trying to figure out how to make the grooves that you used CNC on. For those grooves I am thinking either a fixture of some sort on the rotary table or getting a second small rotory table to stack on top of my bigger one with the required offset.
I wonder if you could just get a 1/8" cutter of the appropriate diameter? Then it becomes just a plunge cut. You'd still need a rotary table or something to index them in 5 locations, but I would expect that to get the slots necessary.
 
I wonder if you could just get a 1/8" cutter of the appropriate diameter? Then it becomes just a plunge cut. You'd still need a rotary table or something to index them in 5 locations, but I would expect that to get the slots necessary.

I think this is exactly right. A slitting / slotting saw the right diameter and thickness would almost certainly do the trick. I was just a bit worried about chatter, and didn't have such a cutter on hand.

If I didn't have CNC, that's exactly what I would have done. But making use of the CNC was half the fun!

For those grooves I am thinking... getting a second small rotory table to stack on top of my bigger one with the required offset.
That sure would be fun too though!
 
Episode 8 || Cylinder Barrel Trials

I’ve gone through three rounds of trying to machine some cylinder barrels, and haven’t been happy with any of them. I’m calling them “trials”, but let’s face it, they were failures. The three trials are in order in the photo below starting with Trial 1 on the left.
IMG_7221.JPG Fusion_02.PNG

In all three cases, the ‘failure’ was associated solely with making the fins --- the drawings call for ten 0.040-inch-wide fins separated by 0.040-inch-wide grooves. So that’s what I’m going to focus on in this post. I’ll discuss the other aspects of making the cylinder barrels once I perfect the technique and bang out five good ones. Also, I haven’t yet made a cylinder barrel I’m happy with, so there’s a fair chance of additional ‘trials’ along the way. Who knows.

The logical way to create the fins on these cylinder barrels is using a parting tool on the lathe. Now, I’ve always struggled with grooving and parting-off on my lathe. I’ve tried grinding my own parting blades and using store-bought blades. I’ve tried narrow blades (0.040”) and wide blades (0.125”). I’ve tried lining up things to be square by eye, aligning things square using an indicator, and even purposely lining it up off-square. I’ve tried neutral-, left-, and right-cutting geometry. I’ve used high-speed steel, brazed carbide, and carbide inserts. I’ve used the “T” style, and all sorts of other styles. I’ve tried setting the tool on center, slightly above center, and slightly below center. I’ve tried power feeding and hand feeding. I’ve worked with aluminum, brass, bronze, cast iron, mild steel, and alloy steel. I often tighten up my gibs, I always choke up on the tool, and I always set the carriage lock.

I very often get a nice, consistent chip without any chatter. But I’d conservatively estimate that 90% of the time I end up with a crooked groove. Often a very crooked groove.

I know it’s the poor craftsman who blames his tools, but it seems my lathe is simply too flexible or worn out to get decent/consistent results.
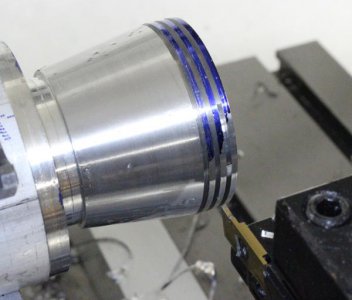
Trial 1
Because making these fins is so obviously a job for a parting tool on the lathe, that’s where I started. I used a 0.040” commercial parting blade with a V shaped profile, and squared it up to the work. I was actually getting some reasonably straight cuts and reasonably consistent fins, but some of the middle fins ended up narrower than the others, and some of the edge fins ended up tapered/bend due to the cuts wandering. When I finally parted off the cylinder barrel (using a 1/8” HSS parting blade with a neutral grind), you can see some of what I’m taking about with the wandering cuts. I was actually willing to live with this one, as it wasn’t horrible.
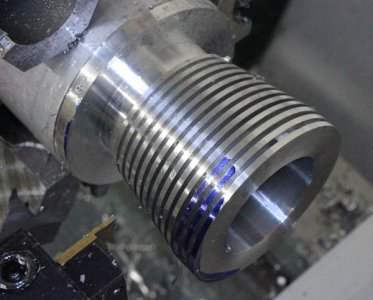
IMG_7097.JPG IMG_7099.JPG

Trial 2
The steps for making the fins on this barrel were identical to the first trial. Same parting blade, same method of squaring it up, etc. But the results were woefully inferior. The taper is so bad that the top-most fin has zero thickness at the outermost tip, and some of the fins down lower had zero thickness at the very inside, resulting in partial or complete separation of some fins from the meat of the barrel. Completely unacceptable. The two initial cylinder barrels were going in the scrap bin, and I needed to find a better way to skin this cat.
IMG_7115.JPG IMG_7222.JPG

Trial 3
If you can’t do it on the lathe, try it on the mill, right? I had a 0.032” slitting saw on hand, so I reckoned I’d give that a go. It wasn’t the specified 0.040” thickness required, but it was close enough for a trial run. For those who have read my past posts, you may know that my Bridgeport has some very modest CNC capabilities; among those capabilities is tracing out a circle in X/Y space, which is exactly what I needed to cut these fins. (Though if I had a rotary table, that’s probably what I would have used instead. But I don’t have one.) So I machined out a blank on the lathe, brought it over to the mill, and went at it with the slitting saw. The results? Excellent! But then I pushed it too hard and ended up shattering the blade, rendering the part a complete loss… oh well.
IMG_7125.JPG IMG_7129.JPG

I was able to get 2.5 of the grooves cut with the slitting saw before it shattered, and it yielded crisp, sharp results. Great!
IMG_7134.JPG IMG_7132.JPG

I ordered a couple 0.040” slitting blades and plan on milling out the fins for the cylinder barrels. I think this is actually ideal, as similar fins are called for on the heads which cannot be cut using a parting blade on the lathe. So doing everything with the same slitting saw using the same equipment should give me an overall more consistent look.

So that’s the plan going forward. Slitting saw on the mill, take it easy on the cutter, and use plenty of lube.


TIME ON CYLINDER BARREL TRIALS: 9.5 hours
CUMULATIVE TIME: 100 hours
 
FWIW I used a Nikcole tool on my (6061 alloy) radial cylinders. This particular groove width is 0.043" (1.1mm). My deepest groove was 0.172" DOC. No problem cutting at all. Just slow in-feed by hand & WD-40 or your favorite cutting fluid for aluminum. It would make a nice continuous chip but I think its better to pause feed every so often & let it break off. I really like this system, they offer a range of insert thicknesses including some bull nose (full round) which come in handy.

Because of this particular fin orientation I needed to mill off a small section of the shank that was interfering with the part at full depth. The shank is make of kryptonite, the end mill did not like cutting it.

I've modified HSS parting blades too. They work but the setup has to be rigid & extend only just slightly beyond DOC for max rigidity. I don't care for the style that has a beveled top. I think those are intended to finish on one side of a part? Anyways I find they will slowly wander on deeper grooves. Just a square tip, razor sharp, good rake & absolutely square. Pays to extend tool past an indicator to ensure its perpendicular to lathe axis.

I've heard some guys use HSS jeweler blades in a makeshift tool for very thin grooving but haven't tried that yet myself.
 

Attachments

  • IMG_2515_edited-1.jpg
    IMG_2515_edited-1.jpg
    52.9 KB · Views: 52
  • IMG_2517_edited-1.jpg
    IMG_2517_edited-1.jpg
    67.6 KB · Views: 52
  • IMG_2528_edited-1.jpg
    IMG_2528_edited-1.jpg
    49 KB · Views: 61
FWIW I used a Nikcole tool on my (6061 alloy) radial cylinders. This particular groove width is 0.043" (1.1mm). My deepest groove was 0.172" DOC. No problem cutting at all. Just slow in-feed by hand & WD-40 or your favorite cutting fluid for aluminum. It would make a nice continuous chip but I think its better to pause feed every so often & let it break off. I really like this system, they offer a range of insert thicknesses including some bull nose (full round) which come in handy.
Nice set of jugs you've got there!

My deepest DOC is about 0.280", so a fair amount deeper. That certainly doesn't help my wandering cut issues.

I've never used one of those parting/grooving tools before, but you may have convinced me to give it a go. This is the carbide cutoff tooling I use w/ GTN2 inserts.
1591362811712.png

I very much dislike it, so I mostly go w/ HSS these days.

Also, I don't like my parting blade toolholder either. Dorian makes a nicer style that holds the parting tool much more securely, but haven't come across a decent deal on one yet.
1591363003981.png 1591362918129.png
 
Perhaps grind an HSS tool and do it in 2 steps to minimize stickout? I have had pretty good luck with my hand-ground 'grooving tools', but they are only ~.150 thou long (I even part with them when I can :) ). Essentially, they are a dovetail shape with a flat front. I cut near the 'middle' of the slot to depth, then do partial cuts toward the left and right until I hit full width. My system for these (I've not done nearly as many fins as you!) to get measurements is:

1- Blue up and layout the part.
2- Cut the center of the groove with the tool to depth/near depth.
3- Measure the 'tailstock' side, then make cuts in that direction (usually pretty small ones) until that fin is the correct width.
4- Measure the width of the groove, and move left with small cuts until the groove is the correct width.

Then repeat for every other groove. The nice part is it will stop any compounding errors. Additionally, if you do it with 2 different tools for depth, you can reduce

I suspect that you're either not perfectly straight on with your tool, it has a not 'flat' front (causing it to wiggle back and forth), or it is just too thin. With my hand-ground tools, I end up getting more rigidity because there is a big square right behind it. However, since you need a .040 width, you're going to need to be pretty gentle, my system used a .060 tool for a .070 groove about .050 deep, so .040 with a .280 DOC seems really difficult!
 
I'd give up with a parting tool for that job and grind up a solid piece of HSS. Parting blades will never have the same rigidty where the blade meets the holder as there is in the root of a solid tool, and this is important when you're doing thin grooves and looking for accuracy.. You've only going ~1/4" deep so it shouldn't be hard to grind up an appropriate tool.
 
Back
Top