12" Atlas Reverse Tumbler Gear Stud

Things are a bit cramped in there, but it is workable.

View attachment 310160

Another option would be to remove the switch from the motor, find a suitable grommet for the hole and run the wire through there to the headstock switch.
That's a great idea - and there's probably enough room in the base for some strain relief.
Subject to where the motor mounted switch is located, that might be another way to do it. However, if you have rug rats or other knob twiddlers around, the motor mounted switch might be treated as a safety measure. Whenever you are done wtih the lathe, turn off the motor mounted switch. Someone just walking by who has an irresistible urge to flip the headstock mounted switch and does so will be rewarded with nothing happening.

If you do decide to tie the headstock mounted switch into the motor and leave the motor mounted switch in place, identify the hot wire coming from the switch. Disconnect it from its terminal and splice it to the black wire going to the headstock switch. Connect the white wire coming from the headstock mounted switch to the terminal from which the wire from the motor mounted switch was removed. And connect the green wire in the cord from the headstock mounted switch to some convenient grounding point at each end.
Green wire? No such animal here - hadn't been invented yet, apparently.
 
OK. As you didn't mention it in any detail, I was assuming that the 2-wire cord or the two loose wires in flexible conduit (BX) was missing and that it would be a new piece of 3-conductor. If the BX is still present, I doubt that it will fit into one of the three holes that the photo shows. What do you have?
 
OK. As you didn't mention it in any detail, I was assuming that the 2-wire cord or the two loose wires in flexible conduit (BX) was missing and that it would be a new piece of 3-conductor. If the BX is still present, I doubt that it will fit into one of the three holes that the photo shows. What do you have?
The motor has the typical sj/so cord coming out of it, with a two prong plug. That's why I'm unsure of how this thing was being powered on, other than using the switch on the motor. The lathe came out of an estate in Denver, I never met the owner, or saw it being used. The headstock switch has a short piece of so/sj cable attached, with bare wire on the end.
 
Last edited:
OK. The motor power cord is probably original 70 odd years old. The cord to the front switch is probably the same age but may not be original as the few that I have seen photos of were usually in BX flexible conduit. For safety, both should be replaced with new 3-conductor SJOOW 300 VAC rated. And the plug should be replaced with a 3-pin one. Wire gauge should be the same as the original.

You only need to identify the wire that comes from the switch and that is not connected to anything else internally. It is, unfortunately, possible that there is no such wire under the cover plate. In that case, you can't run the wire to the front of the headstock out of the junction box without taking the motor apart, and knowing what you are doing.
 
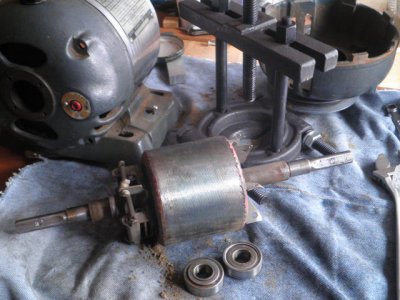
Still at it - trying to replace the motor bearings, which are quite noisy.

The motor cap without the centrifugal switch comes off easily. The one with the switch, is constrained by wires, of course, and the bearing on that end prevents the armature from pulling through, as the hole in the centrifugal switch is not large enough. I can pull the armature towards the switch end just enough, I think, to get a puller/bearing splitter behind the bearing on that side. Is that how this has to be done?
 
It is many years now since I last needed to pull the armature out of a capacitor start motor, but I do not recall ever having to pull the switch end bearing in order to extract the armature. That being said, it does sound as though your motor is different. And that you will have to pull the bearing first. It might be wise, once you have the bearing off and the armature out of the way, to inspect the switch and see whether the hole through it can be enlarged just enough to get the bearing through. I would assume that you will have to disconnect the switch from the wiring in order to do that, though.
 
You should be able to push the whole armature out of the switch end cover all the way through the motor, the bearing should stay in the end cap. If you have a puller that will fit in the slots on the cover near the bearing use that. If no puller, you can put the open end up on blocks with the edges of the iron core on the blocks and the shaft free to drop an inch or so then tap on the other end of the shaft with a soft hammer or wood block to drive it out of the bearing. (be sure and clean any rust off of the shaft first) If my description isn't clear enough let me know and I'll cobble together a drawing to explain it better.
 
Done - used a bearing splitter/puller, enough space to fit it between the back of the bearing and the end housing. Now, off to source new bearings - do they have to have the shoulder on the inboard side?
P1212788.JPG
 
If yours has the New Departure 8502 bearings, the modern equivalent is 87502. They are not a very commonly used size so they are usually expensive compared to similar size bearings, $15 or so each. It may be worth trying to clean and lube your existing ones, there may just be old crud in them.
 
They're 87502 - can I substitute a 6202 and make a spacer to account for the lack of shoulder? Given the flat capacitor that's made of "unobtanium", I'd like to put as little as possible into this motor.
 
Back
Top