2000 Enco 110-2034

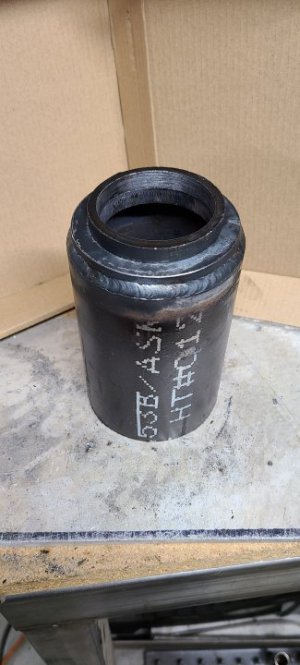
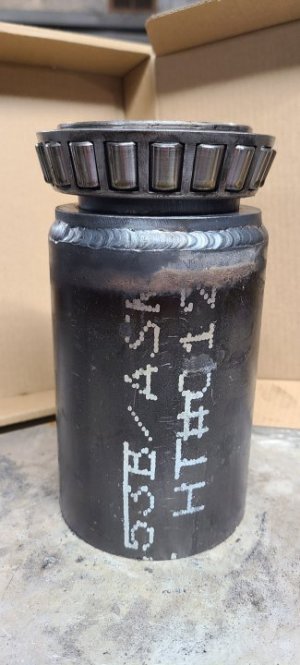
I made a custom sleeve to press the front bearing onto the spindle. A 5" long peice of sch.40 3" black iron pipe and a plasma cut cap with ring worked great. I did tig weld the cap ring to pipe, but left the inner race contact ring loose and glad I did. The inner diameter tolerance was a little too close on the inner race ring and I had to bore it slightly on my SB9c. That inner ring makes contact with the inner bearing race only, to avoid any pressure on the rollers, cage, and outer race. Other than that, pressed smoothly on to spindle without issue.
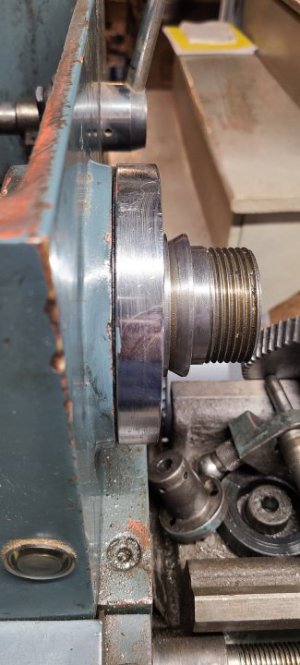
I have off work tomorrow and hoping to reinstall spindle with belt sheave, spacers, rear bearing and spanner nuts, ect.
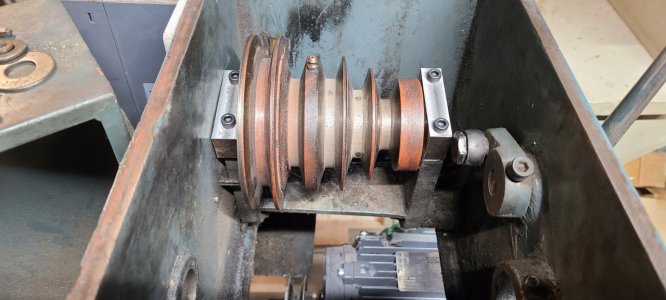
Next is removing and pressing new 6005zc3 bearings into the rear pulley. My replacement shaft caps and other parts are supposed to arrive tomorrow as well and can only hope I will be able to test out the spindle under power or Friday at latest.
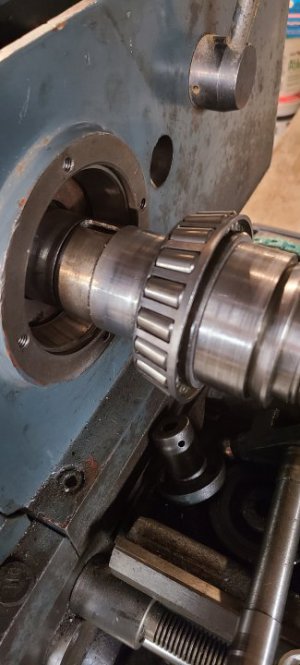
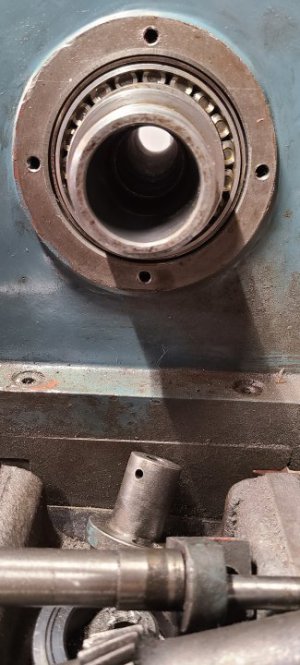
One minor annoyance is the front bearing cap and having been misaligned and misdrilled from factory. Would not effect performance, but slightly irritating. May just be me? Lol.
 

Attachments

  • 1640829005129485265155882971923.jpg
    1640829005129485265155882971923.jpg
    49.3 KB · Views: 22
  • 16408292371356897845657079321140.jpg
    16408292371356897845657079321140.jpg
    60.4 KB · Views: 13
  • 16408292895436817500991700820409.jpg
    16408292895436817500991700820409.jpg
    51.5 KB · Views: 13
  • 16408296373986999007511101309819.jpg
    16408296373986999007511101309819.jpg
    50.5 KB · Views: 9
  • 16408297202883085430087332746013.jpg
    16408297202883085430087332746013.jpg
    50.7 KB · Views: 17
Last edited:
The rear pully bearings came out fairly easy with a long piece of 1/2" rod. I did have to remove one of the side shields on each of the new bearings to allow for stock grease path into bearing from grease point on the pulley. A HF pick to lift a tab on the shield and then a small set of square nose pliers and the shield peeled off easily. I installed each bearing with remaining shield to the outside and reinstalled the shaft through the pulley. One side of the shaft has a threaded bushing on the large diameter cap side and has a spanner nut on the small diameter cap side to align the rear pulley.
Patiently waiting for UPS to show up to finish the headstock up and hopefully get her back under power.
 
Finally finished the mounting caps for rear pulley. Not worried about overall size or form, just function. I could mill front, back, and thickness of the left side cap, but opted for install and testing over form. Also could have counterbored. It function in the same manner.
Pulley has brand new bearings installed.
Next will be installation of back gear, final fitment of spindle back end.
 

Attachments

  • 20220130_130454.jpg
    20220130_130454.jpg
    142.8 KB · Views: 22
Last edited:
I decided to replace the headstock spindle belt with the accu-link, since it did such a nice job on the first belt. The huge advantage of this belt is that you don't have to remove anything to install it, but the old belt. And after poking and checking i found the jackshaft to have a bit of play and ordered new 6005zz-c3 bearings.
Having finally eliminated that crazy vibration, i feel going over the little things are definitely worth it at this point.
I have a rough set up to power the lathe and the next project is to reinstall forward and reverse switches, power switch and light, and the e-stop.
However, I will also add a rheostat and rpm display. The trick is getting it wired correctly with the vfd. With the preconfigured modes of the vfd, it shouldn't be that difficult, but the jog button will have to fall to the way side.
I'll upload some pics, but this is definitely not a "show piece" and more of a resurrection to some extent. The last owner was none too kind and not a machinist by any stretch of the imagination. Again for $750 vs. $5k for new, its hard to complain and fills a need in my shop for a larger 1-9/16" bore machine. Next in line is a plasma table build and 2nd mill.View attachment 382931View attachment 382932View attachment 382933View attachment 382934
Hello sir, I was just looking at your thread because you had your spindle out which I may end up having to-do as well soon.

What caught my attention is your stand looks like it's only tack welded everywhere from the photos perspective I see... And I'm trying to figure out how to politely ask if you're not worried with all that weight on top. My tack welds break once in a blue moon thanks..

Also 750.00 for that lathe, you must be thrilled to death, saved an easy 4k plus freight that's awesome...
 
Last edited:
Hello sir, I was just looking at your thread because you had your spindle out which I may end up having to-do as well soon.

What caught my attention is your stand looks like it's only tack welded everywhere from the photos perspective I see... And I'm trying to figure out how to politely ask if you're not worried with all that weight on top. My tack welds break once in a blue moon thanks..

Also 750.00 for that lathe, you must be thrilled to death, saved an easy 4k plus freight that'sq awesome...
So, there are two main sections of the frame, headstock and tail, with two connecting tubes, upper and lower, between them. All top and bottom joints were tig welded. There are a total of 6 adjustable feet. I did my best to keep everything level when I welded, didnt have a large enough table to clamp down, and ended up with a slight gap at the joint in front of the headstock section, when I mounted the lathe. I cut the welds on the top of the upper and bottom connecting tubes to headstock section to remove the gap. I could of just shimmed the .030-.040"...
At some point I do need to unmount lathe to properly repair, and also weld solid but even if I totally remove both connecting tubes, the lathe would stand freely without issue.
I'll try and take a few pics to illustrate. I can see by the few pics showing frame joints you would think this.
 
Last edited:
Example.
FYI, fillet welds will pull and butt welds do not, particularly with stainless.
When welding tube, you want to do butt welds first. Also always tack corners to eliminate any humped welds or running over tacks, and it's also easier to cut and adjust if needed.
 

Attachments

  • 20220207_200143.jpg
    20220207_200143.jpg
    32.7 KB · Views: 15
  • 20220207_200157.jpg
    20220207_200157.jpg
    28.6 KB · Views: 11
More bad news. I decided to disassemble pulley and replace bearings and unfortunately found this when I loosened bolts. Both shafts caps where broken. Man this machine was abused.
Good news is I can still get the replacement parts and they are about $20 for the pair. The back gear bracket arm is another $13.50. Not bad. I'm in less than $100 on the head/spindle rebuild so far.

Hi, really glad you're able to get those parts replaced, Question - where are you getting parts from...?

My lathe came from an estate sale, its similar to yours and when I saw you pulled your spindle to replace the bearings it caught my eye.. I was checking your thread to read all the gory details for removing it in case I have to in the future.

I'm a good welder with a bad machine, wait its the other way around... but when I saw your lathe stand with what looked like just tack welds and a 1000Lb machine on top I was like there's a man with confidence...! I'm sure you know what you're doing, it was just the photo views that thru me off.

On my Enco rebuild thread I'm currently beefing up the stock stand to make it mobile, I've cut my parts and will be welding up stuff this week... Have a good rest of your week..

CenterSupport3.jpg
 
Last edited:
Parts are being ordered from Grizzly. These lathes were marketed under many brands. The Grizzly G9249 was pretty much the same with a few slight differences and most parts are available. In most cases either fit directly or can be modified to fit the 110-2034. Also upgrades to be had like the graduated dial for the tailstock. Just need due diligence in crossing and comparing and in some cases taking a risk. So far the rear pulley caps were the only thing that I couldn't or wouldn't try to make work.
As I said, easy to understand your thoughts on the welds due to pics. Tig welds can be made to lay flat and deeper penetration compared to mig.
I've been welding and fabricating professionaly for over 30 years and now manage manufacturing for a fabrication company.
Let me know if you need any info or assistance.
 
More bad news. I decided to disassemble pulley and replace bearings and unfortunately found this when I loosened bolts. Both shafts caps where broken. Man this machine was abused.
Good news is I can still get the replacement parts and they are about $20 for the pair. The back gear bracket arm is another $13.50. Not bad. I'm in less than $100 on the head/spindle rebuild so far.
Gata love that Grizzley still has the parts you need. Saved your butt and made life easier... but kinda wonder why both of them broke.
Keep up the good work.
 
Back
Top