- Joined
- Jan 25, 2015
- Messages
- 2,558
Well, the missus’ mini cooper developed a bad smoking habit last year before we put it up for winter.
Classic signs of valve seals going bad. Oil apparently dissapearing without many traces, smoking on start, after prolonged idle and on downhill overruns. Not destroyer sized smoke screens, but just enough you can see it when conditions are right.
The N12 (peugot designed) engine has a bad rep for cooking the valve seals until they are hard and then bypassing too much oil.
The N12 also has a rep for failing timing chains (although not as bad as the N14 and turbocharged N18). the wife’s N12 isn’t showing a lit of the signs of it going bad, but its up to the approx mileage where they cause trouble and since I have to rip most of it out to do the valve seals, I figured I might as well do a timing kit too.
As an added bonus, I gathered up lots of other parts over the winter I would consider “maintenance”. Hoses, belts, water pump drive, thermostat and housing (themostat is non serviceable on this engine, have to change the entire housing), etc.
The vacuum pump is run off the exhaust cam and also has a rep for failing and taking out the cam drive, valves, sometimes pistons, etc so that gets a new one also.
All parts are BMW originals or the suppliers who make the parts for BMW.
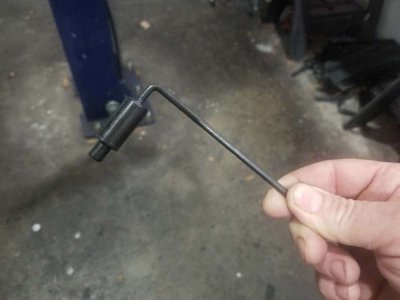
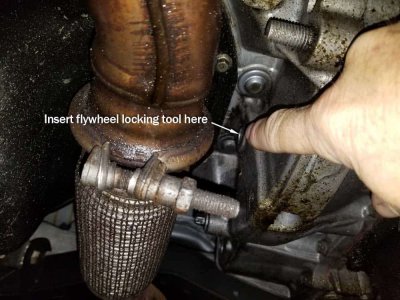
Then came the “special tools”. A special tool to lock the crankshaft. A special tool set to lock the camshafts. a special tool to remove the “valvetronic” springs, a special tool to remove this, a special tool to install that, etc, etc, etc. I’ve bought more “one time use” tools for this French/German engine than I have for any other car I’ve worked on. Once again….ugh.
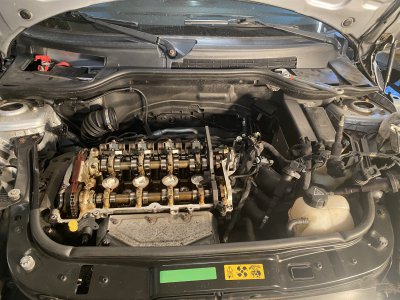
My back will only let me work a couple hours on concrete floors, so this is how far I got today:

Basically, got the valve cover off. Seems like not much done for a couple hours work, but it was a major plastic PITA. That bloody thing was buried under more one way plastic clips and interwoven parts I just can believe. Theres also the German tendency to “over-engineer” everything they build (look up the history of the tiger tank if you want to know more about “German engineering”), so theres hidden fasteners everywhere, more one way clips than you can count and everything (and I mean everything) is plastic, which has “heat hardened” and gone brittle. Fun as heck to get them off without snapping and there were one or two that just weren’t coming apart in one piece….ugh. I HATE plastic parts underhood.
Time to lay down for a few hours. Back on to it tomorrow, but this German designed, French engined, British assembled car is one major PITA to work on!
Fun to drive, but gawd help you if you ever have to work on it.
I did get a couple quotes before getting in to it myself. lets just say that even after buying all the special tools and parts I’m still several thousands of dollars less than the quotes. After seeing the nightmare under the hood, I understand why it is so expensive to work on….
Classic signs of valve seals going bad. Oil apparently dissapearing without many traces, smoking on start, after prolonged idle and on downhill overruns. Not destroyer sized smoke screens, but just enough you can see it when conditions are right.
The N12 (peugot designed) engine has a bad rep for cooking the valve seals until they are hard and then bypassing too much oil.
The N12 also has a rep for failing timing chains (although not as bad as the N14 and turbocharged N18). the wife’s N12 isn’t showing a lit of the signs of it going bad, but its up to the approx mileage where they cause trouble and since I have to rip most of it out to do the valve seals, I figured I might as well do a timing kit too.
As an added bonus, I gathered up lots of other parts over the winter I would consider “maintenance”. Hoses, belts, water pump drive, thermostat and housing (themostat is non serviceable on this engine, have to change the entire housing), etc.
The vacuum pump is run off the exhaust cam and also has a rep for failing and taking out the cam drive, valves, sometimes pistons, etc so that gets a new one also.
All parts are BMW originals or the suppliers who make the parts for BMW.
Then came the “special tools”. A special tool to lock the crankshaft. A special tool set to lock the camshafts. a special tool to remove the “valvetronic” springs, a special tool to remove this, a special tool to install that, etc, etc, etc. I’ve bought more “one time use” tools for this French/German engine than I have for any other car I’ve worked on. Once again….ugh.
My back will only let me work a couple hours on concrete floors, so this is how far I got today:

Basically, got the valve cover off. Seems like not much done for a couple hours work, but it was a major plastic PITA. That bloody thing was buried under more one way plastic clips and interwoven parts I just can believe. Theres also the German tendency to “over-engineer” everything they build (look up the history of the tiger tank if you want to know more about “German engineering”), so theres hidden fasteners everywhere, more one way clips than you can count and everything (and I mean everything) is plastic, which has “heat hardened” and gone brittle. Fun as heck to get them off without snapping and there were one or two that just weren’t coming apart in one piece….ugh. I HATE plastic parts underhood.
Time to lay down for a few hours. Back on to it tomorrow, but this German designed, French engined, British assembled car is one major PITA to work on!
Fun to drive, but gawd help you if you ever have to work on it.
I did get a couple quotes before getting in to it myself. lets just say that even after buying all the special tools and parts I’m still several thousands of dollars less than the quotes. After seeing the nightmare under the hood, I understand why it is so expensive to work on….
Last edited:


