2013 POTD Thread Archive

Hi outsider347,

Maybe someone with good electrical knowledge/experience will chime in on this, mine is very limited. Anyway, this is what I ended up with and prolly a little overkill:

Sola SDP 2-24-100T Power Supply ~$25 + shipping
http://www.ebay.com/itm/Sola-SDP-2-24-100T-Power-Supply-Used-Nice-/261237583005

Even though you could use something as simple/cheap as a windshield wiper motor, I really like the brushless motor with the instant reverse feature. You can drive it nice and slow to just kiss the shoulder then reverse it out without crashing. hth, & post a pic when you're done k...

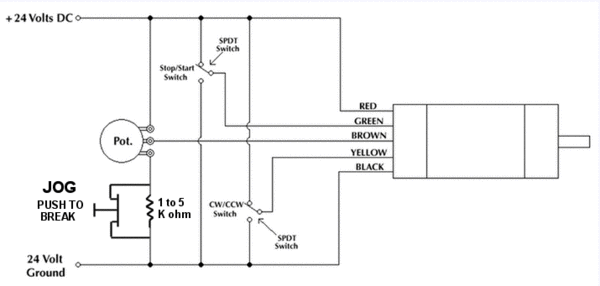
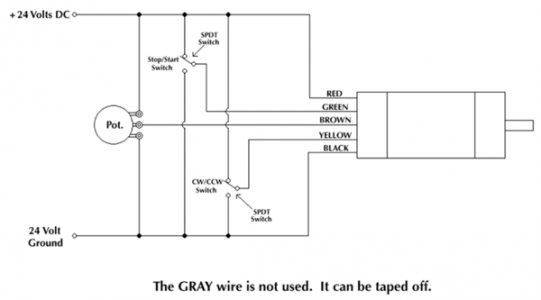
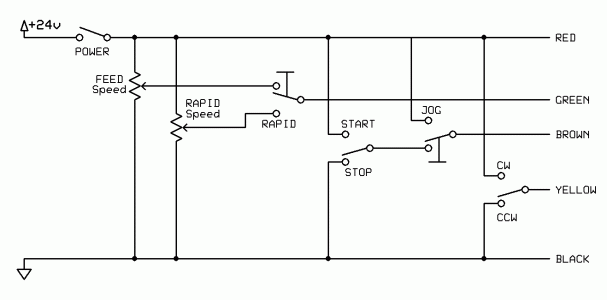
fwiw, if you find another Dunkermotoren, the wiring was easy enough even for me to do:

j96p1u.png

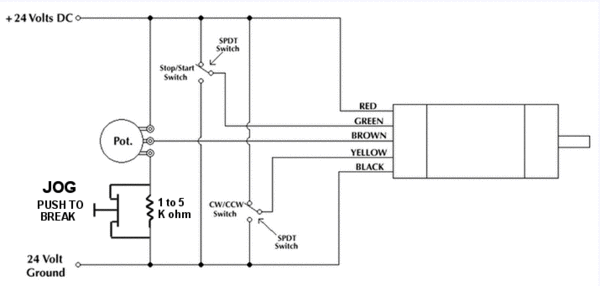
I asked someone how/where do you hook up the Jog switch and here is the pic they gave:

38773.gif

Sadly, the jog feature doesn't work, but like I said, my electrical knowledge is lacking... :)

Oh... the other stuff you'll need: 5k potentiometer, on/off switch + 2 SPDT switches (RadioShack?)

Where did you get the wiring diagram for the JOG switch? I don't see how it would work unless it simultaneously activated the Stop/Start switch.
That "JOG" circuit really looks like a "RAPID" circuit?

Ken
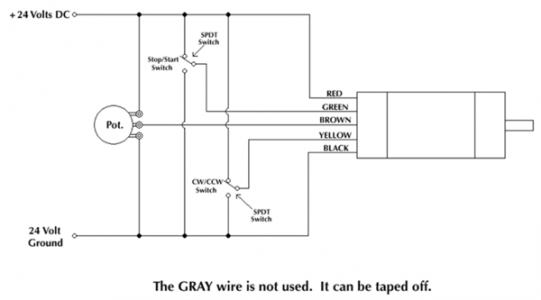
j96p1u.png

38773.gif
 
The way the Jog switch is set now, in the closed position, it will only interrupt the current flow through the switch when you push it.. Given the resistor there, my guess is that you would momentarily slow down the motor, because the resistor would cause a voltage drop.

A simplistic way to add a jog, would be to put a momentary switch parallel with the power switch, that is OPEN when not pushed. Ideally you would have a master power switch providing power to the circuit, then you'd have your switch you would use when operating the device, and the momentary contact switch would be parallel with that one. That way you wouldn't inadvertently jog it when you thought the power was off. If I had a means of showing schematic this would be easier to explain.

Terry
 
The way the Jog switch is set now, in the closed position, it will only interrupt the current flow through the switch when you push it.. Given the resistor there, my guess is that you would momentarily slow down the motor, because the resistor would cause a voltage drop. ......
Terry
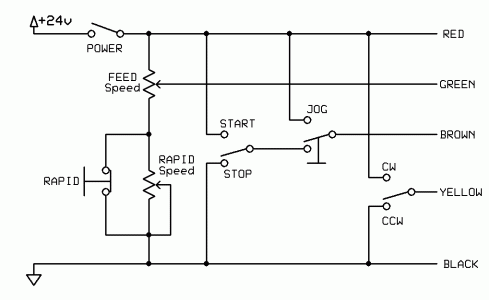
Actually, opening the JOG switch places the resistor in series with the low voltage end of the pot. This will increase the voltage to the Brown wire and increase the speed.

Ken
 
MillControl.gif

This should work.

MillControl2.gif
But, I would prefer to keep the Feed and Rapid speeds totally independent.

Ken

MillControl.gif MillControl2.gif
 
I needed light shades for the unheated addition to the shop. Figured florescent lights would be too slow coming on.
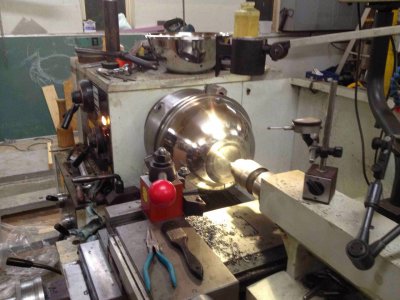
Started with 4 - 8 quart stainless bowls 13 1/2 inches diameter. Mounted them in the 3 jaw to find centre and drill a 3/8 pilot hole.

IMG_0865.jpg

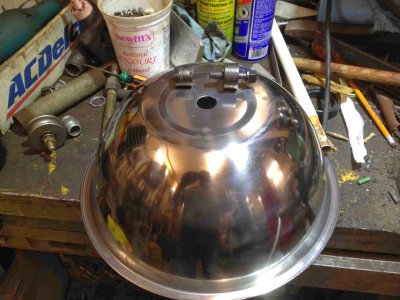
Used a Greenlee punch to make the hole for a strain reliever.

IMG_0866.jpg

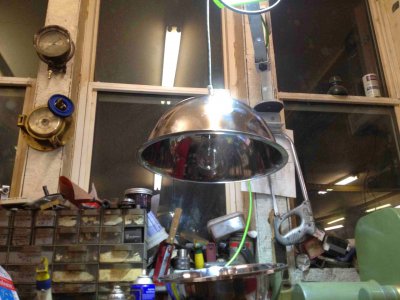
The finished product. About $12 per light including bowl, socket and stain reliever.

IMG_0867.jpg

Greg

IMG_0865.jpg IMG_0866.jpg IMG_0867.jpg
 
I needed light shades for the unheated addition to the shop. Figured florescent lights would be too slow coming on.
Started with 4 - 8 quart stainless bowls 13 1/2 inches diameter. Mounted them in the 3 jaw to find centre and drill a 3/8 pilot hole.


Used a Greenlee punch to make the hole for a strain reliever.


The finished product. About $12 per light including bowl, socket and stain reliever.


Greg

Very nice!
While we don't get as cold as Canuckland we get pretty cold here and I have T8 fixtures that are rated at -20f and they warm up fairly quick.
With the size of the cold space in the barn florescent is way cheaper on the power bill for me.
 
The finished product. About $12 per light including bowl, socket and stain reliever.

Greg

Your wife NOT finding out you knicked her mixing bowls.... priceless! :biggrin:

Nice re-purposing of materials.

-Ron
 
Bought a used floor drill press a couple days ago, and I've been working on a list of improvements.

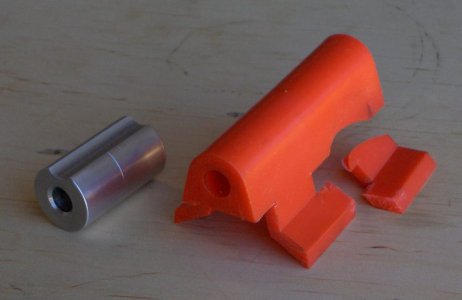
There was a nice accessory included - a circular plastic table for drill bits, etc., that attaches to the column. I've owned one of these before, and found that the real weakness is in the plastic mount. This is held to the column with a hose clamp. Either tightening the clamp too much or simply age will make the plastic fail. I took a piece of 1" aluminum rod, drilled a 3/8" hole for the table mounting rod, and cut a groove along the side for stability against the column - used a ball end mill.

Old and new parts:
HPIM2785k.jpg

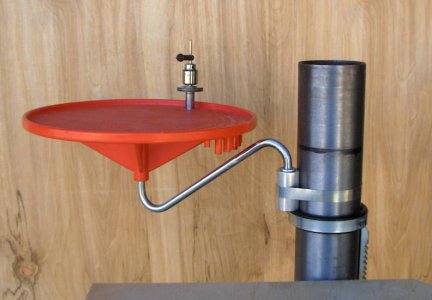
Next photo shows the table attached to the column, using the new mount ...

Note that there's another hose clamp on the upper rack retainer. There was a setscrew in this retainer, meant to hold it it place, with a warning label not to tighten it too much. Unfortunately, some previous owner must have reeefed on it and split the cast iron ring. I widened the split to about 3/32" with a hacksaw, then used the hose clamp to hold it tight to the column.
HPIM2787k.jpg

I'll be replacing the drill press head as soon as I get some new belts I've ordered.

HPIM2785k.jpg HPIM2787k.jpg
 
Nice fix. World better than the original and it looks cooler also.

Jeff
 
Back
Top