Added ER-40 Collet Chuck to PM-1022V

twowhites

Registered
Registered
Joined
Jan 11, 2021
Messages
18
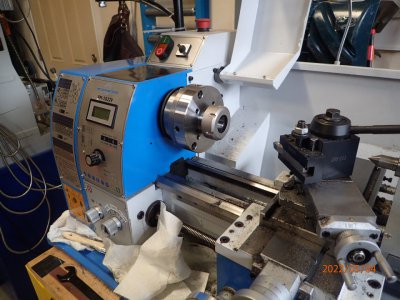
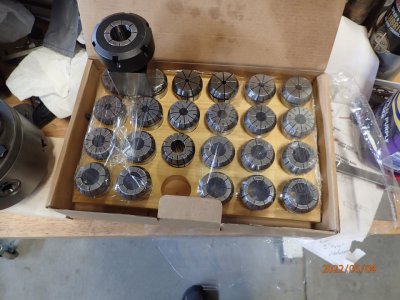
I just added a low profile ER-40 collet chuck to my PM-1022V. I got the back plate from Precision Mathews, the collet chuck from Shars (PM didn't carry one, but their helpful folks pointed me in the right direction) and got the box of collets from LMS. I "needed" the collet chuck for the Turnado freehand metal turning system on order. The collet chuck setup is much lighter than the 3 & 4 jaw chucks - the lathe actually runs a little quieter with the reduced chuck weight. (The gears got a bit noisier after my recent change gear swaps for thread cutting.)

Also, does anyone have a current recommendation for a reasonably priced facing cutter for the PM-728VT mill? I recently obtained an impressive die filer kit from Andy Lofquist that requires some precision flattening. Looks like a challenging kit that should teach me a lot. I removed a 1 1/2 hp motor with variable speed control from a free treadmill advertised online. The motor setup that Clickspring used for his die filer is quite expensive, so I went for the cheapest option I could find....so I could buy more tools.

This retirement thing is great....
 

Attachments

  • Collet Chuck.JPG
    Collet Chuck.JPG
    139.5 KB · Views: 168
  • Collets.JPG
    Collets.JPG
    133.7 KB · Views: 156
I had better luck using the lathe to face the filer table. I'm not positive it would fit on the 1022, but mine is an 1127, so I suspect it would. If you prefer to use the mill, and to keep cost down, I would suggest fly cutting with an HSS bit.

I used a treadmill motor for mine, it works great.
 
I had better luck using the lathe to face the filer table. I'm not positive it would fit on the 1022, but mine is an 1127, so I suspect it would. If you prefer to use the mill, and to keep cost down, I would suggest fly cutting with an HSS bit.

I used a treadmill motor for mine, it works great.
Good info on the lathe versus mill. Plus it would save money. Did you also flatten the bottom and other body surfaces using your lathe? I was worried about securing the die filer body in the lathe chuck given the uneven weight distribution and the 15 pound body weight. Do you have any photos of your process?

Glad to hear you used the treadmill motor as well....and people just give them away.
 
This might be a good choice for your mill flattening operations - you can mount it in a ¾” collet.

 
You might also want to look at this:


I have this as well as the SuperFly that David linked to. I like both, but if I were to have just one I would take the Tri Fly. I often run it with just one cutter installed instead of all three. The SuperFly will cut a larger diameter on the face, but the Tri Fly will cut to a shoulder.

It's nice to have options!
 
Great info and thanks. Do you both think the carbide cutters will work well on the cast iron? I've been staying away from carbide based on vairous comments about suitability on low RPM machines like my lathe and mill. I just have no experience with it.
 
Good info on the lathe versus mill. Plus it would save money. Did you also flatten the bottom and other body surfaces using your lathe? I was worried about securing the die filer body in the lathe chuck given the uneven weight distribution and the 15 pound body weight. Do you have any photos of your process?

Glad to hear you used the treadmill motor as well....and people just give them away.

I keep meaning to post a thread about it. Lol. The table is what I did on the lathe. The body I did mostly on the mill. I used an indexing head with reverse Jaws for most of the process, so aligning things wasn't bad. A bit overkill. I also put the tailstock in the vise to add support. I used a boring head, end mills, and a face mill mostly.


20211217_113646.jpg


20220221_200808.jpg
 
Excellent info. I hadn't thought about the indexing head approach. That would simplify a whole bunch of alignment concerns. Great looking finished product. Any idea how many machining hours you have invested in the die filer. I'm thinking two-four years at my work speed. I'm slow but extremely mediocre. If you start a separate thread about your die filer build, send me the link. It would be well-worth having your build under a dedicated keyword search. I've looked at a number of videos and posts about die filer maching, but I think your approach would really be eye-opening to a lot of builders.
 
Honestly, I'm not sure how much time I have into it. It was a fairly long build, mostly because I don't get a ton of time to mess around in the shop. I would guess around 40 hours of shop time, mostly because I spent way too long trying to find ways to hold things and plan ahead for the next operation. I attached a DXF of a little gasket I drew and laser cut for mine. It might come in handy even just as a template for the drilling for the cover. Though you might want to expand it a little. Mine had an extra page suggesting it might be needed. I thought mine would be ok, but I ended up breaking through on one screw hole. There are enough that it's not a big issue, but it's something to be aware of. I think I was about 0.050 off. lol. Owell.

Overall, it is a lot of fun to build and a useful machine for a home shop. I've used it on a few projects now and it's worked great.

I found a pic of it mounted to a board along with the motor and controller from the treadmill. I kept the flywheel from the treadmill and cut the blank pulley from MLA to match. I did that as the multi-V belts they use are able to handle a smaller drive pulley, so the reduction is higher. The motor is speced for 10,000 RPM, so I wanted to slow the filer down. Keeping the flywheel also keeps the fan that is designed into it. These motors tend to like to be cooled. I think the original belt was broken, I got this one from Amazon.

20220305_182153.jpg
 

Attachments

  • Filer Gasket.dxf
    3.5 KB · Views: 71
You might also want to look at this:

The tri-fly looks interesting. I have the superfly and love it. I'm probably the odd guy out but I love fly cutters. Have you put an indicator on the tips of each carbide insert on your tri-fly and checked them for consistency?
 
Back
Top