-
Welcome back Guest! Did you know you can mentor other members here at H-M? If not, please check out our Relaunch of Hobby Machinist Mentoring Program!
You are using an out of date browser. It may not display this or other websites correctly.
You should upgrade or use an alternative browser.
You should upgrade or use an alternative browser.
Counterbore sets
- Thread starter Aukai
- Start date
- Joined
- Jan 20, 2018
- Messages
- 5,637
If you're looking to actually counter-bore for a hex head (with the hex down inside the hole), as opposed to spot-facing, the counter-bore needs to be large enough for a socket. Unfortunately, the diameters of sockets are not standardized. Cheaper sockets have heavier walls to compensate for lower strength alloy. This is probably why you don't find sets of counter-bores for hex heads.
- Joined
- Jan 20, 2018
- Messages
- 5,637
I've got this counterbore set. Just a cheap Chinese set but does the job for me. I would just use end mills before I had this.
View attachment 310542
These are very versatile and you can make your own pilots. This one hasn't seen much use.
- Joined
- Apr 14, 2014
- Messages
- 3,161
Just an FYI, counterbores for socket head bolts come in 2 standard sizes. The "close fit" size is .015" larger than the diameter of the bolt head. The "standard" size is .0315 larger than the diameter of the bolt head.
- Joined
- Feb 1, 2015
- Messages
- 9,621
A counterbore is nice because it can be used on a drill press due to the pilot. On the mill, I use an end mill. For larger counterbores, I use a pocketing routine on the CNC.
Before I had the CNC, I would use a manual routine. Calculate the difference between the desired counterbore diameter and the end mill diameter. Bore the central portion to depth. Move the x axis over by 1/2 the difference between the diameters and bore to depth. Move the x axis to the opposite side and repeat. Return to the center. Now do the same in the y axis. If the diameters are close enough, this may be sufficient. For larger differences, Now move the table .707 times half the difference in the diameters in the x and y directions in each of the four quadrants and bore to depth.
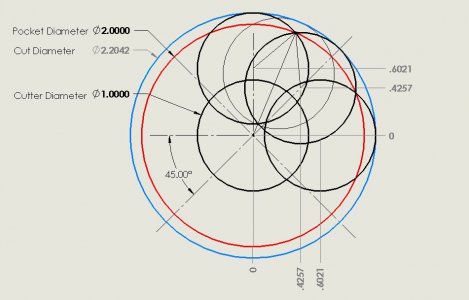
This will result in a pocket that is smaller in effective diameter than desired pocket due to the scallops.The difference increases with an increase in the ratio of the pocket diameter to the cutter diameter. To compensate for this, a slightly larger cut diameter is used. T calculate the cut diameter, I use SolidWorks. The drawing below shows a typical pocket. By changing the values of the cutter diameter and pocket diameter (in bold), the need cut diameter will be displayed.

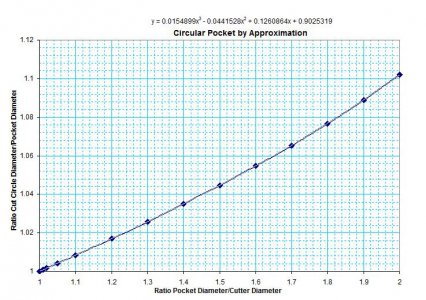
For those who haven't access to parametric modeling CAD, I prepared a chart from a spreadsheet which permits calculating the required cut diameter.

To use, Divide your desired pocket diameter by the cutter diameter and locate on the bottom scale. Then follow up to the blue curve. At the intersect point, trace back to the left hand scale. The value given is multiplied by the pocket diameter to give the cut circle diameter.
As an example, using the drawing above, if I needed a pocket of 2" diameter and had a 1" cutter, the ratio would be 2.0 and the intersect point would be 1.11 so I should use a cut circle diameter of 2.2". I would add a small amount for clearance and rounding errors, so make it 2.21" As seen from the drawing, the actual diameter would be 2.2042".
Using the latter value, the difference between the cut diameter and the cutter diameter will be 1.2042" and half that will be .6021", as shown in the drawing. After making the four cuts on the x and y axes, the diagonal cuts would be .7072 x .6021 = .4257", as shown in the drawing.
The scalloping feature increases with an increase in the ratio of the pocket diameter to the cutter diameter. so it is preferable to choose a cutter as close to the pocket diameter as possible. If this isn't possible, a better approximation can be made by making eight additional cuts at 22.5º on either side of each axis. This will reduce the scalloping feature to a few thousandths. The light black circle in the drawing shows the effect. (sorry, I haven't done the math to calculate the required cut circle but for the scenario in the drawing it will be around .023")
Another use for this method is to create tight tolerance fits for things like dowel pins when an appropriate reamer isn't available. Drills are notorious for making imperfect holes and even if they could make a hole true to their nominal size, the correct drill size to match a dowel pin is usually not available. End mills make a better hole but again., the correct diameter is nit available. By drilling the hole under size and following with an end mill, using the above procedure, you can sneak up on the desired fit for a dowel pin. The fit isn't as nice as a reamed hole where you have full contact with the pin but the eight points of contact will provide plenty of support . An advantage of this method is that the eight point contact permits a greater amount of tolerance in an interference fit as the base material will deform more easily to accommodate the interference.
Before I had the CNC, I would use a manual routine. Calculate the difference between the desired counterbore diameter and the end mill diameter. Bore the central portion to depth. Move the x axis over by 1/2 the difference between the diameters and bore to depth. Move the x axis to the opposite side and repeat. Return to the center. Now do the same in the y axis. If the diameters are close enough, this may be sufficient. For larger differences, Now move the table .707 times half the difference in the diameters in the x and y directions in each of the four quadrants and bore to depth.
This will result in a pocket that is smaller in effective diameter than desired pocket due to the scallops.The difference increases with an increase in the ratio of the pocket diameter to the cutter diameter. To compensate for this, a slightly larger cut diameter is used. T calculate the cut diameter, I use SolidWorks. The drawing below shows a typical pocket. By changing the values of the cutter diameter and pocket diameter (in bold), the need cut diameter will be displayed.

For those who haven't access to parametric modeling CAD, I prepared a chart from a spreadsheet which permits calculating the required cut diameter.

To use, Divide your desired pocket diameter by the cutter diameter and locate on the bottom scale. Then follow up to the blue curve. At the intersect point, trace back to the left hand scale. The value given is multiplied by the pocket diameter to give the cut circle diameter.
As an example, using the drawing above, if I needed a pocket of 2" diameter and had a 1" cutter, the ratio would be 2.0 and the intersect point would be 1.11 so I should use a cut circle diameter of 2.2". I would add a small amount for clearance and rounding errors, so make it 2.21" As seen from the drawing, the actual diameter would be 2.2042".
Using the latter value, the difference between the cut diameter and the cutter diameter will be 1.2042" and half that will be .6021", as shown in the drawing. After making the four cuts on the x and y axes, the diagonal cuts would be .7072 x .6021 = .4257", as shown in the drawing.
The scalloping feature increases with an increase in the ratio of the pocket diameter to the cutter diameter. so it is preferable to choose a cutter as close to the pocket diameter as possible. If this isn't possible, a better approximation can be made by making eight additional cuts at 22.5º on either side of each axis. This will reduce the scalloping feature to a few thousandths. The light black circle in the drawing shows the effect. (sorry, I haven't done the math to calculate the required cut circle but for the scenario in the drawing it will be around .023")
Another use for this method is to create tight tolerance fits for things like dowel pins when an appropriate reamer isn't available. Drills are notorious for making imperfect holes and even if they could make a hole true to their nominal size, the correct drill size to match a dowel pin is usually not available. End mills make a better hole but again., the correct diameter is nit available. By drilling the hole under size and following with an end mill, using the above procedure, you can sneak up on the desired fit for a dowel pin. The fit isn't as nice as a reamed hole where you have full contact with the pin but the eight points of contact will provide plenty of support . An advantage of this method is that the eight point contact permits a greater amount of tolerance in an interference fit as the base material will deform more easily to accommodate the interference.


