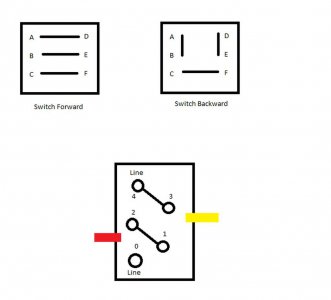
I feel like I am missing something simple here on how to get this all wired up but not sure what it is. I have a Furnas Reversing Controller and a Westinghouse 1/2 HP Type FZ motor, it is single phase and can be wired for 110 and 220. It is also a capacitor start motor. Terminal setups for both the switch and the motor are drawn up in the attached diagram.

First this seems to not be a normal Furnas switch as most of them seem to have the L patter contacts when switched one way or the other and this one doesn't. I also haven't been able to find a wiring diagram for this motor, they seem to be 5 or 8 and this motor has 7 leads. 5 as terminals on a board and 2 as wires next to the board. I have ohm'd the motor and gotten the following out of it.
4,3 to 2,1 = 2.5 ohms
4,3 to 0 = 1.5 ohms
2,1 to 0 = .3 ohms
Red to Yellow had a ohm reading them dropped to 0, is this the capacitor?
Everything other combo is showing open.
So I think there are motor windings between 4,3 and 2,1 but not sure. I would like to get this wired up so that I can use it as 110v right now. Then once I have access to 220, next couple months or so, rewire the motor for that. So sort of stuck here. What am I missing? Thanks for any help.

