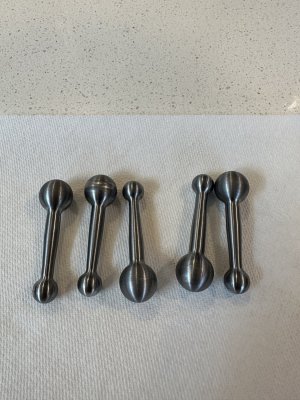
Worked on the 7 smaller ball handles. Broke down the pics into major machining steps.
First I turned the 1/2" ball side by roughing out material with a parting tool, and then using the ball turner that was already set for 1/2" from the larger handles.

Since I already had the 1/2" ER collet in, I flipped each piece, and chucked the ball, and a little bit of the 1/2" stock for rigidity and roughed out the 3/8" side.

Once I was down to 3/8" diameter, I then came back in with the parting tool, and roughed out the thin handle area, and machined the ball with the ball turner now sized for 3/8". I did each operation on all 7 parts so the balls would all be uniform in size, and I would only need to change the settings on the ball turning tool once.

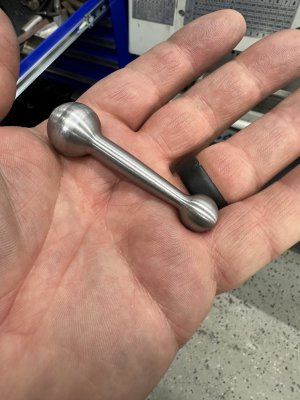
At this point, I installed a 3/8" collet, inserted a plug of 3/8" stock into the collet, leaving about 1/2" clear in the front of the collet to then mount the 3/8" ball into the collet. I brought in a 1/2" reamed guide in the tail stock, and centered up the part by referencing both the ball and the untouched disk of stock in the center of each part, and thigtened the collet on the 3/8" ball positioned just over halfway into the nose of the collet so the shaft was still accessible with cutting tools. I then withdrew the tailstock so the 1/2" reamed guide was just supporting the 1/2" ball, squirted some way oil for lube on the ball, and machined away the remaining disk in the middle of the part. Last operation was to use the compound set at about 1.5 degrees to cut the shaft from right to left towards the 3/8" ball for the taper. Once cutting was done, I removed the tailstock support, and used emory and maroon pad to polish up the part at about 1200 RPM with no tail support. Here is the results of all this work.

All ball handles operations complete outside of drilling and tapping. Will make a jig for that, and I am planning on using the metric alternative for thread and tap sizes from the Quorn plans, as I already own the HSS Spiral flute taps, and have a metric Irwin set I plan on grinding the ends off of to create bottoming taps with.Will single point cut the threads for all the fastening studs.