[How-To] How do I set diameter?

You would be plunging with a boring head, not sure I understand the difference.
Yes, you're absolutely right. I mis-understood your original post as gradually feeding in the Z axis, You mean feeding in the X axis?
 
Yes, you're absolutely right. I mis-understood your original post as gradually feeding in the Z axis, You mean feeding in the X axis?
Yes, it's called ''stepover''
 
You can clamp the shank of the boring bar in a vee block on a surface plate. Using a height gage, determine the top of the shank and calculate the height of the center of the shank. Then add the radius you want to cut and set your height gage to that number. Adjust the boring head to the height gage. HTC
 
The diameter is twice the radius. The radius is the depth of the final cut. I fail to understand what all the foo-fah-rah is about. Why a boring head, it would be a pain to set it that small. I have a 'toy' mill (HF) that is really a glorified drill press. Even that mill can be fitted with a 3/4 end mill. Plunge cut or side cut is your option. The radius is 3/8 inch, how deep you want to cut, if you are looking for an exact half circle.

.
As a rank beginner, I hadn't considered all the options because frankly I don't know what they are. As clearly shown by this thread.
I don't even know if I have a 3/4" endmill
 
Pretty much all the different options would work. At one time or another I have used them. Today I would do the plunge cut with the 3/4" endmill, a couple of thousands shy of the radius. Say .372 instead of .375. It is always easier to cut a little more then to try and put metal back.

The only option I did not see presented was to butt a plate up to the edge and do the whole circle as as UN interrupted cut. I have also done that. It takes some solid clamping but it reduces the chatter and vibration in making the cut. If you elect to start in from scratch, it will take a long time. A boring bar will do it but in very small cuts. The JO Pie video is excellent, but he is using a real mill that can handle bigger cuts and absorb the vibration.
You can also plunge cut with a fly cutter. Again only in very small cuts. The problem with that is tricky measuring and setting in the final cuts so you don't over shoot your dimension.

When you get close with boring bar or fly cutter, blue the surface and bring down the cutter and scratch it. Measure maybe 4-5 times, walk away and then come back and measure again. Close your eyes and hold your breathe and it will all be over in seconds. Been there, done that!!!!!


By the way, you will come across this problem again and again in machining. The problem stays the same, only the dimensions are changed to protect the innocent.
Thank you, I really appreciate the advice!
 
Another option to consider, depending on the size of the work of course, is to butt a sacrificial piece alongside the desired crescent and just drill a hole on a drill press. The sacrificial piece MUST be the same material so the drill doesn't wander. Clamp it up, center bunch the point and, I recommend, step drilling. If you go a fuzz undersized, that leaves a little working material to do a finish cut with a reamer or a mill. Depending on tolerances, just drill to size. I have made many crescent shaped pieces on a lathe this way. A piece of scrap and a 4 jaw chuck work wonders.

.
 
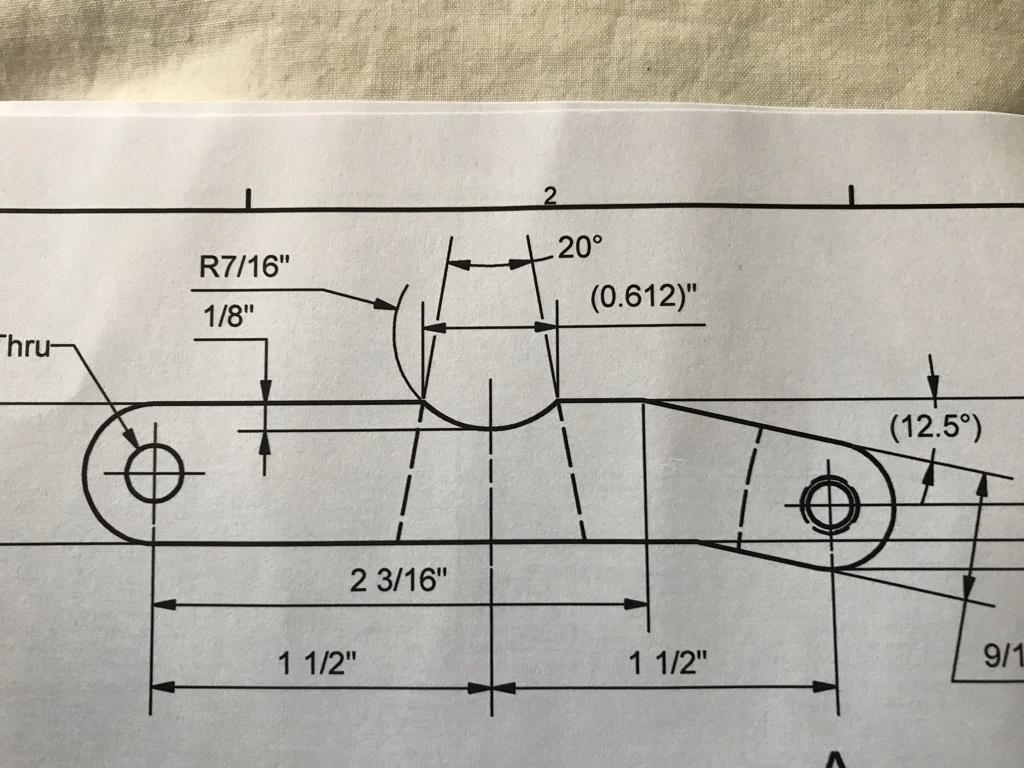
For clarity this is the part that needs the radius feature.
Turns out that that’s it’s 7/8” diameter not 3/4” (blame it on bad memory!)
I do have a 3/4” end mill in the tooling I inherited so I may substitute an 3/8” radius instead.
9bb86a48a96ce1f22971190063eb0b6b.jpg
 
Last edited:
Back
Top