How Do You Use Stamping Tools?

I'm stealing your idea on painting 1 side of the stamps.:anon:

The wooden holders (alpha and numbers separated) were gifted to me already.:tranquility: I keep the stamps impression side up, in alphabetical order , so I find the right one. Anybody keep their stamps in qwerty order?

My hands aren't steady enough for the triple impression to be clear.:(
 
thanks; I bought them on impulse; the worst that can go wrong is I break one. I'll practice on some stuff. All good suggestion, btw that will be helpful
 
I'd be curious to see the holder you made for shop pressing. Unless part of it were acrylic, it would seem difficult to see where the stamp is as the holder would block the view. I've got a 12 ton shop press I built and may try the stamp in it too and do some hammer whacking today in the garage once my wife goes to work (she hates pounding noise). Last time I used the shop press to do something similar was with a hole puncher. The press ended up bending the puncher completely out of shape so I see the utility in a holder (also to prevent it from flying off the press).
 
I had made a stamping fixture for both round and straight parts. The locator plate is keyed and can be turned for either flat or round parts. The arm is adjustable for up or down depending on thickness of part. I also had alignment marks on edge of locator for equal movement of parts during stamping. Here is a rough pic of the fixture.

Stamp Fixture.jpg
 
I've had the best success using a scrap piece of aluminum flat stock with a slot milled in it a few thou wider than the stamp. Then its just a matter of clamping it so the stamp is presented square to the work. For making index marks I just sharpen a piece of tool steel to a really fine point and stick it in a collet in the mill and use the quill feed to move it across the work. Best to you == Jack
 
I have been using and making stamps for many,many years. A master gun engraver ,Lynton Mackenzie,taught me his method: He would scribe a line into the metal. Then,draw the stamp tilted toward the operator (towards himself ) until he felt the stamp "click" against the line. The scribed line does not have to be very deep. You need to develop skill,and a good sense of feel. Then,the stamp was tilted back to vertical and struck heavily enough to indent it into the metal a little bit. Next,the stamp was leaned and struck on each of its "4 corners" to make sure the stamping did not come out light on one side when lifted out of the mark. Finally,the surface was sanded down to eliminate the scribed line,and JUST AS IMPORTANTLY,to eliminate the raised,displaced metal so often just left there these days on guns,etc. It just looks miserably bad.

To do this correctly requires CRISP stamps in good condition,preferably with sharp edges all around the mark,and NOT the rounded edges you get with cheap stamps made in Asia. I would avoid HF stamps entirely. I have spent many years searching in flea markets and on line for GOOD,OLD American made stamps WITH SERIFS(The little lines across the ends of the elements of the letters or numbers. By now I have accumulated stamps from 1/32" to 1/2" with serifs,and have made other sets myself.

I have heard of using DYMO tape for resting your stamps against to align them,but have not tried this myself. Certainly masking tape is TOO SOFT to get the best results with.

Another problem with cheap stamps is the letter is in the middle of a large,flat area that is either round or square. You cannot see where the stamp is actually being located because you can't see the edges of the actual figure.

If I get an otherwise decent set of stamps,but which has this wide margin,I grind the margin away carefully at an angle so as to bring the edges of the letter or number into view when in use. Don't make the angle too acute when grinding the excess metal away. It is not necessary,and can easily result in having part of the figure chip off and ruin the stamp.
 
Last edited:
Thanks for the sketch, Bill. George, your talents always amaze me.

with the wife out doing her hair, I went crazy in the garage, stamping my initials on everything, including a lot of my tools. Seems to work really well with mild steel too. Since the stamps are square, I lined three of them up with my "DAV" initials. Then took a sledge and pounded all three at once so I wouldn't have to use a tape or scrib trick. Problem was each time I did it, only the "A" showed up, so it looks like cheating is out of the question.

So HF guarantees 9000 whacks, I'm down to like 8,900 left before something gives.

I defintely need to make a holder like Bill showed for alignment and so I don't have to hold it. I felt nervous with the sledge and my fingers.
 
I have been using and making stamps for many,many years. A master gun engraver ,Lynton Mackenzie,taught me his method: He would scribe a line into the metal. Then,draw the stamp tilted toward the operator (towards himself ) until he felt the stamp "click" against the line. The scribed line does not have to be very deep. You need to develop skill,and a good sense of feel. Then,the stamp was tilted back to vertical and struck heavily enough to indent it into the metal a little bit. Next,the stamp was leaned and struck on each of its "4 corners" to make sure the stamping did not come out light on one side when lifted out of the mark. Finally,the surface was sanded down to eliminate the scribed line,and JUST AS IMPORTANTLY,to eliminate the raised,displaced metal so often just left there these days on guns,etc. It just looks miserably bad.

To do this correctly requires CRISP stamps in good condition,preferably with sharp edges all around the mark,and NOT the rounded edges you get with cheap stamps made in Asia. I would avoid HF stamps entirely. I have spent many years searching in flea markets and on line for GOOD,OLD American made stamps WITH SERIFS(The little lines across the ends of the elements of the letters or numbers. By now I have accumulated stamps from 1/32" to 1/2" with serifs,and have made other sets myself.

I have heard of using DYMO tape for resting your stamps against to align them,but have not tried this myself. Certainly masking tape is TOO SOFT to get the best results with.

Another problem with cheap stamps is the letter is in the middle of a large,flat area that is either round or square. You cannot see where the stamp is actually being located because you can't see the edges of the actual figure.

If I get an otherwise decent set of stamps,but which has this wide margin,I grind the margin away carefully at an angle so as to bring the edges of the letter or number into view when in use. Don't make the angle too acute when grinding the excess metal away. It is not necessary,and can easily result in having part of the figure chip off and ruin the stamp.

I'd love to see that done. Any way you could make a video.
Most of the stamping instructional videos on YouTube ar geared toward artists, and aligning the letters don't appear important to them.

I'm just a hobby machinist, but whenever I make a part for someone I always stamp my initials and the year on the part. I always practice for a while before stamping the part, but still manage to put one crooked or misaligned letter no matter how hard I try. A little guidance from a pro would be helpful.

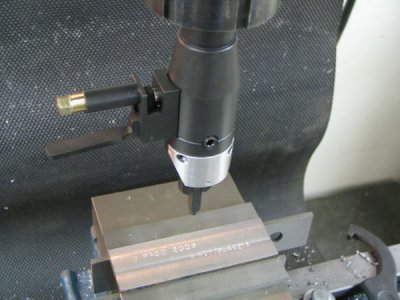
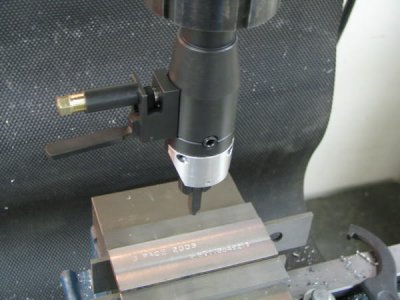
I saw plans for a spring loaded stamping guide that mounts on your mill. It appears to work great but I wonder about the impacts on the mill table. It was designed by Glen Wilson and he wrote an article on it years ago titled "A Precision Metal Stamper" the Plans were in "Projects in Metal" Dec 1993 by Glenn L. Wilson

Here is a photo of the precision metal stamper.
Chris

IMG_0553.jpg

IMG_0553.jpg
 
Last edited:
Back
Top