Installation of a tachometer in an LMS mini-lathe

LMS has the label. So I can get another one. Costs a whopping $3 or so.
Make sure you look at everything they have so you can spend more than the 3.00 for the label :grin big: :grin big:
 
Make sure you look at everything they have so you can spend more than the 3.00 for the label :grin big: :grin big:
It does irk me to spend a very high percentage of the total order on shipping. Spending $8 for shipping on a $3 label, just ISN'T right. At the very least I need to fill the flat rate box, right? Don't worry, I'll find something. I'm on their email list.
 
there is room to shoehorn a display in front.. this is the macpod tach kit, simple no fuss, plugs into the LMS wiring.. https://macpod.net/misc/sx2_tachometer/sx2_tachometer_kit_v2.php
I take my comment back. There's room in the front. Your picture proves it. It seems one has to remove the boards for either install. Once that is done there's room in the front face. I like the front mount better.

Since you have done it, can you provide some hints on the disassembly order? Mine seems to be a jungle of tangled wires. Any guidance would be appreciated.
 
I just removed the switches and board, had to make some stand-off spacers , used a little hot glue to hold the main switch nuts in place during re-assembly.. I did take a few pictures to make sure everything went back correctly..
 
Last edited:
It does irk me to spend a very high percentage of the total order on shipping. Spending $8 for shipping on a $3 label, just ISN'T right. At the very least I need to fill the flat rate box, right? Don't worry, I'll find something. I'm on their email list.
I sure Agree their shipping is super high for what they are shipping. I've held off ordering parts from them because of the high shipping. I don't think there is an option with them to use a fixed box size and than who knows if they would even use it.
 
I sure Agree their shipping is super high for what they are shipping. I've held off ordering parts from them because of the high shipping. I don't think there is an option with them to use a fixed box size and than who knows if they would even use it.
I don't think they are really bad. They do give some options on shipping, including flat rate boxes. I think shipping has gone up quite a bit in general. Buying one little item from them doesn't make sense if you aren't local. But, it's rarely a problem, I usually find enough interesting things to make it worthwhile.
 
Doesn't seem to work for me if I add more things price seems to just increase with the extra added items. I'm not sure if it is shipping or handling charges will have to check that out.
 
Doesn't seem to work for me if I add more things price seems to just increase with the extra added items. I'm not sure if it is shipping or handling charges will have to check that out.
One thing to be aware of is it has to fit in the flat rate box. The boxes are rarely the right shape. LMS does pack pretty well, so it takes up some space. Can tell you, they are NOT the worst of the bunch.
 
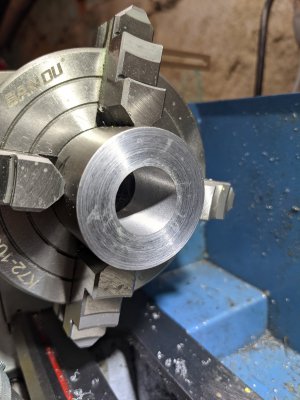
Ok, back to machining. Step one: Make the spider. Found a piece of 1.75" 4140 and chopped off a piece for the spider. That was my first mistake. Wasn't thinking yesterday. Should have left the piece whole. So later on, I will have to make a mandrel so I can turn the outside diameter, or find a good way to turn 1/2 the OD at a time and blend the crossover. Chucked it up in the four jaw. Faced the ends.

Drilled a 5/8" hole, then a 3/4" hole with some MT2 drills. Was slow going, but mostly uneventful. Then bored it through to 19mm. Having larger size drills was great. Minimized the amount of tedious boring. Had yet another lapse, see a pattern here?, and decided to continue boring to 21.5mm. Not a disaster, but on retrospect, should have left it narrower bore.
PXL_20211001_133818904.jpg
Next I will bore a 0.600 deep section to 24.32mm ID. That's what I calculated to be the correct ID for the measured spindle thread. I have had good luck (so far) using ID = measured OD - (0.866 x pitch_distance x 2). The threaded part is 0.500" deep. The extra depth is to give clearance for the threading tool. I will internally thread the nut to M27-1.5 using a home made LH threading tool, with the lathe in reverse. Boring to a blind shoulder is always fun. I installed the fine feed gear set from LMS a week ago and it both gives a nicer finish and makes boring a lot less exciting. So I can easily stop the depth to within 0.005" and finish the last bit by hand.
 
Well, must not have been my day. After learning about modified flank inside threading (in another thread), I proceeded to get everything set up.

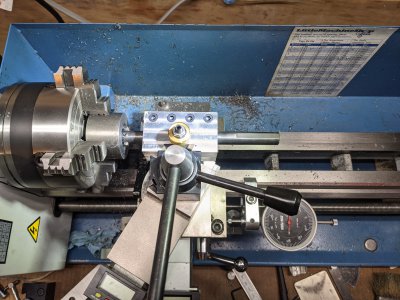
Except for one key thing, I swapped the B & C gears. Basically installed the stack of gears upside down. This does not give one the desired results. Yeah, so I cut a 0.888 mm thread, instead of the required 1.5 mm. Because of my setup, it was difficult to get a thread pitch gauge in, so I didn't notice it right away. I had to have the dial indicator in the tailstock side, because the stem was hitting the headstock. This meant both the boring bar holder (used to hold my threading tool) and the dial indicator were preventing access to the bore. So I painted myself into a machining corner.
PXL_20211001_195706962.jpg
On the plus side, I did learn how to do modified flank inside threading. The tool cut well.

So I have to flip the part around, indicate it to the nice through bore hole I made and re-bore it to the correct size and depth for the threaded section. Then finally thread it again. That isn't happening today. Afraid I used up my blunder quota for the day. Tomorrow is a new day.
 
Back
Top