-
Welcome back Guest! Did you know you can mentor other members here at H-M? If not, please check out our Relaunch of Hobby Machinist Mentoring Program!
You are using an out of date browser. It may not display this or other websites correctly.
You should upgrade or use an alternative browser.
You should upgrade or use an alternative browser.
It's $136 bucks worth of toolpost (+ holders)
- Thread starter graham-xrf
- Start date
- Joined
- May 27, 2016
- Messages
- 3,471
Heh Heh. Please allow that I have no politically correct filter between brain and output. "Neo-Soviet" is not actually intended unkindly.Graham, "Neo-Soviet".
When I got my used Jet mill there was a caliper and micrometer. Both in oily original wooden boxes. Dirty but functional, marked USSR.
I might decide to make a display case for them.
To right matters a little, I confess that I (had) some workshop arrangements that would be recognizably of "Redneck" origin.
I had a Linux OS install from the long past which had a folders icon set choice that included one called "Soviet". Simple, clear graphics that definitely had the "butch" look. The closed folder had a leather strap with buckle around it. The trash emblem bucket had real big rivets.
I can' find it anymore, but the more modern set does have the mood.
https://www.iconfinder.com/iconsets/soviet_linux
 __
__ 
I have taken pictures of the innards of the cheapo toolpost. Kinda "warts & all", showing exactly what I found inside. I have yet to work them into something I can post (smartphone is 3264 x 1836). I will get to it soon, but not now because my timezone is UTC, and it is coming up to midnight!
Last edited:
- Joined
- May 27, 2016
- Messages
- 3,471
Indeed RJ.Regarding the Aloris type tool holders, the wedge type is generally considered superior because the wedge pulls the spindle facing dovetail in tight into the dovetail on two surfaces resulting in a more repeatable positioning when changing tool holders. The piston type pushes on the flat between the dovetails pulling the tool holder tight to the two angled faces. This can result in slight variation in orientation creating positioning inconsistencies.
It appears that your design uses the prism surface for a positive positional reference with the back taper being a second contact point. Your piston pulls the tool holder tight against those two surfaces which should provide a very repeatable reference surface, possibly superior tho the wedge type Aloris.
The system has an eccentric crank that pulls the tool-holder onto the post. It moves very little compared to the key rotation. There must be some mechanical advantage there because even if I rotate the clamp square end with fingers, it puts the tool-holder into place exactly referenced, really hard and unmoving. I tried it, and it locates every time.
Tomorrow, I will be doing the "insides exposé" with pictures, right down to the scratches!
In passing - I took a look at Aloris. I got to thinking "expensive", but I suppose they are real good.
I do not regret buying this set. They are not beyond some criticism, but the design really works, and they seem to be great value for money.
- Joined
- Feb 1, 2015
- Messages
- 9,623
I will be interested in seeing what the insides are like. Since you are pulling the piston in rather than pushing out like the Aloris types do, I expect that it is something like the crankshaft on an IC engine.Indeed RJ.
The system has an eccentric crank that pulls the tool-holder onto the post. It moves very little compared to the key rotation. There must be some mechanical advantage there because even if I rotate the clamp square end with fingers, it puts the tool-holder into place exactly referenced, really hard and unmoving. I tried it, and it locates every time.
Tomorrow, I will be doing the "insides exposé" with pictures, right down to the scratches!
In passing - I took a look at Aloris. I got to thinking "expensive", but I suppose they are real good.
I do not regret buying this set. They are not beyond some criticism, but the design really works, and they seem to be great value for money.
I have a piston type Aloris clone from Grizzly. As I recall, the set was just over $100. I've added an extra half dozen or so tool holders to my collection. It really speeds up machining. I haven't been concerned about any slight positional variation as I always check with a micrometer for critical dimensions.
- Joined
- May 27, 2016
- Messages
- 3,471
@DavidR8
Wow David. Thanks much for the video!
So yes - what I have is definitely Dickson type tool-holders.
OK - it may take a few tries with mistakes and learning, but It goes to show that when making them up for oneself, the aim is to get them really good!
You will see in what follows the full deal on bonkers budget import of an excellent design, and well enough made.
The Shed Dweller is not doing that. Instead, he makes them as if carved out of the Universe with the help of Thor, to pass inspection by Hephaestus!
[ Hephaestus - Metal worker to the Olympian Gods]
[Edit: Yeah - I know. Thor was a Norse God, and probably didn't have Hephastus in his Realm!]
Last edited:
- Joined
- May 16, 2016
- Messages
- 1,700
These Dixon type tool holders are quite common in Europe, with at least half a dozen brands made in different countries. My lathe, when I got it, came with one of these QCTP that was made in Italy. It was very good quality.
The problem I found was that it only came with four tool holders, so I had the problem of getting spare tool holders that would fit. All the different brands vary in the distance between the two 90 deg grooves, and therefore are not readily interchangeable from one brand to another.
When I finally found a supplier of the ones I needed they were very expensive, such that four holders were the same price as an Aloris complete with 3 holders. In the end I bit the bullet and bought an Aloris BXA QCTP and about a dozen tool holders.. I have since found that any BXA tool holder will fit, and they are quite inexpensive to buy, and also relatively easy to make.
As can be seen in video from David R8 they are quite complicated to make and not having a mill, shaper or surface grinder I decided to avoid that Journey.
- Joined
- May 27, 2016
- Messages
- 3,471
Inside the Cheapo Quick-Change Toolpost
Identified by @Nogoingback and @DavidR8 as "Dickson type"
The smaller pictures are thumbnails of 1280 x 720, some of them cropped a little.
Here is where we get down and dirty into the very insides of the RDG Toolpost. From the outside, it is pretty business-like, and the basic design principle seems so effective that it has to be competitive with any other, be it wedge, piston, Aloris, or one of those Chinese that comes as six digits like "250-111" or something. The main post and the tool holders are very hard, and all ground. The clamp and it's crank are softer, and maybe they are supposed to be that way.
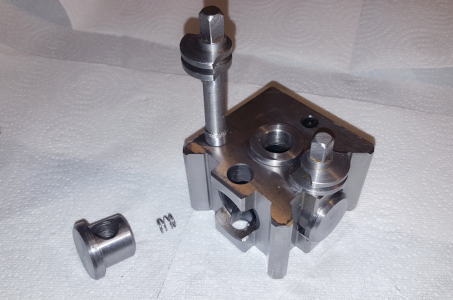
Start with one of the eccentric crank and clamp lifted out.
 __ __
__ __ 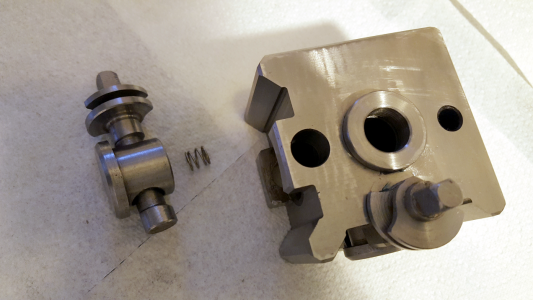
The working principle is seen. The amount of eccentricity is small, so even rotating the clamp only with fingers pulls it up pretty hard.
Let's get a close-up of the hardened insides. A wipe with a PT did bring up some black, but I think it was mostly Moly grease.
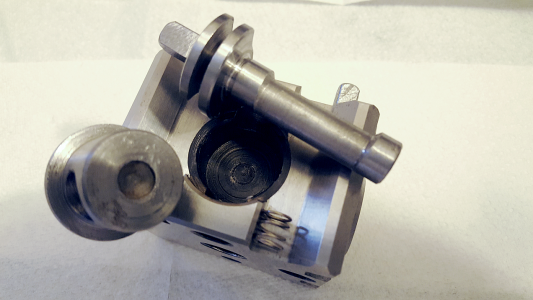
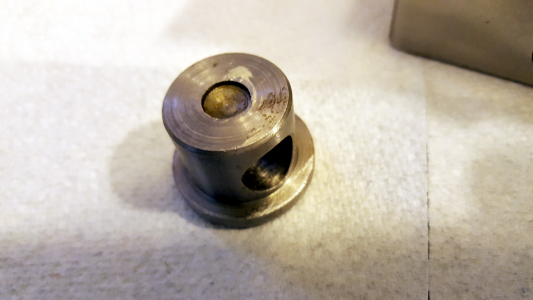
A close-up detail of the clamp part shows the export mass-manufacture finish. I do hope it was not from some semi-starved urchin with an old lathe, a hand drill, and a file! I made the images 1280 x 720, then cropped some. The flash on some gives the critical harsh light that shows up all the scratches.
 _ _ _
_ _ _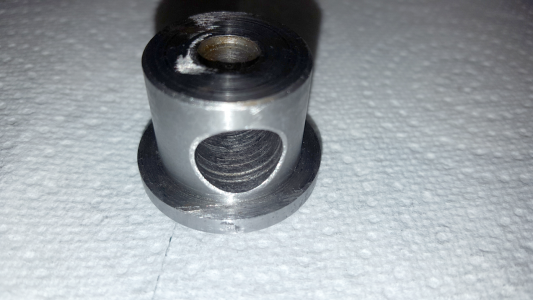
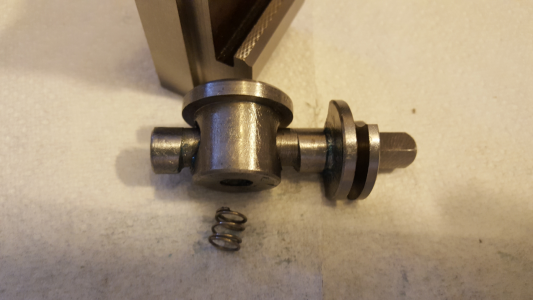
The close-up of the main operating part clearly shows how it works. That offset crank pulls on the piston-like clamp, though I don't think this is the same thing as is meant by "Aloris piston-type". I just don't know.
Here is a close-up of the eccentric crank.
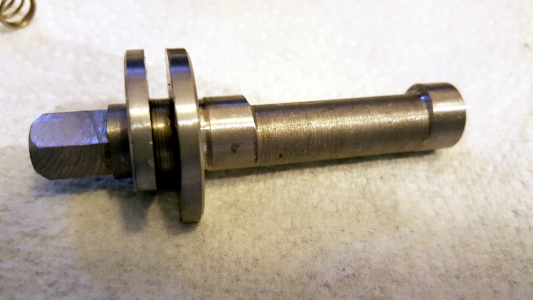
I think the crank is harder than any old bright steel, but it is not as hard as the post and holders. I tried scratching it with a screwdriver, and not much happened. It does yield to a file. The turned finish on the eccentric offset is nothing to write home about, but it does "work, and for the most part, I guess nobody gets to see it unless they took it apart.
Two kinds of lighting. Amazing. Just about the harshest, most critical one can get!
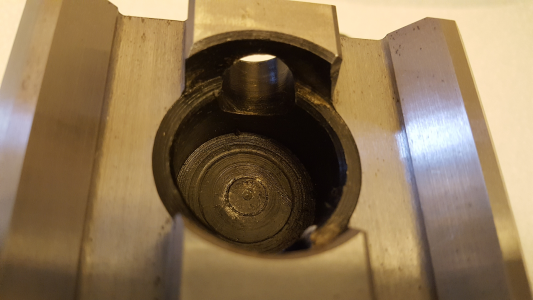 _ _ _ _
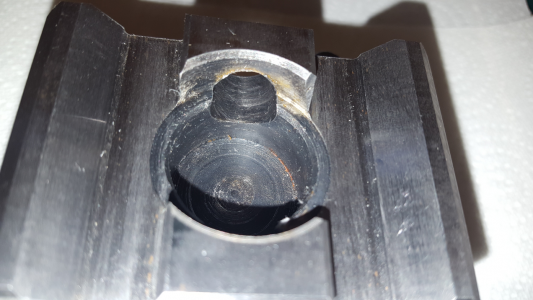
The Hardened Burr from Hell!
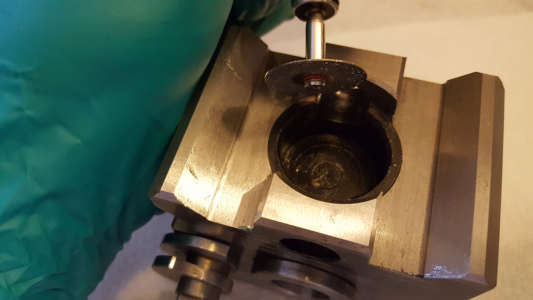
It bothered me some that the crank rod would get it's turned ends somewhat scratched up in removing it, and trying to put it back. It was a hardened burr. I resorted to a diamond thing in a die grinder.
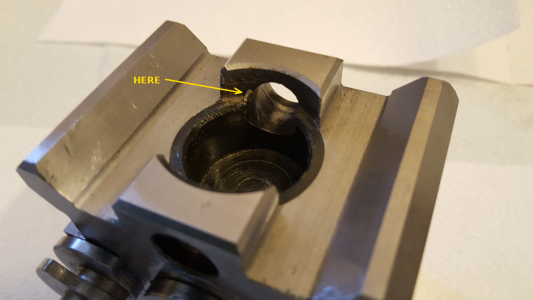 _ _ _
_ _ _
The last two pictures makes it clear exactly how this works. The operation is exactly as @RJSakowski explained.
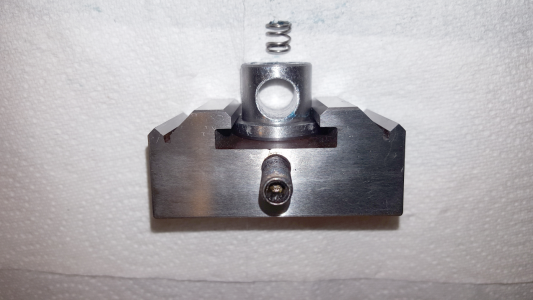 _ _ _
_ _ _
So there it is. For £125.00 I was expecting something worse - possibly even to the extent of regrets, and accepting that if you buy trash, you buy twice. That turns out not to be the case. Internally, it won't win any beauty contests, but there is no question that it works really well.
I am not too worried that various makers will use the Dixon style, but vary the width to make them "incompatible". Separate toolholders are available now. I think this particular Boxford/South Bend compatible style is likely to have toolholders available into the future, but for me, I do not anticipate buying a whole big set. When I am ready to do that, I will have researched QCTP's, their toolholders, and all that goes with them
You will know that I fumbled when you see another posting like this, except Aloris or A.N.Other as the victim!
Identified by @Nogoingback and @DavidR8 as "Dickson type"
The smaller pictures are thumbnails of 1280 x 720, some of them cropped a little.
Here is where we get down and dirty into the very insides of the RDG Toolpost. From the outside, it is pretty business-like, and the basic design principle seems so effective that it has to be competitive with any other, be it wedge, piston, Aloris, or one of those Chinese that comes as six digits like "250-111" or something. The main post and the tool holders are very hard, and all ground. The clamp and it's crank are softer, and maybe they are supposed to be that way.
Start with one of the eccentric crank and clamp lifted out.
 __ __
__ __ 
The working principle is seen. The amount of eccentricity is small, so even rotating the clamp only with fingers pulls it up pretty hard.
Let's get a close-up of the hardened insides. A wipe with a PT did bring up some black, but I think it was mostly Moly grease.

A close-up detail of the clamp part shows the export mass-manufacture finish. I do hope it was not from some semi-starved urchin with an old lathe, a hand drill, and a file! I made the images 1280 x 720, then cropped some. The flash on some gives the critical harsh light that shows up all the scratches.
 _ _ _
_ _ _
The close-up of the main operating part clearly shows how it works. That offset crank pulls on the piston-like clamp, though I don't think this is the same thing as is meant by "Aloris piston-type". I just don't know.
Here is a close-up of the eccentric crank.

I think the crank is harder than any old bright steel, but it is not as hard as the post and holders. I tried scratching it with a screwdriver, and not much happened. It does yield to a file. The turned finish on the eccentric offset is nothing to write home about, but it does "work, and for the most part, I guess nobody gets to see it unless they took it apart.
Two kinds of lighting. Amazing. Just about the harshest, most critical one can get!
 _ _ _ _
The Hardened Burr from Hell!
It bothered me some that the crank rod would get it's turned ends somewhat scratched up in removing it, and trying to put it back. It was a hardened burr. I resorted to a diamond thing in a die grinder.
 _ _ _
_ _ _
The last two pictures makes it clear exactly how this works. The operation is exactly as @RJSakowski explained.
 _ _ _
_ _ _
So there it is. For £125.00 I was expecting something worse - possibly even to the extent of regrets, and accepting that if you buy trash, you buy twice. That turns out not to be the case. Internally, it won't win any beauty contests, but there is no question that it works really well.
I am not too worried that various makers will use the Dixon style, but vary the width to make them "incompatible". Separate toolholders are available now. I think this particular Boxford/South Bend compatible style is likely to have toolholders available into the future, but for me, I do not anticipate buying a whole big set. When I am ready to do that, I will have researched QCTP's, their toolholders, and all that goes with them
You will know that I fumbled when you see another posting like this, except Aloris or A.N.Other as the victim!
Last edited:
- Joined
- Oct 18, 2016
- Messages
- 2,872
I would think that for 125 pounds you did just fine, and at that price level a rough surface finish on the inside is
reasonable as long as it doesn't effect function.
The six digit part numbers you've seen on Chinese toolholders are standard designations used by many manufacturers
of Aloris style toolposts. They describe both the specific toolholder and the size, since Aloris type toolposts come in several sizes: AXA, BXA and CXA are the most common. There are also six digit numbers for the tool post itself.

