Learning how to use the C Gorton 10” Rotary Table

I would take a bolt that fits that thread and thread it in there. Then I would indicate off the shank of the bolt to center on RT. Then I’d indicate the part to axis of machine. Check center again. Then offset for cut.
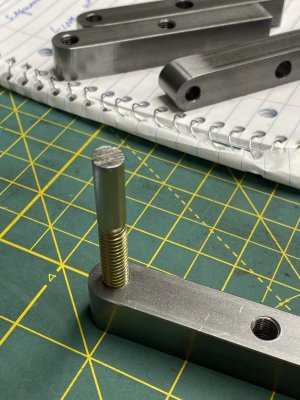
One helpful tool I made for the RT was a expandable plug that goes in the hole before you put your part down. You then run a bolt through your part and threads into the expandable plug. It allows you to fasten a small part down to the RT make adjustments then you can put strap clamps down when it’s in its place.
 
I see I'm a little late, but the above advise is essentially the way I laid out the drilled holes and degree graduations on the plate in my first post. If you look closely at the picture you'll see there's a threaded hole in the part directly over the center hole of the table. There was a plug in the hole attached to the plate using a machine screw. I removed the machine screw to attach the arm to the plate to be sure all the graduations were in the proper places and inline with the hard stop holes. In this case the plug didn't have a flange and fell to the bottom of the table when the machine screw was removed. The description below was written before I realized I was late to respond.

In this case I would think the easiest method would be to make a plug that fits the hole with a flange on the top (to keep it from dropping into the table) and a hole in the center threaded the same size as the threaded hole in the part. Run a bolt through the part and attach the plug to the part. Put the part on a sacrificial shim and clamp it to the table. You already know the distance from the hole (which is now at the center of the rotary table) to the end of the part. Calculate the tool offset distance needed and move the X axis that distance. Then turn the table to cut the radius
 
Thanks guys,
It came out ok.
Better next time.
I’m coming to the conclusion that a rotary table is an incredible tool that must be conquered.
A little bit at a time.
 

Attachments

  • 23950A5A-137A-4913-96CD-DF83F880B25C.jpeg
    23950A5A-137A-4913-96CD-DF83F880B25C.jpeg
    575.8 KB · Views: 15
  • BC20C81E-7363-46C3-B425-59CCB5658F6A.jpeg
    BC20C81E-7363-46C3-B425-59CCB5658F6A.jpeg
    734.1 KB · Views: 14
Here’s a shot of that plug for the center hole. Use it all the time with the RT. 181E84D8-7AFF-4103-AB8E-1F95245C8D0D.jpeg
 
Back
Top