

-
Welcome back Guest! Did you know you can mentor other members here at H-M? If not, please check out our Relaunch of Hobby Machinist Mentoring Program!
You are using an out of date browser. It may not display this or other websites correctly.
You should upgrade or use an alternative browser.
You should upgrade or use an alternative browser.
Learning to dial in a 4-jaw
- Thread starter DavidR8
- Start date
")
- Joined
- Oct 16, 2019
- Messages
- 6,576
Oh crap... I clicked on th.......e........o.......t..........h..........e..............r................t...................h..................e.................a......................d....................s!
- Joined
- Sep 28, 2013
- Messages
- 4,306
best tip I was ever given for centering work in a 4 jaw was to get a 2nd key for the chuck. Then use the rings (or edges of the jaws relative to the body), get it close, work in pairs (one key in each jaw) and halve the difference. A DI or DTI in a tool holder helps alot, but isn't essential. You'll get it down to less than a minute in no time.
- Joined
- Jan 31, 2016
- Messages
- 11,448
Oh crap... I clicked on th.......e........o.......t..........h..........e..............r................t...................h..................e.................a......................d....................s!
Uh oh ………………….there goes this years tooling budget .

- Joined
- Feb 7, 2013
- Messages
- 2,486
Try this if so inclined:
Indicate off the top of the part using a mag base and indicator. Rotate the chuck for the lowest indication and loosen the top screw what is
determined to be half the error. Rotate the chuck one half turn and tighten the top screw. After 4 to 5 adjustments, one is usually within
10 thousandths or so. If the low appears in between the screws, loosen both screws nearest the indicator, Rotate 1/2 turn and tighten
both screws. At that point, the part(if so inclined) will not dislodge from the chuck. Once down to a couple thou, I look for the high spot and
tighten the top screw for a last nudge or two. All the screws may not end up tightened exactly the same but that's not critical as long as
all are tight within reason. Also, it isn't necessary to ever look at the numbers on the indicator, just the lows and highs to ascertain the next move.
It works for me.
- Joined
- Mar 26, 2018
- Messages
- 8,407
Cat head makes a good point, I’ve stumbled along and found moving half the distance reduces the tail chasing.
My first four jaw set up was in 1973. Mr. Wade was standing over my shoulder so I bet it went fairly well.
My second time was in 2018. It took more than ten minutes!.
David, here is my rendition of Mr. Pete’s qctp indicator mount. It helps!

My first four jaw set up was in 1973. Mr. Wade was standing over my shoulder so I bet it went fairly well.
My second time was in 2018. It took more than ten minutes!.
David, here is my rendition of Mr. Pete’s qctp indicator mount. It helps!
- Joined
- Jul 8, 2018
- Messages
- 880
Part of the problem is the my mag stand is a piece of rubbish so I was struggling to get the thing to stay put
Get a Noga. It really makes a huge difference.
As for the actual dialing-in process, sounds like you are doing just fine. The above advice is all good.
- Joined
- Oct 10, 2018
- Messages
- 543
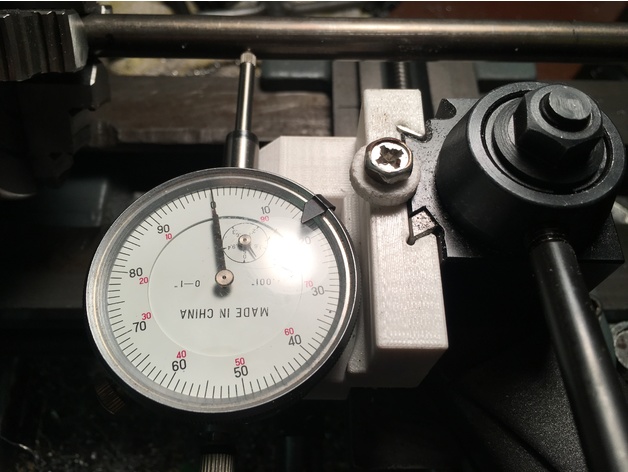
I found a design on Thingiverse and 3D printed one:I'm going to figure out how to make a tool holder for my indicator. Without a mill Hmmm.

Thingiverse - Digital Designs for Physical Objects
Download files and build them with your 3D printer, laser cutter, or CNC.
 www.thingiverse.com
It mounts on my QCTP (0XA size) and I have a dedicated dial indicator in it. Mounts in seconds and is always on centre. Makes truing up the 4-jaw much less painful!
Our local library branches have 3D printers available by the hour ($4). The holder took a long time to print--can't remember exactly but I think it was 4+ hours. Still, it was by far the fastest way to a decent holder for little money.
Craig
Wanna drive yourself crazy pull out a tenths gauge. I've found that numbering the jaws and taking your reading at the jaws not in between the jaws will help a lot. Once you get a feel for how much to loosen and tighten the jaws you will become faster. You don't want to muscle down on the jaws till your within a thou. Get Within a thou and you can usually just tightening the jaws to get ya perfect.